Body-worn ozone generator for sanitizing N95 masks
thingiverse
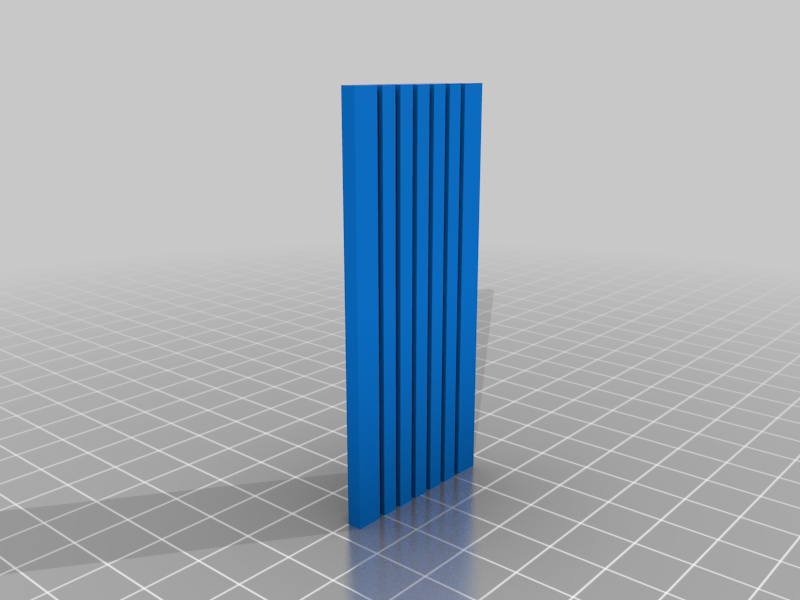
This project assumes a moderate level of electronics assembly competence, and is intended for the intrepid DIY'er or as the beginning of a discussion on simplifying the assembly (e.g. by having the PSU board mass-produced). PLEASE UNDERSTAND THAT BUILDING OR USING THIS DEVICE INVOLVES RISK, AND I take absolutely no responsibility! Err, I mean, I do not accept responsibility for loss, injury, or death as a result of the building or use of this device. A small, homebuilt ozone generator that can be worn in a fanny pack or backpack for the purpose of disinfecting an N95 mask before re-use. In environments where providers are re-using disposable PPE, this could allow a person to reduce their risk without the need for centralizing a process. Each provider keeps one of their N95 masks (or other small PPE item) in a resealable plastic bag, where an ozone generator runs to produce high concentrations (1000's ppm) of ozone within the sealed bag. The user determines the dwell time using an external timer (e.g. phone, watch, etc.). The small amount of testing I have done indicates that the device can create several 1000's of ppm O3 from room air in a few minutes inside a sealed 1 gallon ziplock bag (filling the bag with medical oxygen before running would produce much higher concentrations), on a power consumption of about 3W. The device can be powered over a USB cable from a common, off-the-shelf back up battery for hours of use. Using a 1 gallon ziplock (or equivalent), the typical cycle might consist of sealing the PPE in the bag, running the device for 5 min, then wait 20 min (half-life of O3), then cycling again for 3 min, wait 20 min, repeat once more, then move to a well-ventilated area, and remove the N95 mask. Users would need to be careful not to breathe high concentrations of ozone, either retained in the mask, or from the sanitizing device itself. I started from the documentation produced by this person: http://www.bigclive.com/oz.htm. It would probably be easier to have the high voltage PSU mass produced than to include directions for hacking the cold cathode tube PSU (which is already well documented in bigclive's post, linked here). The design uses a lightly-hacked inverter power supply sold for powering cold cathode tube lamps, glass microscope slides, a 40 mm fan, and copper slug tape. I created a coronapile of 6 corona plates (each with four lines of corona the length of the plate, and added a Pololu 5V to 12VDC boost converter, and a micro USB jack, so that it can be powered by 5VDC over a USB cable; and 3D printed housings. I would like to automate the timing of the cycle with commonly available discretes (e.g. 555, etc.). With enough interest, I or someone else could design scratch-built power supplies that could be assembled from kits, rather than hacking the cold cathode tube PSU's. The parts used to construct my prototype cost about 16USD. Data on sanitizing with ozone are widely available. The goal of this project would be to reduce risk, not eliminate it. It's fair to say that a device like this would not sterilize an object. The efficacy of the device could be tested in a lab setting, but if my O3 concentration results can be corroborated, kill-rate/concentration/dwell time data from others could be used to justify its use. The coronapile is held togeher with 6-32 threaded rod and nylock nuts. The PSU enclosure is held together with M3 X 20 mm screws. Holes in the coronapile assembly are sized for 6-32 threaded rod. Holes in the PSU enclosure top are threaded for M3 X 20mm screws. I chased them with a tap. I used 20% infill density, though it's not critical. Once you have assembled all of the corona plates, and you have modified the HV inverter PCB as shown in the photos, you will have three wires from the HV output side of the board, and you will connect the two wires from the low voltage side of the board to the two outer-most pins on your micro USB jack (these wires should be pretty short (~25 mm). On the HV side of the PCB, the wires attached to C5 and C6 on the PCB each go to one of the two tapes on one side of a microscope slide. The third wire from the HV side of the PCB goes to the single tape on the other side. You then wire the six plates together in parallel. You have to keep the wires between the plates fairly short so that they will fit in the fan mount. I recommend you cut, strip, and tin the short (~25mm) wires first, then add them incrementally until you have all six plates joined so that the connecting wires are like the spine of a book. To wire these in parallel, attach the short connecting wires between the same, or corresponding, tape on two adjacent plates. Go slowly, and know you can easily de-solder and re-solder wires if you get it wrong. Carefully check your work when done before smoke-checking the device. Handle the microscope slides carefully as they are easily broken, and are really sharp! Once the device is wired, slide the fan plate support over the plates so it is between the plates and the HV PSU. Insert the plates into the comb so that the ends are perfectly lined up. Insert the plates into the fan plate support and slide the spacer over the comb and plates. Press the EndCap onto the ends of the plates and hold the assembly together carefully as you add the fan shroud on the intake side of the fan and fasten the threaded rod and nuts to secure everything. It's a fiddly process for sure. Some tips to help make it easier: scrape the edges of all the little slots that accept the plates, and make sure the comb fits easily (sand it) inside the spacer without gaps. Don't be tempted to force the glass slides into slots that are too tight. They shatter and chip easily. There are some triangular features on the outside of the fan plate support and EndCap. They are obsolete. The orientation of these doesn't matter.
With this file you will be able to print Body-worn ozone generator for sanitizing N95 masks with your 3D printer. Click on the button and save the file on your computer to work, edit or customize your design. You can also find more 3D designs for printers on Body-worn ozone generator for sanitizing N95 masks.