Bodyshaker en Playseat Challenge Lowcost
thingiverse
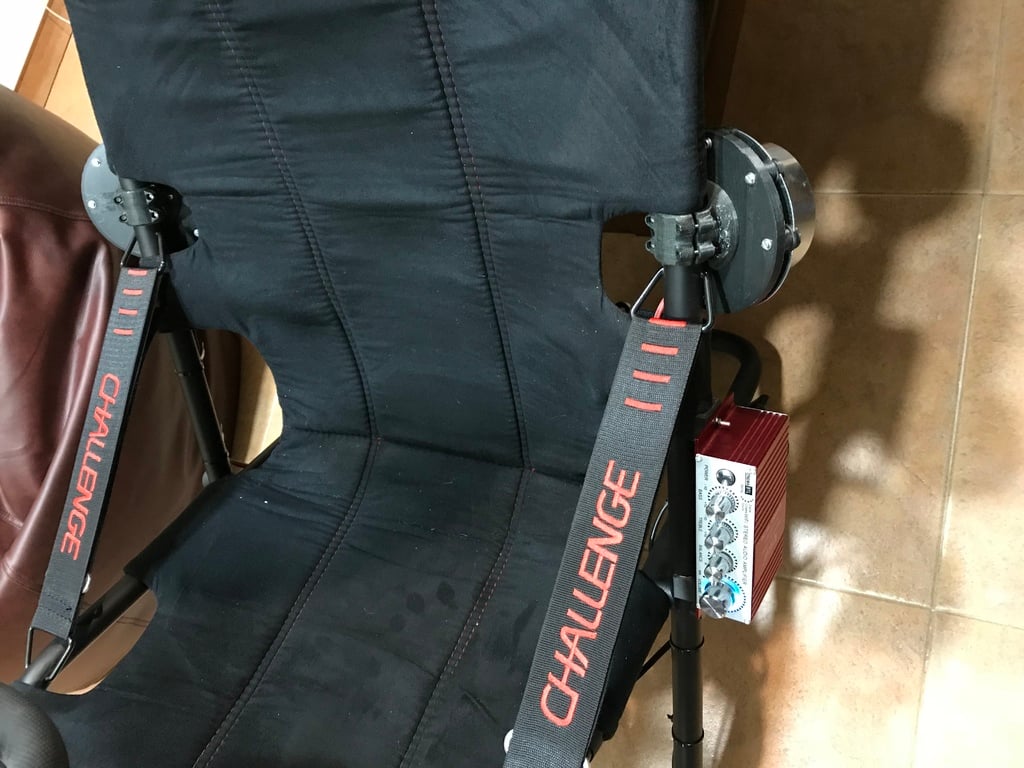
Sistema de Bodyshaker lowcost para nuestros Playseat Challenge. Probé a instalarlos en diferentes localizaciones y sin duda en esta posición es donde producen mayor vibración y mas sensaciones. Como programa de pc yo uso SimShaker, que también es más económico que el Simvibe y funciona muy bien. Basado en el montaje de: https://www.thingiverse.com/thing:561762 https://www.thingiverse.com/thing:2613282 MATERIALES: - 2 Bodyshaker 100w, 4 Ohmios, frecuencia 28 - 55 Hz - 1 AMPLIFICADOR Kinter MA-180 (el conector de altavoces está al revés: izquierda es derecha y derecha es izquierda) Personalmente yo uso el amplificador con el BASS casi al máximo y el TREBLE casi al mínimo. - 1 ADAPTADOR DE CORRIENTE 12v 5A: - Cables de conexión al pc o consola - Tornillos: La abrazadera va cogida al tubo con tornillos M2,5x20 (tuve que calentar por debajo las tuercas con un soldador para colocarlas en su posición) Entre la abrazadera y el plato use tornillos M3x16 Y entre el plato y los Bodyshaker usé M3x25 - También usé unas gomas de fontanería que tenia por casa para eliminar ruidos entre los bodyshaker y el plato. English: System of Bodyshaker lowcost for our Playseat Challenge. I tried to install them in different locations and definitively in this position it is where they produce excellent vibration and sensations. The program of PC that I have is the SimShaker, which also is more economic than the Simvibe and works very well. Based on the assembly of: https://www.thingiverse.com/thing:561762 https://www.thingiverse.com/thing:2613282 MATERIALS: - 2 Bodyshaker 100w, 4 Ohms, frequency 28 - 55 Hz - 1 AMPLIFIER Kinter MA-180 (the connector of loudspeakers is wrong: left side is right and right it is left) Personally I use the amplifier with the BASS almost to the maximum and the TREBLE almost to the minimum. - 1 ADAPTER OF CURRENT 12v 5A: - Plug wires to the PC or console - Screws: The clasper is taken to the pipe by screws M2,5x20 (I had to warm for below the nuts with a welder to place them in his position) Between the clasper and the plate uses screws M3x16 And between the plate and the Bodyshaker I used M3x25 - Also I used a few rubbers of plumbing to eliminate noises between the bodyshaker and the plate.
With this file you will be able to print Bodyshaker en Playseat Challenge Lowcost with your 3D printer. Click on the button and save the file on your computer to work, edit or customize your design. You can also find more 3D designs for printers on Bodyshaker en Playseat Challenge Lowcost.