Bolt Circle Diameter Tool
prusaprinters
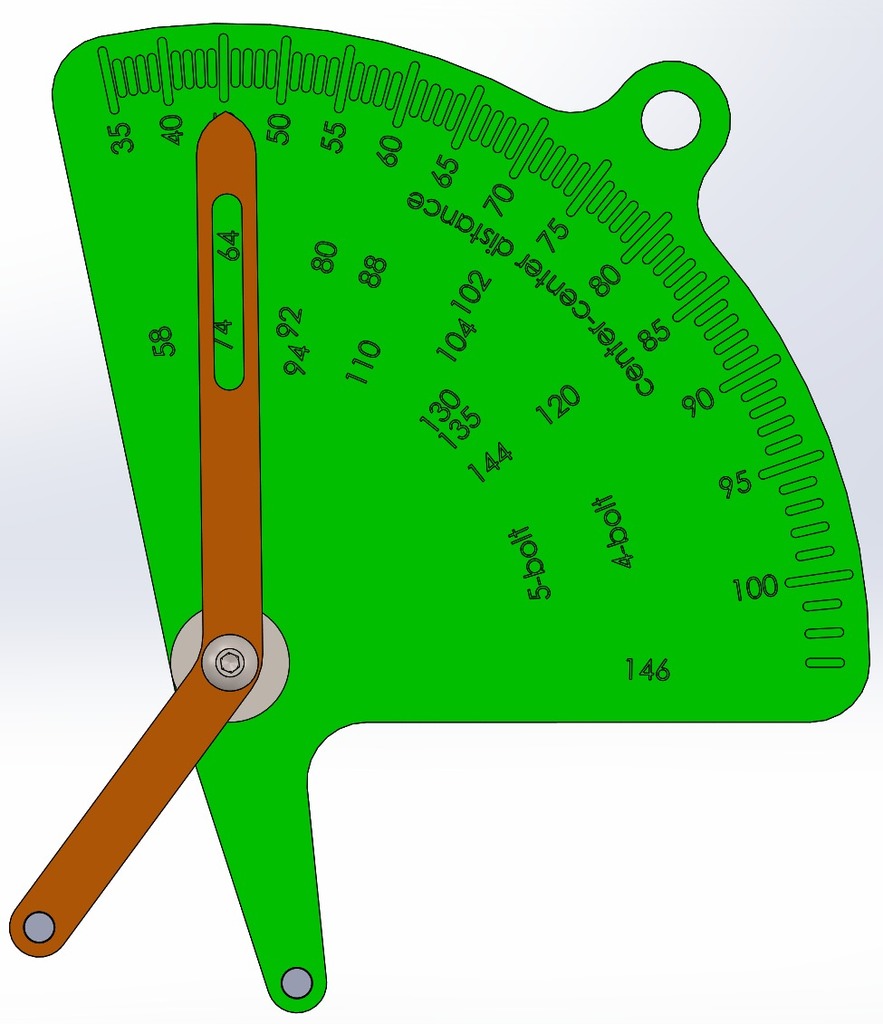
<p>Used to read off the bolt circle diameter or BCD of 4 & 5 arm cranksets so you can swap out chainrings.</p> <h3>Design</h3> <p>I chose the numbers based off of what Park Tool decided were common BCDs.</p> <p>Scaled the reference image knowing the pivot nut measures 3/8" across the flats. Uses a 10-32 stud, but I'll change to metric once the full version is done.</p> <p>I only followed the shape of the original roughly, instead opting for my own version.</p> <p>I don't know the thickness of the original CDG-2, but I left these parts at 3 mm for the body & the arm. The text is sunk 1 mm.</p> <p>Based on the Park Tool CDG-2. Chart with other BCDs is here: <a href="https://www.parktool.com/assets/doc/product/CDG-2_instructions.pdf">https://www.parktool.com/assets/doc/product/CDG-2_instructions.pdf</a></p> <p>Info page: <a href="https://www.parktool.com/product/chainring-diameter-gauge-cdg-2">https://www.parktool.com/product/chainring-diameter-gauge-cdg-2</a></p> <h3>Usage</h3> <p>The outer numbers are the nearest center-to-center distance for the bolts in question.</p> <p>The middle ring of numbers are common 4-bolt BCDs, while the inner ring features common 5-bolt BCDs.</p> <p>All units are mm when reading off the gauge.</p> <h3>Assembly</h3> <p>Figured out how to plot the graduations & text, thanks to "variable pattern".</p> <p>In theory, you could go into the SLDPRT file & change it to best suit your needs, but the patterning operations (there are a few) are fairly intensive to render, so you'll need to be patient or have a powerful computer.</p> <p>I created 2 points (1 short & 1 long). The long one goes with the arm, & the short one goes with the main body. They feature a 5 mm OD which mates to a M5 close clearance fit on the body & arm. I suspect fit may be an issue, in which case you can sand the ID or OD down of the respective parts. In theory, you should be able to glue these in place.</p> <p>Alternatively, you can grind down some M5 bolts to points, & simply use nuts to secure them. You'll have to play around to get the points to land at the same height, so that they determine a plane parallel to the body.</p> <p>In sum, you'll need:</p> <ul> <li>M5 x 12 bolt</li> <li>M5 nut</li> <li>M5 washer</li> </ul> <p>As far as 3D printed parts:</p> <ul> <li>body</li> <li>arm</li> <li>short point</li> <li>long point</li> </ul> <p>Assembly should be otherwise straightforward. I uploaded an STL of the assembly for your inspection (so you can rotate it without having Solidworks).</p> <p>You may want to use a marker to make the numbers easier to see.</p> Category: Tools
With this file you will be able to print Bolt Circle Diameter Tool with your 3D printer. Click on the button and save the file on your computer to work, edit or customize your design. You can also find more 3D designs for printers on Bolt Circle Diameter Tool.