Bondtech BMG Upper Mount for Ultibots D300VS
prusaprinters
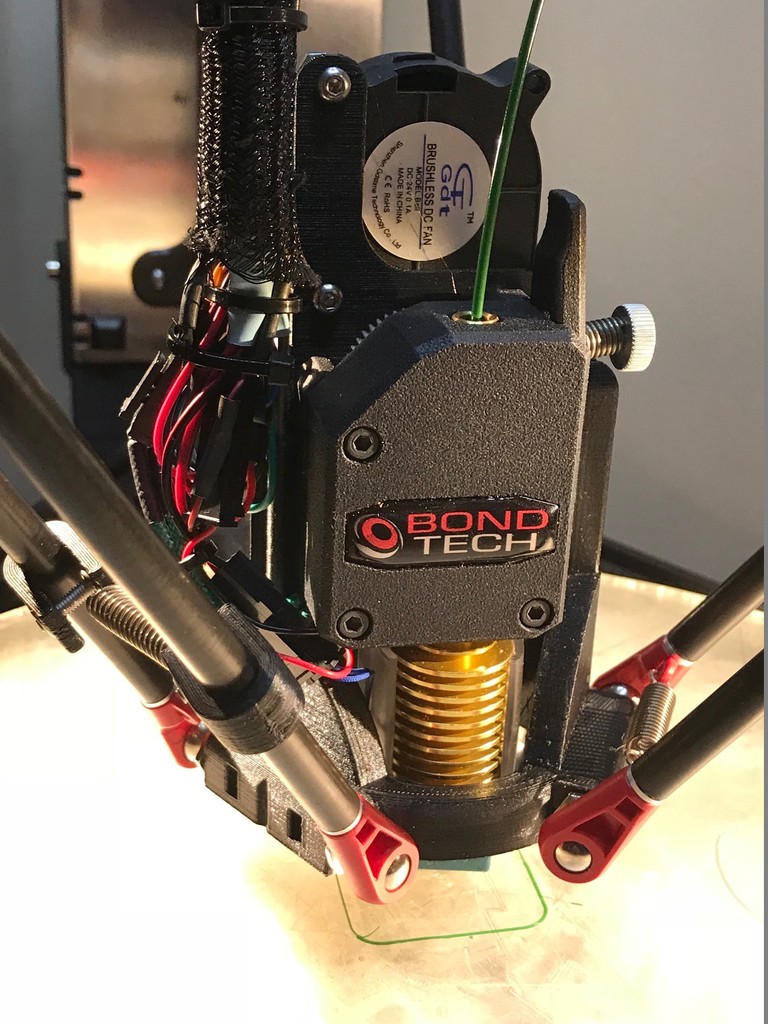
<p>UPDATE: I've moved on to a Hemera mount for my D300VS. The cooling is much better with the new mount and allows printing overhangs and bridges much faster than with this mount. <a href="https://www.thingiverse.com/thing:4027625">https://www.thingiverse.com/thing:4027625</a></p> <p>This is a BondTech BMG extruder mount for the Ultibots D300VS+ that sits above the effector plane, giving more Z printing height and also potentially minimizing acceleration wobble of the nozzle. This should work with SeeMeCNC Max printers or any other delta with a 50mm ball-ball spacing and using Tricklaser arms. The stock SeeMeCNC arms interfere with this mount. Hot end is a E3D V6. A Volcano should work as well.</p> <p>With this mount, I have over 500mm of build height on my D300VS+.</p> <p>It will not work with the magball D300VS carriages as the ball spacing isn't right. If you upgrade to Tricklaser arms and appropriate carriages then it will work. (This is the best upgrade for D300VS, by far).</p> <p>The Bondtech BMG is a really nice extruder. It is well designed and the dual driven hob pushes filament like no other.</p> <p>There are 2 versions of this mount. One that uses ball studs and another that uses SeeMeCNC nylon barbells, and should work with the machined aluminum barbells available from SeeMeCNC.</p> <p>The nylon barbells have a consistent ball-to-ball distance, but unfortunately, they flex quite a bit, leading to ringing on direction changes. With the metal balls I see about 1/2 the wavy ringing on direction changes.</p> <p>Ball studs: <a href="https://www.ultibots.com/ball-studs-set-of-12-non-magnetic/">https://www.ultibots.com/ball-studs-set-of-12-non-magnetic/</a></p> <p>Nylon barbells <a href="https://www.seemecnc.com/collections/parts-accessories/products/replacement-ball-joints">https://www.seemecnc.com/collections/parts-accessories/products/replacement-ball-joints</a></p> <p>Machined barbells <a href="https://www.seemecnc.com/collections/parts-accessories/products/cnc-machined-ball-joint-kit">https://www.seemecnc.com/collections/parts-accessories/products/cnc-machined-ball-joint-kit</a></p> <p>Cooling is performed by a 4020 blower fan. The fan is mounted above the stepper and body of the mount is the manifold. You can install up to 8 4mm aluminum tubes that descend from the effector base for part cooling. I have had good luck with 6 of them installed. Drill out the plugged holes with a 4mm bit for the tubes you wish to populate. Fix with a dab of CA adhesive The aluminum tubing is 4mm diam x 0.45 wall. I bought this via amazon, though it is out of stock now. Should be available at hobby stores.</p> <p>https://www.amazon.com/gp/product/B005WPAJUE/ref=oh_aui_search_detailpage?ie=UTF8&psc=1</p> <p>Print the mandrel and roller parts and bend the aluminum tubing. It may require some sanding, tweaking, pinching and cutting to get the aluminum shaped correctly. Press them into the drilled holes on the bottom of the effector and optionally secure with some CA adhesive.</p> <p>Copper or brass should also work. Stainless (available from mcmaster.com) is too hard to easily bend, though you may have better luck packing the tube with sand or using a torch to bend.</p> <p>This design requires a 20mm thick pancake Nema17 stepper. A 25mm thick might work, but it may interfere with the Z column arms. 20mm stepper at 800mA & 24V works just fine and doesn't skip steps. I got mine from steppers online:</p> <p><a href="https://www.omc-stepperonline.com/hybrid-stepper-motor/nema-17-bipolar-18deg-13ncm-184ozin-1a-35v-42x42x20mm-4-wires-17hs08-1004s.html">https://www.omc-stepperonline.com/hybrid-stepper-motor/nema-17-bipolar-18deg-13ncm-184ozin-1a-35v-42x42x20mm-4-wires-17hs08-1004s.html</a></p> <p>There is provision for a 2mm dia rod to function as a strain relief mast for the wires leading to the effector. Drill that out if necessary.</p> <p>Note, that to get things to not interfere, I had to move the nozzle 20mm forwards of the centerpoint. This wlll slightly reduce the print area. If using Duet3D, add the following to your config.g file:</p> <p>G10 P0 X0 Y-20 ; for offset BMG extruder</p> <p>Here's all my config changes for this:</p> <p>M92 E421 ; From motor calibration via mhackneys calibration tool. Your's may be different</p> <p>M906 X1000 Y1000 Z1000 E800 ; Bondtech set motor currents to 800mA for 20mm pancake (mA)</p> <p>G10 P0 X0 Y-20 ; BMG Upper has nozzle 20mm offset. Compensate for that. (edited)</p> <p>M665 L374.810 R204.934 H514.769 B140.0 X-0.073 Y-0.237 Z0.000</p> <p>M558 P4 X0 Y0 Z0 H50 I1 ; FSRs with JohnSL board Z probe behaves as a switch and is not used for homing any axes</p> <p>You will also need to edit homedelta.g to lower the carriages down a bit so the 20mm offset can be accomplished without bumping the endstops.</p> <p>Change the G1 Z-XX line to:</p> <p>G1 Z-15 F2000 ; down a few mm so that we can centre the head</p> <p>; Change "H25" to "H3" AFTER commissioning your printer</p> <p>Run through step 84 of the D300VS build guide. Once M665 values have been found, replace them in config.sys and you may reduce the H50 in the M558 command to H5 (I have it set at H3 for even faster bed probing)</p> <p>calibration tool: <a href="https://www.thingiverse.com/thing:2598993">https://www.thingiverse.com/thing:2598993</a></p> <p>Finally, slice this with Slic3r PE using the "Support on Build Plate Only" checkbox selected in the Support Material tab. This prevents it from infilling the manifolds with support material. Also uncheck Support Bridges. I haven't found a way to do the same in KissSlicer.</p> <h3>Print Settings</h3> <p><strong>Printer:</strong></p> <p>Ultibots D300VS</p> <p><strong>Rafts:</strong></p> <p>No</p> <p><strong>Supports:</strong></p> <p>Yes</p> <p><strong>Resolution:</strong></p> <p>0.2</p> <p><strong>Infill:</strong></p> <p>50%</p> <p><strong>Notes:</strong></p> <p>Best to print with a higher temp plastic. I used Carbon Fiber Atomic PETG.</p> <h3>How I Designed This</h3> <p>Designed using Fusion 360. See attached archive file. I'm still new at Fusion 360, so it kinda became a bit of a mess near the end.</p> Category: 3D Printer Parts
With this file you will be able to print Bondtech BMG Upper Mount for Ultibots D300VS with your 3D printer. Click on the button and save the file on your computer to work, edit or customize your design. You can also find more 3D designs for printers on Bondtech BMG Upper Mount for Ultibots D300VS.