Bot_Legs_Project (Exoskeleton)
thingiverse
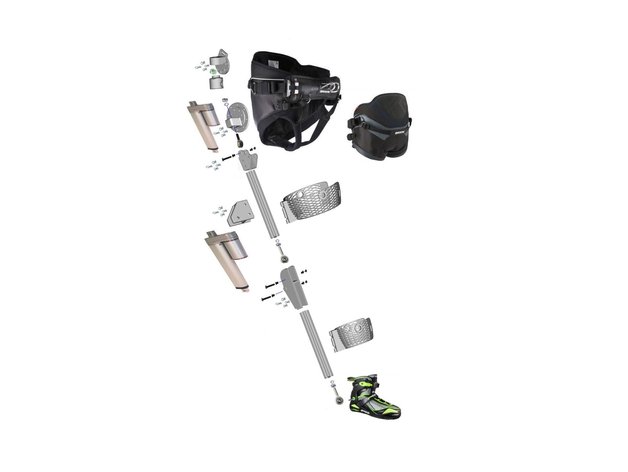
Human: Assistive Technology. The goal is to create a walking aid for individuals with some motor control but insufficient strength to walk independently. The motors amplify intended movement, increasing mobility. There's an SWF Video of the motors in action on the "thing files" (download) section. This project is open-source - please contribute your talents to enhance it. Constructive feedback, ideas, designs, and insights are welcome through comments or hyperlinks. Note: I'm not a doctor, nor do I have medical training; this work is intended for research purposes only. The STL files include joints and linkages for 20X20 Bosch Rexroth aluminum extrusion used with GLA750 Linear Actuators (18V DC) and a Mystic 'seat type' kite surfing harness. I sourced my 50 mm actuators from Gimson Robotics: https://gimsonrobotics.co.uk/categories/linear-actuators/products/gla750-12v-dc-small-linear-actuator. I used plastic (M8 Male) and metal (M6 Male) rods for linkages, which can be easily cut with scissors or a sharp tool. Note that some files have built-in supports. The 20X20 aluminum extrusion provides multiple attachment points for batteries, covers, and other components. It's strong, lightweight, and readily available. Thigh Support files are uploaded; you may need to print them at 95% scale due to printer limits. All Leg supports should be printed with 100% infill. Added a general-purpose strap attachment point for the harness, which can be used for additional supports or back braces. The Arduino code is basic and needs further development. You'll require Christoph Bober's excellent driver from his site: http://www.christophbober.com/?p=70. Currently, there are only two switches controlling two motors; four switch inputs are needed. I've started writing a build steps manual, which you can find in PDF form on the project page. Note that this is a work-in-progress and further updates are expected. You can use this project as a starting point for implementing voice control from a smartphone or inertial referencing. Remember to share your modifications! For those who need it, this is a quality-of-life improvement. I re-used and modified existing designs on Thingiverse; if you deserve credit for any work here, please let me know. Print Settings: * Printer: K8200 * Resolution: 0.2 * Infill: 20-25% * Notes: Printed in Bridge Nylon; some files have built-in supports that can be easily cut away. Post-printing instructions: * Cut away supports with scissors or a sharp tool. Design Process: This project is the result of trial and error on a limited budget as a spare-time project. Another option would be to mount both motors on the thigh, using the same modified mount facing in opposite directions. This design would have less bulk at the hip and no need for additional support on the harness. Implementing turning ability is the challenge in this arrangement but would result in a cleaner design.
With this file you will be able to print Bot_Legs_Project (Exoskeleton) with your 3D printer. Click on the button and save the file on your computer to work, edit or customize your design. You can also find more 3D designs for printers on Bot_Legs_Project (Exoskeleton).