Bottle Stand and Dispenser
thingiverse
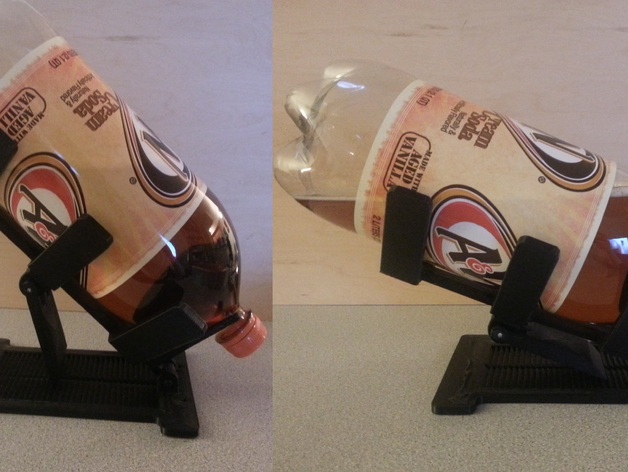
WORK IN PROGRESS Status - On Hold Currently working on improvements, including: Square for better screwing/unscrewing. Tube in bottle for better airflow when dispensing. Possible use twist valve instead of one way valve for better airflow. Illustrated assembly guide with step-by-step instructions for easy/clear/frustration-free assembly. Check back soon, current plan/timeline has these improvements all done by end of IceboxChallenge (Nov 23rd) . Suggestions are always welcome! Help me develop this into something really cool! This is a adjustable bottle stand with dispensing nozzle for putting in the fridge. This super cool stand and dispenser means you no longer have to take out your 2 liter soda bottle, unscrew the cap, pour into a cup, screw the lid back on, and add ice to your drink. With this, you can just open the fridge, push a nozzle, have have a cool refreshing beverage dispensed straight into a cup! FEATURES -Adjustable stand for fitting on any shelf in your fridge! No worries about if the bottle will fit, this stand gives you a nice range between 0 to 60 degree bottle angle. -Soda Dispenser head, fits a standard 2 liter bottle cap, and mounting to ensure it can be used multiple times* -Soda dispenser has one way valve to help airflow into the bottom while dispensing, and keep carbonation in when not! Soda Stand The first part is an adjustable stand, sized to hold a 2 liter bottle. Includes: Holder comes in two version, the nice big strong version (large half circle), and the plastic-savers version (several long ribs). Base, large footprint to ensure no bottle tip over, and slots for stand engagement. Stand & ClipHolder. This mounts on the bottom of the holder for easy adjustment of bottle angle. Soda Dispenser Nozzle Nozzle for dispensing soda. Angled to keep the nozzle as close to horizontal as possible. I.E. if the bottle is at 30degrees, nozzle is level, if at 60degrees, nozzle is only 30degrees off horizontal. Also included is one-way valve hole for better airflow. Cap Holder designed to fit over standard cap. 4 smaller holes ensure that continued tightening/untightening doesnt break any seals around the cap. Internals also designed to easily drain liquid inside the part, for easy washing and cleaning. Angled Section includes one way valve hole, to better replace dispensed liquid with air. Nozzle holder holds a standard nozzle of amazon, with enough room to tighten nut on inside for excellent sealing. If you need any more files or details, feel free to comment, I will try to respond as soon as possible (may be several hours at least, and even longer during work hours) Instructions Check back for illustrated step-by-step instructions Non-3d printed materials required: -Nozzlehttp://www.amazon.com/gp/product/B007VBU7MW/ref=oh_aui_detailpage_o05_s00?ie=UTF8&psc=1 -One-way valvehttp://www.amazon.com/gp/product/B00A0GP7WA/ref=oh_aui_detailpage_o05_s00?ie=UTF8&psc=1 -FDA approved Silicone Sealanthttp://www.mcmaster.com/#7425A51 -M3 bolts and nuts(Alternatively use 3mm diameter filament, glue on ends after inserting) 4xnuts 2x60mm long bolts 2x8mm long bolts (technically anything longer is okay too) *See note for additional/suggested materials 3D printed parts: One of each stl file STAND: -BaseV#.stl -HolderClip.stl -StandLockV#.stl -SodaHolderV#.stl DISPENSER: V1: -DrillGuide.stl -CapMount.stl -AngledSection.stl -NozzleMount.stl Suggested settings: PLA 40% infill, much less and parts flex from the weight of the soda bottle. Suggest support for CapMount, but will work without. Models for dispenser have brim to help with adhesion. DrillGuide.stl is used to help drill holes in the cap for the CapMount.stl. use a 5/16bit, then sand all edges to remove any scraps of plastic. Wash thoroughly with soap and water. Insert Nozzle into NozzleMount.stl. Tighten nut. Apply Silicone sealant to cap holder inside, slide cap on. Apply sealant to top chamfer, slide into AngledSection. Apply sealant to one way valve, insert into angled hole. Apply Sealant to AngledSection chamfer, slide into nozzle holder. Let cure. Wash with hot water and soap after 24hrs. DO NOT DISHWASH. Use long bolts to secure SodaHolder.stl to Base.stl, and HolderClip.stl to StandLock.stl. Use short bolts to secure HolderClip assembly to SodaHolder. *Suggested additional materials: -Start with a 8 pack of mini-bottles. This gives you several caps to work with if you mess up. FDA approved Polyurethane sealant. -Highly suggested for longer use, 3d printed parts are not very food safe for longer term use. There are lots of cracks and crevices that make it easy for bacteria to grow. Designed as much as possible for easy cleaning with soap and water, but I still suggest taking this measure if this will be used alot.
With this file you will be able to print Bottle Stand and Dispenser with your 3D printer. Click on the button and save the file on your computer to work, edit or customize your design. You can also find more 3D designs for printers on Bottle Stand and Dispenser.