Bowden setup spacer for Z axis anti wobble nut (Ender 3/pro/v2)
thingiverse
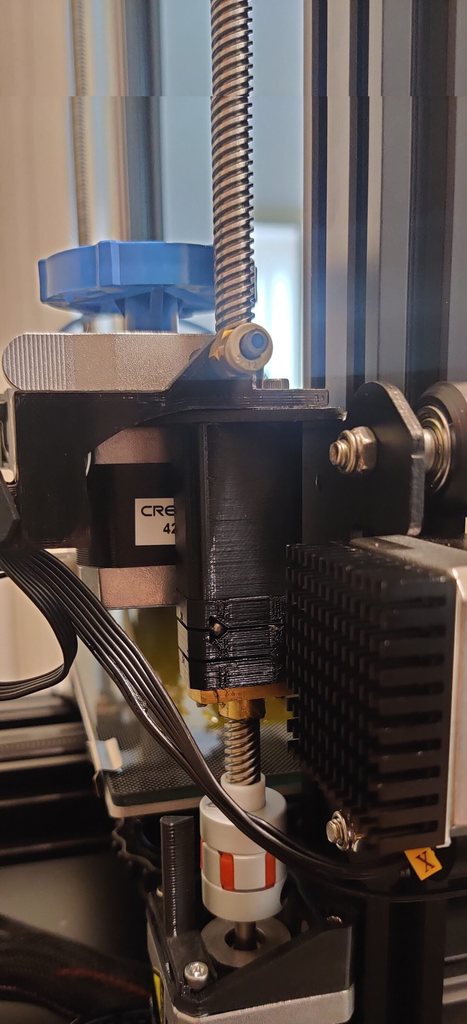
I installed the original mod in my printer, but while it improved print quality from the previous device I was using to eliminate z wobble, It immediately became apparent that the mod is thought mainly with a direct drive setup in mind. Even thought the narrower version fits, there simply isn't enough space between the extruder motor and the lead screw for this to take advantage of its full range of motion, in fact in my setup, the side of the extruder would push the whole mechanism to the side, leaving it barely enough room to move at all. After all, isn't the the whole point of this thing to let the Z screw be unconstrained? I initially considered mounting the extruder in a different way, since I don't wanna swap to DD, but that proved to be more complex than I expected. So instead, I went for the easier solution. Taking advantage of the large gap between the lead screw brass nut and the z axis motor, I made this spacer which will move down the whole anti-wobble assembly just below the extruder motor, thus giving it enough horizontal clearance to move in its full range of motion in every direction. I'm also using heat inserts to ensure everything is held in place as tightly as possible to prevent the spacer from wobbling. The process to assemble this is largely similar to the original, and uses all parts from the original, but varies slightly on which parts you need to print. Parts to print: - Bowden setup spacer - 1x - Square_Middle_Bowden_45deg - 1x, from original thing - Square_18mm_Bowden_StockNut_45deg - 2x, from original thing Additional parts: - M3 8mm screws - 6x - 4x4mm cylindrical magnets - 8x or 12x - 4mm steel balls - 4x - M3 threaded heat insert - 4x Embed the threaded inserts in both ends of the spacer, then refer to the original mod for instructions on how to put toggether the z wobble device (it's largely the same, but replace the top piece with the second stocknut mount you'll print, instead). There are a few things to consider with this solution. First and foremost, YMMV when it comes to how much clearance there is between the coupler and the brass nut when you home Z. in my case there was roughly 1cm left in between, so plenty of room for error, but right after installing this mod please manually move down the gantry until its home position and check that the brass nut won't crash into the Z stepper motor. Second, print the spacer at high infill and perimeters to ensure it's as solid as possible. PETG and ABS are good material choices. I printed mine out of PETG with 70% infill and 4 perimeters. Probably overkill but better safe than sorry. Also, while this works for me, my 3d printer has dual Z axis screws. I have not tested this in a single lead screw setup. Lastly, bear in mind your stepper motor and lead screw will need to be reasonably aligned with the hole in the gantry since the brass nut will be sitting much lower than it usually does.
With this file you will be able to print Bowden setup spacer for Z axis anti wobble nut (Ender 3/pro/v2) with your 3D printer. Click on the button and save the file on your computer to work, edit or customize your design. You can also find more 3D designs for printers on Bowden setup spacer for Z axis anti wobble nut (Ender 3/pro/v2).