Brace connector for stacked IKEA Lack tables, no hardware and no support required
thingiverse
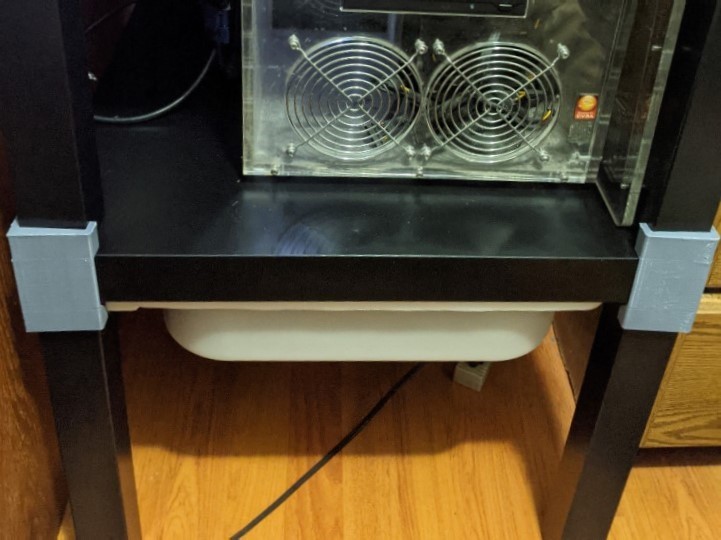
This clip-on connector brace is used to stabilize the connection between stacked IKEA lack tables. I wanted to share this part because it worked surprisingly well in the final iteration. No Hardware or supports required <H3> <b> About the design </b> </h3> The IKEA lack table's legs and top are 50.5mm thick. The part was modeled to those dimensions. I added a recess of 2.5mm for the slight protrusion of the top between the legs of the two tables. Applied 0.01 mm offset on all the critical interior faces for tolerance which adds up to a 0.03mm difference. <H3><b> Getting a good fit </b></h3> Experiment with part scale in your slicing software, taking into account your material shrinkage. Regular PLA shrinks by about 2-2.5%. Smaller parts clip on tighter but might break in assembly with more brittle filament. The 45-degree overhang helps the protrusion of the desk's top fit the recess if it is slightly undersized. With this design, it's better to slightly undersize the part for a more solid connection. Beware, too tight of a fit might cause damage to the paint on your lack tables <H3><b> My settings and printer setup </b></h3> Printed using an Ender 3 v2 <b>Filament:</b> e sun pla+ (requires higher printing temps than regular PLA, more warping) <b>Amount of fillament used: </b> 50g per part <b>My print time: </b> 1 hours 54 minutes per part <b>Slicing Software:</b> Cura 4.8.0 <b> "Make overhangs printable" setting in Cura: </b>Enabled (experimental in my version) <b>Nozzle Temperature:</b> 215c <b>Bed Temperature:</b> 85c <b>Part Cooling Fan:</b> off or 0% (to reduce warping with my filament, 45-degree overhangs printed fine) <b>Nozzle Diameter:</b> 1mm (not the usual 0.4mm) <b>Layer Height:</b> 0.5mm <b>Wall Thickness:</b> 1mm <b>Wall Count:</b> 1 (thicker walls let me get away with only 1 wall) <b>Print Speed:</b> 50mm/s <b>Infill Density:</b> 15% My final part has some over extrusion at the infill/wall intersections and under extrusion on the back side because I still need to do some more tuning for my 1mm nozzle and the new type of filament I am using. I print without a proper enclosure which is probably why my final prints are also very dimensionally inaccurate.
With this file you will be able to print Brace connector for stacked IKEA Lack tables, no hardware and no support required with your 3D printer. Click on the button and save the file on your computer to work, edit or customize your design. You can also find more 3D designs for printers on Brace connector for stacked IKEA Lack tables, no hardware and no support required.