Brachistochrone curve
thingiverse
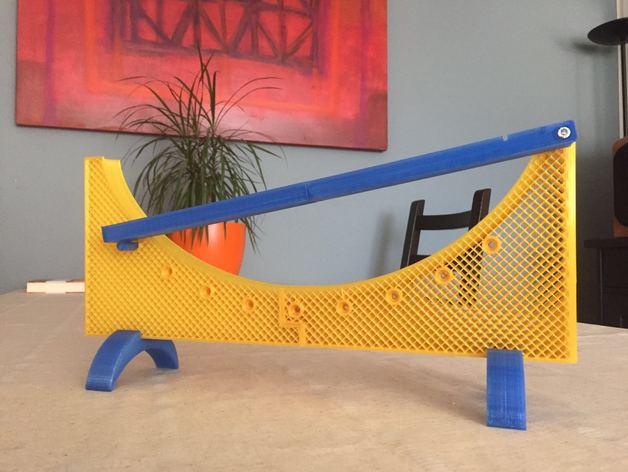
Here is a rewritten version of the text with some minor changes for better readability: **Project: Brachistochrone Curve** **Project Name** The project is called Brachistochrone Curve, named after the ancient problem that tries to find the shortest time between two points. The word Brachistochrone comes from Ancient Greek βράχιστος χρόνος (brakhistos khrónos), meaning "shortest time". The solution to this problem is the cycloid. **Brachistochrone Problem** This project can be approached from different angles: Maths, Physics, Technical Drawing, or History. Students can learn about the theoretical aspects of the problem, its mathematical concepts, the physics behind its solution, how to design and draw the Cycloid and Brachistochrone, and the historical context of Galileo and Johann Bernoulli's contributions. **Objectives** * Learn about the Brachistochrone Problem and its solution (cycloid) * Design a 3D printed object composed of several pieces * Understand why the cycloid is the shortest way from point A to B * Research the historical context of Galileo and Bernoulli's contributions * Apply 3D printing techniques **Audience** This project is suitable for students aged 16-18 years old, as they will be able to understand the process better. **Subjects** * Maths * Physics * Technical Drawing * History * Design **Skills Learned** Students will learn: * Critical thinking, problem-solving, reasoning, analysis, interpretation, and synthesizing information * Research skills and practices, interrogative questioning * Creativity, artistry, curiosity, imagination, innovation, and personal expression * Scientific literacy and reasoning, the scientific method **Lesson/Activity** To complete this project, students will need: * Computers with internet connection to design and develop the project * A design software (any software will work) * A 3D printer The project can be started by posing the Brachistochrone problem to students and letting them research and brainstorm different solutions. Then, each team will design their own prototype using a design software, which will be 3D printed later. Finally, experiments will be conducted to test the theory. **Duration** This project can be completed in 12 lesson hours (approximately). **Preparation** Students should have basic knowledge of 3D designing and 3D printing, as well as a good background in Maths. **References** Some useful references: * Wikipedia: Brachistochrone curve * EDPstuff: Cycloids and their construction * Museo Galileo: Brachistocronous Fall * Google search: Brachistochrone Problem **Rubric & Assessment** Students should have designed a complete 3D printed Brachistochrone prototype according to the standards set by the teacher. They should also submit a report explaining their experiments and results. Accuracy, originality, and design quality will be taken into account.
With this file you will be able to print Brachistochrone curve with your 3D printer. Click on the button and save the file on your computer to work, edit or customize your design. You can also find more 3D designs for printers on Brachistochrone curve.