Bread Tie Prototype
thingiverse
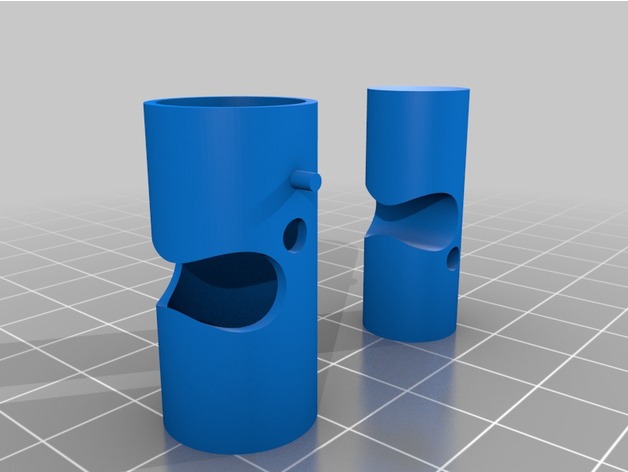
This is a proof of concept test for a type of spring-loaded bread wrapper tie. Overview and Background Assembly Instructions 1) Print the attached model with support, resulting in a large cylinder with 2 small pins, and a smaller cylinder. 2) Remove all support material when complete, ensuring the small cylinder slides easily through the large cylinder. 3) Bend one leg straight of a 35mm paper clip. With pliers, bend the tip 90 degrees for a length of about 2 millimeters, creating a hook to pull the rubber band through the 3mm holes. 4) Place the small cylinder in the large cylinder and align the 3mm holes so the small cylinder sticks up above the large cylinder. 5) Insert the paper clip leg through the holes, allowing it to pop out the other side. 6) Hang the rubber band on the hook. 7) Pull the rubber band halfway into the cylinders. 8) Hook the rubber band around the pin with your fingers. 9) Pull the hook the rest of the way through the cylinders. 10) Pull the hook up and hook the end of the rubber band around the other pin. 11) Remove the hook from the rubber band, and the print should be functional at this point. Lesson Plan and Activity Materials Needed These bands serve as the spring. http://www.kmart.com/goody-ouchless-girls-clear-mini-elastics-100-pcs/p-038W006389924001P One large metal paper clip with a slight bend near the end is required. http://i62.tinypic.com/dx1qp0.jpg Duration of Lesson Preparation Rubric and Assessment References
With this file you will be able to print Bread Tie Prototype with your 3D printer. Click on the button and save the file on your computer to work, edit or customize your design. You can also find more 3D designs for printers on Bread Tie Prototype.