Breakout PCB - Ultimaker 2 PG35L Direct Drive Extruder for 1.75mm E3D v6 Hotend
thingiverse
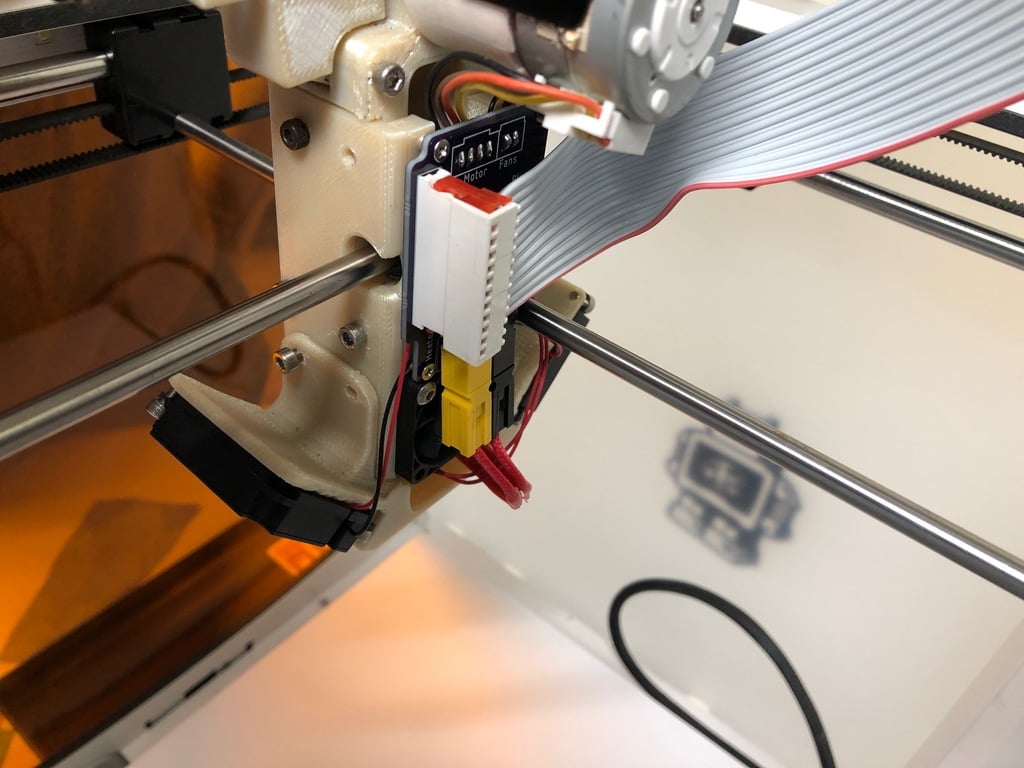
After quite a while of using the extruder design by jasonatepaint (https://www.thingiverse.com/thing:1102900), I got the itch to add on to it in order to clean up the wiring. The zip tie that I had strapped around the extruder motor to keep the wires bundled kept sliding back and pushing the heatsink off the motor. After seeing the design of the Wanhao Duplicator 9, I was inspired to consolidate all of the print head wires into a single ribbon cable with a quick disconnect. This also allows for easy swapping of the print head so that you can keep your high temperature and low temperature materials in their own dedicated hotends. I planned out exactly how many wires I would need and began sourcing parts on Digikey. (http://www.digikey.com/short/j1cm8j) I downloaded the source models from jasonatepaint's design and utilized the Push-to-Fusion360 feature in Eagle to fit-check my design before ordering the boards on OshPark. The design is a 4-layer board so the cost will be a bit higher. The reason I chose to use 4 layers instead of two was so that I could use the inner two layers completely for the heater connection and reserve the outer two layers for the fan, motor, and PT100 traces. I used an Anderson Powerpole as the connector for my heater cartridge, but I am thinking that may have been too large for the design. Feel free to make any changes that you want, but keep the current consumption in mind when choosing a connector. For the temperature sensor, I am using a PT100 sensor from E3D so that is why I chose to use that particular connector on the PCB. For the motor and fan connections, I just soldered the wires directly to the board (from the back, in order to hide the wires). Please pay close attention when soldering the blower motors to the board and wire them in series. It had been too long since I had first put this extruder together and I had forgotten this requirement. I quickly burned out the blowers and blew up the transistor on my control board and had to replace it (the transistor, not the control board). A modified version of this PCB could separate the two blower connections and connect them in series internally. I used some #2 screws to secure the PCB to the print head with some aluminum standoffs that I purchased from McMaster-Carr. The sizing of the standoffs isn't really critical. This was just to give a little bit of clearance for the wires behind the PCB. I did have to drill some pilot holes, but perhaps a rework of the extruder design could include these holes. When assembling the cable, I used the convention that the red wire (wire #1) was Heater+ and wire #2 was Heater-. I believe I followed the +/- convention all the way through. For the motor wires, I just kept the same order as the original design. It is merely a pass-through.
With this file you will be able to print Breakout PCB - Ultimaker 2 PG35L Direct Drive Extruder for 1.75mm E3D v6 Hotend with your 3D printer. Click on the button and save the file on your computer to work, edit or customize your design. You can also find more 3D designs for printers on Breakout PCB - Ultimaker 2 PG35L Direct Drive Extruder for 1.75mm E3D v6 Hotend.