Breville Barista Express Single Dose Hopper
thingiverse
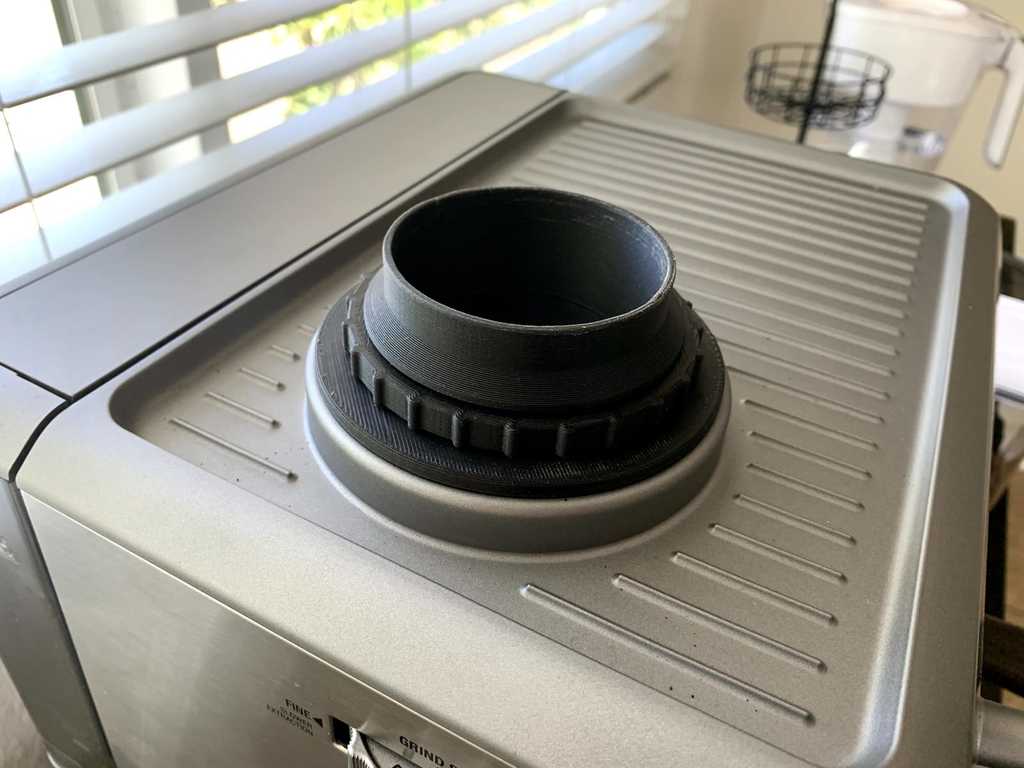
Advanced users of the **Breville Barista Express** espresso machine likely don't fill up the stock bean hopper, but instead only grind enough (carefully weighed) beans for a single espresso shot. The stock hopper has an issue that beans fall into the areas around the burr grinder, creating unreliable grinding results and even stale beans being introduced into a grind. This single dose hopper replaces the stock hopper with a much smaller, low profile design that holds 18-20g of beans. The stock hopper has 2 locking pins to hold it in place, one of which activates a safety switch. This feature, which was challenging to duplicate, is implemented in this design. The bean feeder chute extends all the way down to the grinder, preventing beans from falling into the voids around the burr grinder. If you are concerned with such things, you may want to use a food safe filament. PET-G should be fine, but some PLA filaments have additives which probably aren't good for you. Two hopper lid designs are provided, the first is a simple flat lid. The second is a bellows design similar to the one used on the very expensive Ceado single dose grinders. This is intended to blast any remaining grounds out of the grinder into the portafilter, achieved with a few swift pumps at the end of the grinding process as the grinder speeds up. It works well in use, but the TPU filament I used hasn't lasted, splitting between layers after a few weeks of use. Your mileage may vary, please let me know if you find a flexible filament with stronger layer adhesion (possibly NinjaFlex or TPU/TPE filaments with similar properties). This hopper should work on all Breville machines that use the SP0001570 Bean Hopper: WORKS: * Barista Express BES870 WILL LIKELY WORK: * Barista Touch BES880 HAS BEEN REPORTED TO WORK: * Barista Pro BES878 [TheClash] * Oracle BES980 [bortoni] WORKS WITH MODIFICATION: * Smart Grinder Pro BCG820 [izkariot] LIKELY WON'T WORK: * Oracle Touch BES990 ### PRINTING #### Parts: Any rigid filament can be used, as long as an adhesive can be used on it for the 3 feeder sections. The bellows is printed in a flexible filament, like TPU. * **hopper_base.stl** Fits into the stock hopper opening * **hopper_pin_2x.stl** Print 2 of these (**NOTE: one has to be mirrored**) * **feeder_bottom.stl** Bottom part of rotating inside feeder * **feeder_top.stl** Top part of rotating inside feeder * **feeder_extender.stl** Extension part of rotating inside feeder * **feeder_lid.stl** Flat lid * **bellows.stl** Bellows lid #### Other Parts: * **M3x6mm Socket Head Cap Screws** 2 Required. Similar size can be substituted. Used to lock feeder assembly into hopper base #### Slicer Settings: * 30% Rectilinear infill * Turn off **Only infill where needed** (if using Slic3r/PrusaSlicer/SuperSlicer) * 0.20mm layer height * Enable supports and possibly brim for the top of the cone for **feeder_bottom.stl** * Enable brim for **feeder_extender.stl** * Print **bellows.stl** in a durable flexible filament with good layer adhesion ### FINISHING & ASSEMBLY * Clean up the 2 hopper pins and ensure they slide freely in their respective slots in the hopper base. Also ensure the pins can move freely on the spirals in the feeder bottom * The feeder assembly has 3 parts, the bottom, top and extender * Check the fit between the 3 feeder parts, clean up where necessary * Assemble the 3 feeder parts using your choice of adhesive. I used regular super glue (Cyanocrylate) on PLA. If you use ABS filament, acetone or nail polish remover works well * Clean up extra adhesive around the joints if necessary * Clean up the holes and test fit the 2 M3x6mm screws that go into the alignment tabs on the sides of the hopper base. The screws should only extend about 2-3mm into the hopper base and the heads should not project from the 2 alignment tabs * Back out the screws so they don't project into the hopper base interior before proceeding * Ensure the feeder assembly rotates freely in the hopper base * Insert the 2 hopper locking pins into the hopper base in their respective slots. Make sure both pins are all the way out * Align the spiral with the slots in the locking pins and insert the feeder assembly into the hopper base. This part may be a little fiddly to get right * Gently rotate the feeder assembly using the knurled knob. It should rotate 1/4 turn from the locking pins being fully extended to being all the way retracted * GENTLY screw in the 2 M3x6mm screws to retain the feeder assembly in the hopper base. If the feeder doesn't rotate anymore, back out the screws slightly ### USING THE HOPPER * Remove the stock hopper as shown in the user manual * Rotate the knurled knob on the feeder assembly until the locking pins are fully retracted * Line up the alignment tabs on the hopper base with the espresso machine slots * Fully insert the complete assembly * GENTLY turned the knurled knob to lock the assembly into place * That's it! *NOTE: I have added an improved version of the bellows with more rounded corners that lasts a lot better than the old design when printed in TPU filament.* Designed in Fusion 360. I don't provide the design file as a few unscrupulous people have been selling my designs online for profit in violation of the license.
With this file you will be able to print Breville Barista Express Single Dose Hopper with your 3D printer. Click on the button and save the file on your computer to work, edit or customize your design. You can also find more 3D designs for printers on Breville Barista Express Single Dose Hopper.