Brio - British Rail Class 67 battery powered train
thingiverse
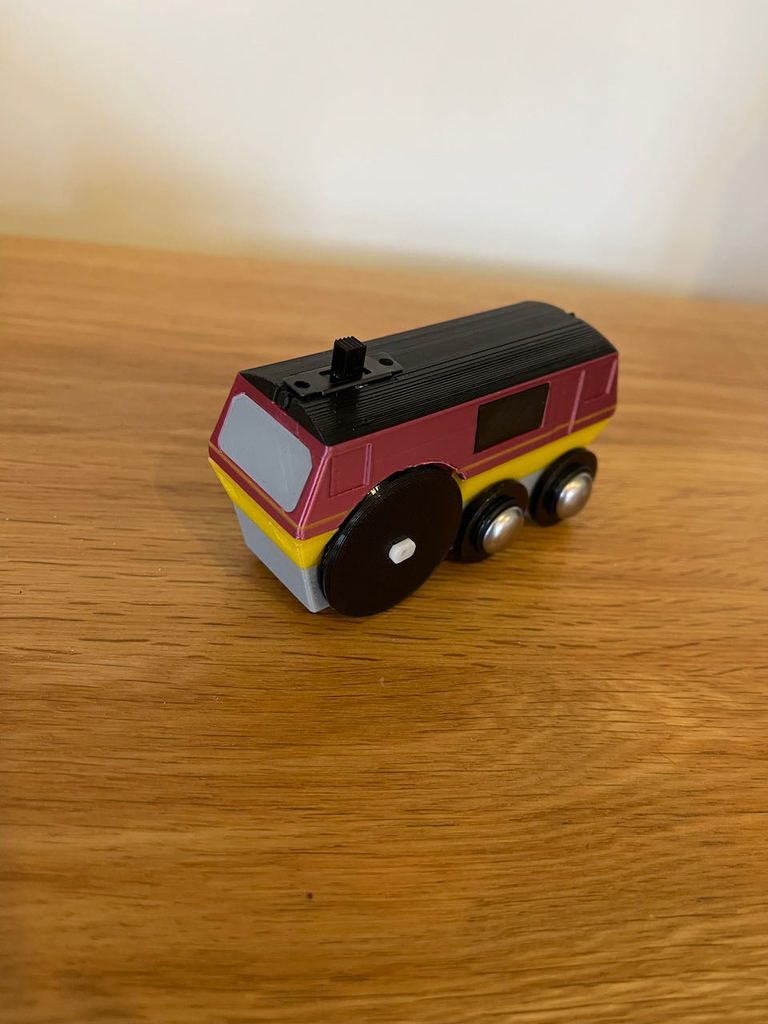
Overview ======= After designing track and accessories for a while, I thought I would have a go with designing and printing a battery powered train. This was probably ambitious and whilst my son is happy with it, I think the design limitations of the TT motor make this very much a compromise. That said, it is a good foundation for other train designs and a good project if you want to toy with simple electrics and printing. Inspiration was taken from British Rail Class 67 engines which I would often see when commuting into London Paddington (https://en.wikipedia.org/wiki/British_Rail_Class_67) Bill of Materials ============ The bill of materials is as follows: TT Motor ------------ https://www.amazon.co.uk/gp/product/B07ZKRF6DN/ref=ppx_yo_dt_b_asin_title_o09_s00?ie=UTF8&psc=1 AAA Battery Holder -------------------------- https://www.amazon.co.uk/gp/product/B07MSFXVFJ/ref=ppx_yo_dt_b_asin_title_o08_s00?ie=UTF8&psc=1 Switch --------- https://www.amazon.co.uk/gp/product/B008DFYHV2/ref=ppx_yo_dt_b_asin_title_o07_s00?ie=UTF8&psc=1 You may be able to find these at other suppliers, but this is where I sourced things. Where possible, I tried to keep things to Amazon as that seems to have a global reach. You can probably however source things locally or with a marketplace of your choice Brio or wooden train type wheels seem very hard to source and in the end the ones I found aren’t perfect. Often the ones I found have a wider diameter than what normally comes with a completed train set. That said, the best I was able to find was with AliExpress and the supplier I used was reliable and the goods were as expected Wheels ---------- https://www.aliexpress.com/item/4000089359002.html To give things an authentic look and run I sourced the wheel hubcaps from a hobbyist in the UK, one may have different success in finding things in your geography Spring Caps/Hubcaps ------------------------------ https://www.hobbies.co.uk/spring-caps-pack-of-4-sp5 Axle Rod ------------ https://www.hobbies.co.uk/axle-rods-ar5 Alternately, you may be able to print these on your own if you are good with a 3D tool. Printing ====== The design is pretty straightforward, the Lower Engine Cradle holds the TT Motor and slots in quite well. The Upper Engine Cover does pretty much what it says on the tin and slots into the cradle nicely. The left and right shaft pegs are for the middle holes in the Lower Engine Cradle as the front holes should use the Axle Rods that were sourced. Alternately if you want to print the front axle, that has been sized for a 4.8-5mm shaft. The windows and engine grill are optional and if used, likely will need to be superglued to the Upper Engine Cover Colour Changes ============= Lower Engine Cradle ---------------------------- 0 - 13.10mm Grey 13.10mm - 23.15mm Yellow 23.15mm - 30.95mm Maroon Upper Engine Cover --------------------------- 0 - 2.90mm Maroon 2.90mm - 3.35mm Yellow 3.35mm - 16.85mm Maroon 16.85mm - 20.15mm Black Assembly ======== The TT motor engine sandwiches between the Lower Engine Cradle and the Upper Engine Cover. It is useful to route the black and red leads under the protruding hooks before bringing it up to where the switch is. The AAA battery holder should be positioned as far forward in the Lower Engine Cradle as possible with the leads facing the the rear. This should rest on top of the TT Motor and in between the protrusions in the Lower Engine Cradle. The Drive Wheels will require some force to slot into the TT Motor shaft. They are printed with no tolerance to ensure proper grip. The Drive Wheels are notched in the middle to accept a rubber band to provide traction. Place a rubber band of about 15mm in diameter around the wheel to help ensure that there is dig onto the surface. Electrical assembly will require some soldering or could be possibly done with electrical tape. You will need to connect the leads per the wiring diagram picture provided. The switch is a double throw double pole switch which allows for forward and reverse movement. Once all is assembled and in place, it should all close snugly and hopefully give you hours of enjoyment
With this file you will be able to print Brio - British Rail Class 67 battery powered train with your 3D printer. Click on the button and save the file on your computer to work, edit or customize your design. You can also find more 3D designs for printers on Brio - British Rail Class 67 battery powered train.