Bronze Bushing Upgrade for Flashforge Creator
thingiverse
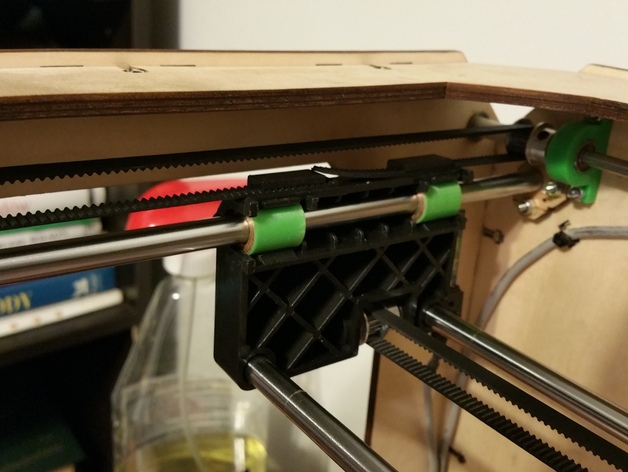
Because I've been taught to define acronyms, here they are: I.D. = Inner Diameter, O.D. = Outer Diameter. This is a spacer that's needed to install standard 14mm O.D. X 8mm I.D. Bronze Bushings onto the FlashForge Creator. The stock LM8UU Linear Bearings have an outer diameter of 15mm. Standard Bronze Bushings don't come in a 15mm outer diameter size - I haven't found any at least. After doing this upgrade, my printer runs much smoother and quieter. It also feels much stiffer than it did with the stock linear bearings. My printer now runs like butter. Instructions: You will need twelve Bronze Bushings to swap out all of your stock linear bearings. I got mine from www.sdp-si.com/. They have pretty fast shipping. Size is 8mm I.D. X 14mm O.D. X 16mm Long. Bronze Bushing Part Number (from sdp-si): A7B4MP081416 Print out the spacers. I printed out a few extra just in case - sixteen total. You'll notice that the spacer I.D. is a little bigger than 14mm, and that's because it was designed to be pressed in easily but still fit snug (they fit perfectly). The uploaded .x3g file was generated in Makerware - my Simplify3D doesn't like thin walls, so feel free to slice the stl however you like. Press the spacers carefully onto the bronze bushings. Remove your extruder head. Disconnect the connector going to the X-axis motor and the connector going to the X-axis switch. Move them out of the way. Disassemble the Y-axis Rods - slide the bearing holders (plastic pieces) off of the Y-axis rods, and then slide the extruder carriage off of the X-axis rods. Remove the old bearings from the Y-axis holders and the extruder carriage - a total of eight bearings. I used an Allen key to help pry them out. Be careful not to crack your plastic. Remove your build-plate arms and carefully pry out the old linear bearings. At this point all twelve of your old linear bearings should be removed. Press the new Bronze Bushings with 1mm Spacers into all locations where linear bearings were - a total of 12. Put everything back together in reverse order.
With this file you will be able to print Bronze Bushing Upgrade for Flashforge Creator with your 3D printer. Click on the button and save the file on your computer to work, edit or customize your design. You can also find more 3D designs for printers on Bronze Bushing Upgrade for Flashforge Creator.