Browser File Management Interface, Toshiba FlashAir WiFi SD
thingiverse
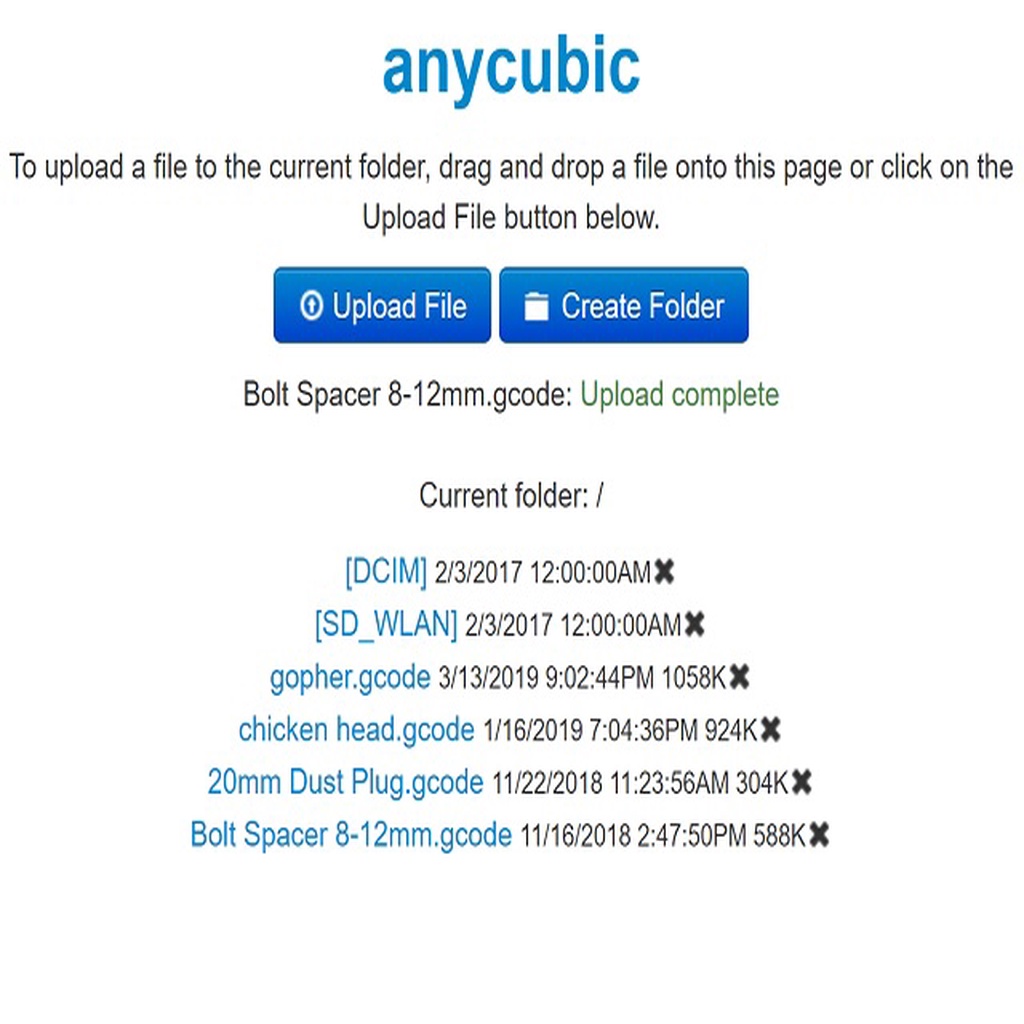
This is a web-browser-based file management interface for Toshiba FlashAir Wi-Fi SD flash memory cards. From your PC, tablet, or smartphone, wirelessly navigate folders and upload and delete files on the FlashAir card inserted in your 3D printer, CNC controller, or other device. View file and folder contents, timestamps, and file sizes without having to pull the card. Writing file timestamps allows the Marlin firmware to sort the file listing so that the more recent files appear at the top. The FlashAir card can be configured to run in Station mode so that it doesn't broadcast another SSID for the passthrough AP. This interface was derived from the web browser tutorials at <a href="https://www.flashair-developers.com/">FlashAir Developers</a>, and the download at <a href="https://mattshub.com/2017/04/11/flashair-sd-card/">Matt's Hub</a> which seems to be based on an earlier version that is no longer available (www.extrud3d.com/flashair). Installation: Apply the <a href="https://jp.toshiba-memory.com/ww/support/download/flashair/w04/config02.htm">most recent firmware</a> from Toshiba. Download the flashair2web.zip file to the hidden /SD_WLAN folder on your FlashAir card and unpack it there. Make sure that the js, img, and css subfolders and the supporting files that they contain are created off of the folder. The CONFIG.tmp file contains all of the entries that need to go into the hidden /SD_WLAN/CONFIG file. You may wish to simply rename the existing CONFIG file (ie. to CONFIG.old) and rename CONFIG.tmp to CONFIG. Open the CONFIG file and edit the APPNAME, APPSSID, and APPNETWORKKEY lines to match your printer URL preference and router settings. If you are using static IPs or a proxy server, consult the <a href="https://www.flashair-developers.com/en/documents/api/config/">FlashAir CONFIG file reference</a> for additional lines that you may need to add, change, or remove. Some configuration and troubleshooting examples can be found in <a href="https://shop.prusa3d.com/forum/user-mods-octoprint-enclosures-nozzles--f65/flashair-wifi-sd-card-setup-and-drive-mapping-t13693.html">this thread</a>. Whitelist the FlashAir MAC on your router, if needed. Unmount the card and insert it into your 3D printer or other device that you want to upload files to. Using your web browser, navigate to ht<span>tp://</span>printerhostname. printerhostname is the value that you set for APPNAME in CONFIG (For example in the photo, APPNAME=anycubic and navigate to ht<span>tp://</span>anycubic). The first time that you navigate to the page, you will see the factory default FlashAir page asking you for additional values to set up the card. Do not make any changes and refresh the page. At this point, you should see the newly-installed browser interface. Multiple FlashAir cards can be managed. Configure each card with a different printerhostname. The browser interface displays the printerhostname in the title and heading so that if you have multiple tabs open, it is clear which card you are currently working with. Notes and Caveats: - IE users must refresh (F5) the interface page after file deletion, folder creation, and upload in order to view the updated directory listing. - If you are browsing the FlashAir card from a device that caches directory entries, changes made through the browser interface may not appear until the directory listing is refreshed. Do not attempt to delete or overwrite a file that is currently being printed. There is potential for hotends and heated beds to be left on if the remainder of the file cannot be accessed or ends unexpectedly. - Files are uploaded with an approximation of the file's original last-modified timestamp. File last-modified timestamps might not be supported or implemented correctly by some browsers, in which case a timestamp from 1979 or the current timestamp is written. When uploading larger files, the timestamp might be significantly different from the original due to the time required for the upload. - JPEG thumbnails may not display properly due to the limited file formats supported by thumbnail.cgi. UPDATED 03/03/2020 - Added long file/folder name support as a separate version (LFN). Note that due to differences in file/folder naming conventions in Windows and MacOS, and URL syntax, it is possible to create folders that cannot be opened or deleted using the browser interface. This is a shortcoming of the FlashAir API and you would have to manage these files and folders using WebDAV or with the SD card inserted in a Windows or Mac PC. The workaround is to only use characters that are common to Windows, Mac, and URLs and that do not have special meaning or are invalid to use. UPDATED 08/29/2019 - Bug fix for upload failure after delete. Added a folder creation function. Simply replace the list.htm and js/main.js files in your installation and refresh your browser view for the new changes to take effect. UPDATED 02/10/2019 - Bug fixes. Added jump to base upload folder in heading. Enable folder deletion. Enable JPEG thumbnails. Open files in a new window. Added meta debug entries. Revised CONFIG.tmp template.
With this file you will be able to print Browser File Management Interface, Toshiba FlashAir WiFi SD with your 3D printer. Click on the button and save the file on your computer to work, edit or customize your design. You can also find more 3D designs for printers on Browser File Management Interface, Toshiba FlashAir WiFi SD.