Brushless Dual Stage Worker Hurricane Cage + Flywheels
thingiverse
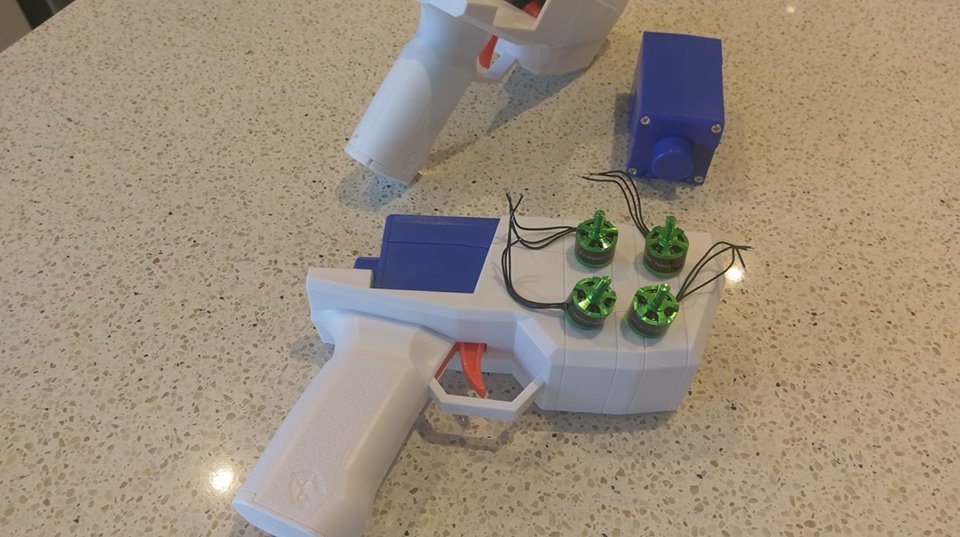
Stock motors in a Worker Hurricane are crap. But you can now upgrade them to a Brushless setup. Performance on 3s has lows of 190fps with highs to 215fps (low 200's average). Over time, an accumulation of dart foam on the flywheels will improve performance by about 5-10 fps. There are 2 crush versions of the wheel available. I am using 8.5, but if you have jamming issues with your darts, you can use 9.0. **Shopping List:** 4 x Turnigy Viking 1308 4100kv motors: Two CW and two CCW https://hobbyking.com/en_us/multistar-viking-brushless-outrunner-drone-racing-motor-1308-4100kv-cw.html https://hobbyking.com/en_us/multistar-viking-brushless-outrunner-drone-racing-motor-1308-4100kv-ccw.html 1 x Brushless 4-in-1 Quadcopter ESC of 20a or more. It needs to be small, and I Have modelled an adapter plate for the 20x20mm units. I prefer BLHeli_s and have a 20x20mm BS-28A 4in1 unit installed. 28a - https://www.banggood.com/20x20mm-BS-28A-4in1-2-4S-BLHELI_S-ESC-Support-PWM-Multishot-Oneshot-DSHOT-4-1g-for-RC-FPV-Racing-Drone-p-1198297.html 1 x BEC module https://www.aliexpress.com/item/Receiver-Power-Supply-5V-3A-Brushless-ESC-External-Type-BEC-UBEC-Support-2-6S/32882504953.html 1 x Arduino Pro Micro https://www.aliexpress.com/item/New-Pro-Micro-for-arduino-ATmega32U4-5V-16MHz-Module-with-2-row-pin-header-For-Leonardo/32768308647.html 1 x 25 turn trim pot of your choice. Thinner is better. https://www.jaycar.com.au/10kohm-spectrol-25-turn-trimpot/p/RT4650 Please be aware with the Pro Micro, you must ensure you select the right CPU clock frequency and voltage in Arduino. The default is 3v3 / 8mhz instead of 5v / 16mhz. *You will soft-brick your Arduino if you get it wrong.* You will not fit a Nano in here. **Printing Info** Flywheels need to be printed at 30% infill, with a 3d infill pattern (e.g. cubic). 4 Walls, floor, and roof layers are required for structural integrity. No supports required. I use Polymax for flywheels as it's nearly indestructible. Cage needs to be printed at 100% infill.Supports are required. PLA will not handle the temperatures generated. **Use PETG or ABS instead**. I just used a locally sourced PETG. Upper cage and ESC bracket can be printed in any settings you like. I typically use a 25% infill **Installation Process** Screw the motors into the cage using the included hex bolts. ESC attaches to the mount, and will sit under the cage. The motors solder to the ESC. You will also need to devise a tail for the ESC's signal lines - they include a patch cable that I cut in half, and soldered longer wires to. Please refer to the specific ESC manual for the wiring diagram. The following shell mods are required: - Cut out all the motor support structures in the center of the lower shell piece. Obviously not the screw posts - Remove the vertical support structures in the lower shell towards the front. There are 3 if I recall. - Cut out the barrel support on the top and bottom shell all the way until about 5mm before the front of the shell - Cut off the barrel retention nubs on the top and bottom of the shell. The top and bottom assembly should seat neatly in the shell - Cut some vents for the underside of the cage to be able to suck in outside air. Airflow is terrible in this shell. 1) Install motors 2) ESC goes between the lower shell and the lower cage. 3) Screw down the lower cage to the lower shell 4) Install flywheels 5) Install upper cage assembly. Use M2.5 bolts (or your choice of similar self tapper) 6) Install arduino on top of upper cage assembly. Solder wires to the side, not through the holes. 7) BEC goes in the wiring run space Follow my photos for guidance. I have videos on the details of this particular build, but I have assumed that you have a fairly basic level of knowledge on brushless setups. There are plenty of videos on brushless nerf builds - especially based on Ultrasonic2's Ultra Stryfe. The process is fundamentally the same. My ESC's are tuned in the following way: - Timing = Medium High - Startup Power = 100% Everything it more or less default. Please remember that since this is a 4-in-1, you have to do it 4 times. **Wiring** Firmware is TBA. - Rev trigger connects to Pin A2 (as labelled on the Arduino). The side of the switch connects to Ground. The stock arrangement with the slide switch can be used to break this signal to provide a safety - Speed Pot center pin connects to Pin A0. One side of the Speed Pot connects to 5v from the BEC, the other connects to Ground - ESC Front connects to Pin 10 - ESC Rear connects to Pin 9 The solder pads for the power wires on the ESC are a little tight. Don't worry if some solder spills over to the surface mount caps - they are continuous. Don't let the solder spill over to anything else. Remember with solder - less is more. There is a wiring run in the top left corner of the shell. **Video Info** Demo https://www.youtube.com/watch?v=k1z1VuG1Bmo **Shoutouts** Shoutout to Ultrasonic2 as I cut my teeth building a number of brushless setups based on his files. That experience allows me to develop this. **License** Absolutely no commercial use of these models, firmware, circuit diagrams, etc are allowed. My exception is when you pay a general purpose print lab / service (such as 3dHubs) to print models for your own personal use. If you have anything else in mind, please contact me.
With this file you will be able to print Brushless Dual Stage Worker Hurricane Cage + Flywheels with your 3D printer. Click on the button and save the file on your computer to work, edit or customize your design. You can also find more 3D designs for printers on Brushless Dual Stage Worker Hurricane Cage + Flywheels.