Budgie Sony A7-series Shift-and-Stitch Adapter
prusaprinters
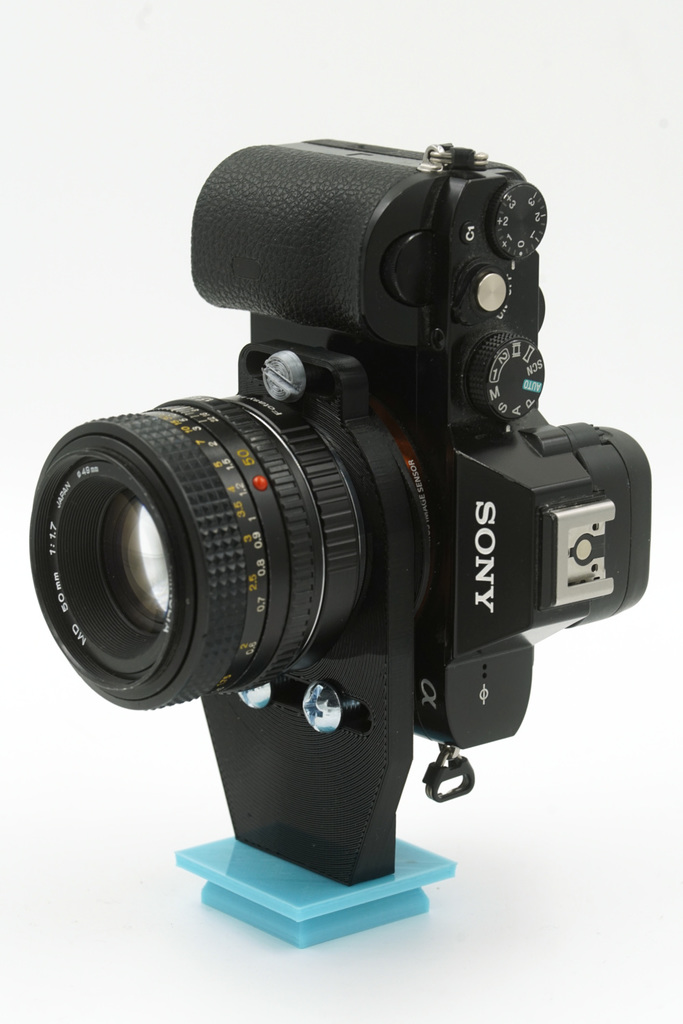
<p>Use your full-frame Sony E-mount (FE) body to capture images up to 48x36mm -- generously larger than the 44x33mm sensors people are often calling medium format. I argue that's really best considered as<em>multi-aspect 135 film (35mm)</em> format for getting the largest possible coverage sampling using a designed-for-full-frame lens.</p> <p>Budgie is an adapter for Leica M to Sony FE -- except it does offset shifting and includes a tripod mount. The name comes from the idea that the camera can be budged +/-12mm relative to the mounted lens to capture multiple images for stitching. The diagonal of a 36x24mm full frame is approximately 43.27mm. However, that's with the standard 3:2 aspect ratio. In 1:1 (square) format,<strong>a lens that can cover that diagonal also should be able to cover a square with approximately the same diagonal, which would be 30.59x30.59mm</strong>. In infinity:1 (the limit on panoramic aspect ratio),<strong>a lens covering that diagonal should be able to cover 43.27x0mm</strong>. In other words, all aspect ratios are contained within a 43.27x30.59mm capture rectangle -- which easily fits inside Budgie's 48x36mm space. Very few full-frame lenses will produce high-quality coverage of the full 48x36mm capture space, but quite a few will cover more than one would expect; for example, most lenses I've tried can cover a 36x36mm square image. In any case, using a 42MP body, such as the A7R II, stitching two (or better, three) shots will get you an approximately 48x36mm stitched image with about 84MP effective resolution. If you have a body like the Sony A7R IV, combining this with the camera's "pixel shift" will give up to 482MP of image detail! Of course, the image stitching software might give you any number of pixels, but the point is that you can get that medium-format look using your existing full-frame camera and lenses.</p> <p>Why Leica M? For the same reason the TechArt Pro LM-EA7 uses it: nearly all old lens mounts can be adapted to Leica M, so this adapter is reasonably universal. For example, to use a Canon FD lens, simply mount a Canon FD to Leica M adapter on this and then mount your FD lens on the front. Not only are lots of adapters commercially available, but I've also designed and posted free 3D-printable M adapters for: <a href="https://www.thingiverse.com/thing:3095199">Argus C3</a>, <a href="https://www.thingiverse.com/thing:1730319">Minolta/Konica-Minolta AF / SonyA</a>, <a href="https://www.thingiverse.com/thing:1727361">Canon FL/FD/FDn</a>, <a href="https://www.thingiverse.com/thing:1719685">Minolta SR/MC/MD</a>, <a href="https://www.thingiverse.com/thing:1708739">M42</a>, and <a href="https://www.thingiverse.com/thing:1706976">Kiev 10/15</a>.</p> <p><strong>Notes:</strong> There have thus far been five major versions of this adapter. The first two worked well, and the second was used for the images shown here, but the mounting screws could hit the EVF shroud while mounting/unmounting. The third and fourth versions allowed the weight of the camera to flex the E flange too much, making focus imprecise. Version five, 20210621, is simplified, but features three-point clamping that forces the E flange to remain flat... while still (just barely) mounting without bumping into any part of the body of the A7, A7R II, etc. There was even a last-minute tweak to the 20210621 version (not shown in the photos) to remove one of the half-inch screw reinforcing collars to make more clearance for some A7-series models.</p> <p>Also note that, although you could use Budgie with an APS-C E-mount body, the result couldn't be larger than about 39.6x23.6mm. Thus, for APS_C, it's probably more interesting to use <a href="https://www.thingiverse.com/thing:4880226/">APSC2</a>, which also uses full-frame lenses with an M mount, but captures four offset-rotated shots, giving an image of approximately 30.6x30.6mm.</p> <h3>Print Settings</h3> <p><strong>Printer Brand:</strong></p> <p>Anycubic</p> <p><strong>Printer:</strong></p> <p>Kossel</p> <p><strong>Resolution:</strong></p> <p>.25 or finer</p> <p><strong>Infill:</strong></p> <p>25-40%</p> <p><strong>Filament:</strong> Any PLA or ABS</p> <p>Any light-blocking colors</p> <p><strong>Notes:</strong></p> <p>There are actually six parts of five types in Budgie:</p> <ul> <li>20210621e.stl -- the E-mount part</li> <li>20210621m.stl -- the M mount</li> <li>20210621slock.stl -- the M-mount locking screw</li> <li>20210621short.stl -- the short screw (to pass over the body lens release)</li> <li>20210521shalf.stl -- the half-inch long 1/4-20 screw, of which you need TWO (2); these are standard hardware, so<strong>you might save time by buying these instead... and the metal screws do actually work slightly better</strong></li> </ul> <p>These are precision parts, so pick appropriate settings for your printer. However, there is nothing tricky about printing them. The touchiest part by far is the set screw, which is a 1/4-20 thread part with a screwdriver slot; it is used to lock the M adapter in place. The screw is potentially subject to deformation over time and use, so you might want to print a spare or two.</p> <p>It is strongly recommended that the E and M mount parts be made of opaque material to prevent stray light leaking in.</p> <h3>Using Budgie</h3> <p>Before assembly and use, clean-up any threads or bumps on the printed parts. If you filed any parts, it's probably a good idea to lightly wash them to remove any plastic dust. If you wish, it's also a good time to paint the bird logo as I did -- light blue on the 20210621 version.</p> <p>The Budgie parts need to be assembled for use, but it's pretty simple:</p> <ol> <li>Put the E and M parts together using the bottom half-inch screw (which goes in the reinforced threaded hole). You don't want it too tight because that would prevent the two pieces from smoothly sliding; backing-off about 45 degrees from just tight is probably about right.</li> <li>Similarly install the short 3D-printed screw. This acts simply to provide adjustable clamping force to keep the E part from deforming. Be warned that if you try to use a half-inch screw here, it will bump into the body lens release button when you try to mount Budgie on the body.</li> <li>Mount your M lens (or adapter from the lens mount to M) on Budgie. To do this, align the red dot on the M lens (or adapter) with the screw-threaded hole, push it into Budgie, and then turn it clockwise so that the M locking slot shows in the screw hole.</li> <li>On the other side of the adapter, slide the E part so you can access the screw hole and screw-in the locking screw. This should prevent the M lens from rotating. Note that you can't change the M-mount lens while Budgie is mounted on the camera, but if you're using an M-mount adapter to, for example, Minolta MC, you can trivially change the Minolta MC lens while Budgie is on the camera.</li> <li>Line-up Budgie's E flange (with Budgie's tripod foot hanging off the non-grip side of the body, insert it, and turn clockwise to lock it (as you would an E-mount lens). After mounting, the tripod foot should now be parallel to the camera's baseplate. Now you can put in the second half-inch screw; if put in earlier, it can hit the EVF protrusion on some A7-series models.</li> <li>Pick any one of the three 1/4-20 threaded holes in the tripod mount, and mount it on your tripod normally. The camera's grip should be on the top as it is mounted on your tripod. Note that Budgie can be used with the tripod holding the camera horizontal, but Budgie was<strong>not</strong> design for that.</li> </ol> <p>To use Budgie, you'll need a suitable lens. A Minolta MD 50mm f/1.7 and commercial MD-to-M adapter are shown, but I've used lots of different lenses. Some vignette more than others, but most lenses seem to work with surprisingly minor vignetting. I recommend starting to frame the shot by sliding the lens to the center, focusing, and then checking/tweaking composition by sliding the lens back and forth. In theory, you only need two shots to get 48x36mm, but perfect alignment of shots is unlikely, so I recommend shooting one in the center, one left, and one right. It's fast and easy. However, if your tripod isn't very good (mine aren't) I'd suggest setting the camera to use electronic shutter and either remotely trigger it or use the selt timer -- that will minimize misalignments due to vibration -- and also brace the tripod while your sliding the camera so the tripod doesn't move.</p> <p>For stitching, I recommend <a href="http://hugin.sourceforge.net/">Hugin</a>. It's free, runs on most computers, and produces very high-quality results. The key trick to know is that, unlike stitching a sequence of photos taken by moving the camera and lens, your images shouldn't really have any lens motion. Thus, you'll want to tell Hugin that you used a lens with a relatively long focal length, so that it doesn't try to undistort captures that were not distorted in the first place. For example, I find 5 degree view angle an effective lie. Keep in mind that the stitched images will vary slightly in pixel count and even in aspect ratio due to minor misalignments. I recommend letting Hugin pick the render resolution and then cropping and (down) scaling to the appropriate image: stitching three images from my A7R II nominally produces a result with around 10600x7952 pixels. The generous overlaps mean that Hugin could do a bit of HDR, super-resolution, and/or noise reduction processing, so each pixel should be of slightly higher quality than a single shot delivers -- provided nothing has moved between captures.</p> <p>The last three images posted here are scaled-down stitch results. The image just before those is one of the component image captures.</p> Category: Camera
With this file you will be able to print Budgie Sony A7-series Shift-and-Stitch Adapter with your 3D printer. Click on the button and save the file on your computer to work, edit or customize your design. You can also find more 3D designs for printers on Budgie Sony A7-series Shift-and-Stitch Adapter.