Built-in undercounter (or stand-alone) Sous Vide/temperature controller (STC-1000-based)
thingiverse
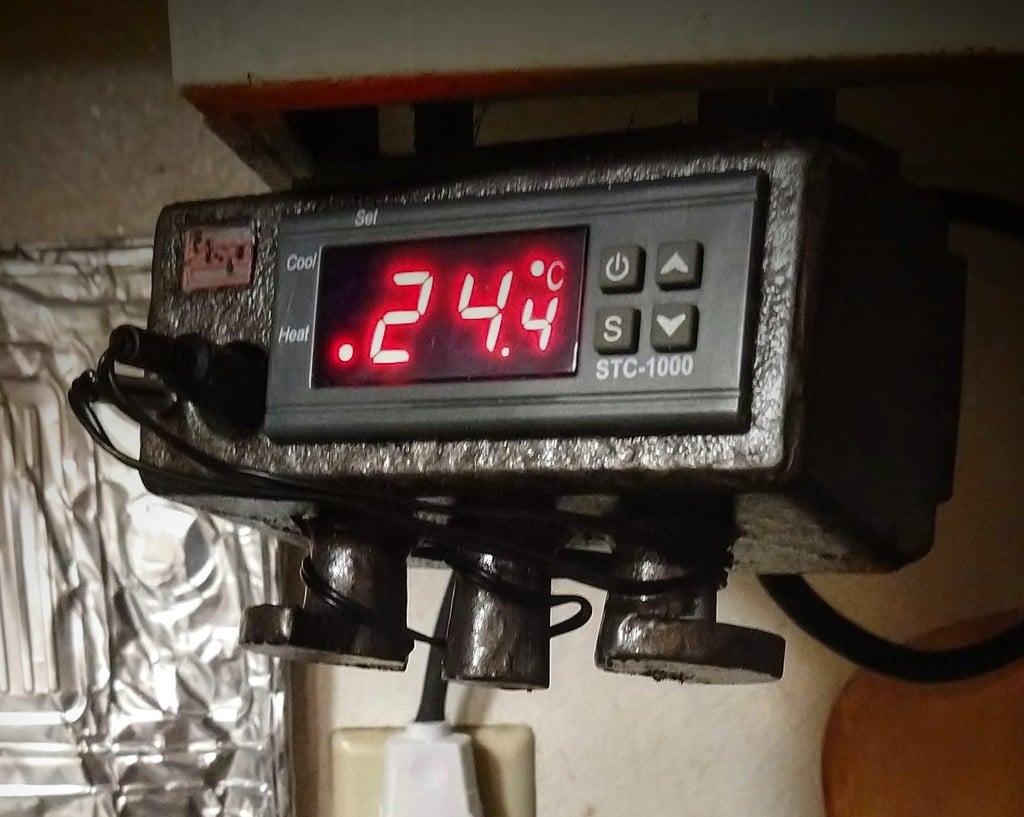
A **built-in undercounter Sous Vide/temperature controller** using off-the-shelf parts. This allows the temperature-based control of any heating device that can be controlled by simply turning on or off its power. There are many, many applications, from home-brewing to Sous Vide cooking to sourdough baking... While the kitchen is the most obvious location, I have one mounted in my garage workshop as well. One can also pre-install the mount alone in a less used location since the controller can easily be detached from its mount and relocated to another mount located elsewhere. In this way one needn't make an entirely separate controller for each location. While I have built similar controllers in the past in unmounted form, it occurred to me that recasting it as a pre-mounted, plugged-in and ready-to-go appliance increases its ease of use and most of all reduces the hassles of having to take it out each time, find a location that doesn't get in the way and plug it in, only to be reversed once you've finished using it. **This design features** a slide-in mount w/snap feature, a front panel cubby-hole to hold the temperature probe when not in use and a cable wrap underneath for probe cable storage. The unit is designed to be kept plugged-in and is turned on via a rear-mounted AC switch. The heating device to be controlled is plugged in to an AC socket on the left side of the case. An advantage of its slide-in mount is the ability to move it from mount to mount for use in lesser used areas such as a garage, project or work room. Perhaps less obvious is that the cord wrap feature doubles as feet to allow for stand-alone use. When used as a stand-alone device its feet will angle its front panel up further (compared to when it's in its mount) to preserve an optimal viewing angle. **Assembly is very tight**, especially mounting the main case components, and will have to very carefully plan the sequence in which you assemble them. My **suggested order of assembly for the main case**: A) pre-wire mini audio jack and install first. Since there's very little engagement of the locking nut to the jack, I've found it best to pre-install its mating plug to trap the nut, then with a pair of long-nosed pliers twist the jack's body to catch the threads. Once the thread is caught, you're home free... B) install the STC-1000. You will likely need a pair of thin, long tweezers to attach the locking clip C) delay installing the AC socket for after you have assembled and wired the rear cover components, leaving the loose wires for the AC socket. D) with the rear cover still detached, thread the wires for the AC socket through it's opening in the main case and solder the socket onto the wires while it is outside the case. E) snap the AC socket into the case, then carefully fold all wires above the STC-1000 and close. **Tip**: to attach the melt-in threaded brass fittings, I found it convenient to place a bamboo skewer into its hole in the front cover, and drop the brass fitting onto the skewer. The bamboo skewer will help constrain and guide the brass fitting while you heat it with a soldering iron and press it in. When it's more than half-way sunk into the plastic, remove the skewer and complete the install with the soldering iron alone. Please note that **as this involves working with 120VAC wiring and power**, only consider this project if you are fully knowledgeable working with residential AC wiring and safety practices. **Parts list**: (1) STC-1000 temperature controller (readily available online) (1) AC plus socket - (DigiKey part #Q227-ND or equivalent) (1) AC SPST rocker switch - (DigiKey part #EG5676-ND or equivalent) (1) 2.5mm audio jack - (DigiKey part #486-3395-ND or equivalent) (1) 2.5mm audio plug - (DigiKey part #CP3-1004-ND or equivalent) (1) 10k NTC thermistor probe - (DigiKey part #495-2171-ND or equivalent) (1) Philmore 65-1050 - SJT 16/3 strain relief or equivalent (1) grounded (3 conductor) appliance cord and plug (4) 6-32x1/4" machine screws (4) 6-32 brass melt-in insert nuts **But where's the schematic?** - Apologies in advance for not providing a schematic, but this should only be attempted by those familiar enough working with AC wiring to readily deduce the schematic themselves. However it is very basic and not much more complicated than wiring a household wall switch. Top **areas for future improvement**: 1) the living hinge snap, I find, is too stiff and could use a redesign... 2) an IEC input power module for the AC entry would be a nice improvement, incorporating both switch, fuse (non-existent in the present design) and IEC AC cord socket.
With this file you will be able to print Built-in undercounter (or stand-alone) Sous Vide/temperature controller (STC-1000-based) with your 3D printer. Click on the button and save the file on your computer to work, edit or customize your design. You can also find more 3D designs for printers on Built-in undercounter (or stand-alone) Sous Vide/temperature controller (STC-1000-based).