Bun Slicing Guide
thingiverse
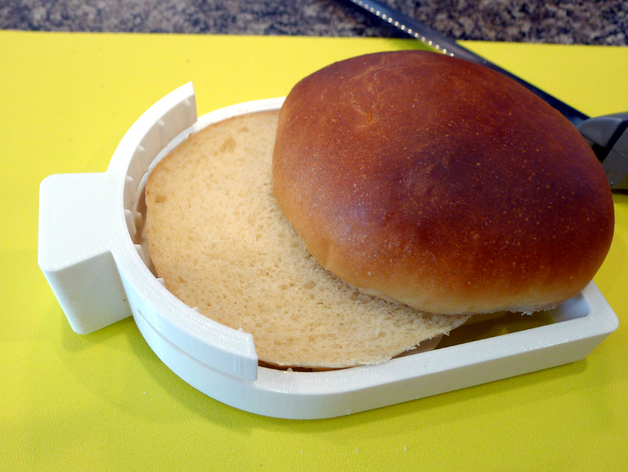
I've been making my own hamburger buns for several months now -- and it's a game-changer. The process is incredibly simple, and the benefits are numerous: fresher, tastier buns that aren't mushy. However, there was one major drawback to my previous method - slicing the finished bun. I kept cutting too high or too low, or sometimes both, resulting in a subpar slice that looked almost as bad as store-bought buns. Most online resources suggested using a cutting board as a guide, but this proved awkward and impractical for me. That's when I remembered my 3D printer and OpenSCAD software - and the perfect solution was born. My new bun slicing guide is spacious enough to accommodate buns up to 4 1/2 inches in diameter. The adjustable cutting height ranges from a maximum of 3/4 inch (with a 3/4-inch bottom) down to about 1/4 inch, in 1/4 inch increments using the spacer disks. To print, simply create as many discs as you think you'll need - but only three will fit under the gripper ribs. To use my guide, place any needed spacer disk on the cutting tray, position the bun in place, and hold your knife flat against the two side rails while gripping the handle. Keep your fingers behind the guard and away from the cutting path - it's basic kitchen safety. Take your time, be aware of the knife edge at all times, and you'll be enjoying perfectly sliced buns. If you have an electric knife, use it for superior quality cuts. If not, a bread knife will work almost as well, which is what I use when I don't feel like breaking out the electric knife. One final tip - add some rubber feet to the bottom of your guide (see pics). The added stability makes the guide much easier and safer to use. Printing notes: To get the best results, be sure to enable supports. They'll be perpendicular to the two surfaces where the knife blade goes, which will eventually get scratched anyway. Cooking note: I started with this excellent recipe from All Recipes and made some minor adjustments to suit my high-altitude location. I replaced 4 oz of all-purpose flour with bread flour for added structure and baked at 350°F for 18-20 minutes instead of 375°F for 15 minutes. Non-altitude-related changes include using a bread machine to make the dough, portioning and freezing the dough balls before the first rise, and omitting the egg wash in favor of a light milk mist right before baking. Print Settings: Printer Brand: MakerGear Printer Model: M2 Rafts: No Supports: Yes Resolution: Medium works well Infill: 20% is fine Material: PLA or ABS - either works great.
With this file you will be able to print Bun Slicing Guide with your 3D printer. Click on the button and save the file on your computer to work, edit or customize your design. You can also find more 3D designs for printers on Bun Slicing Guide.