Button Box
thingiverse
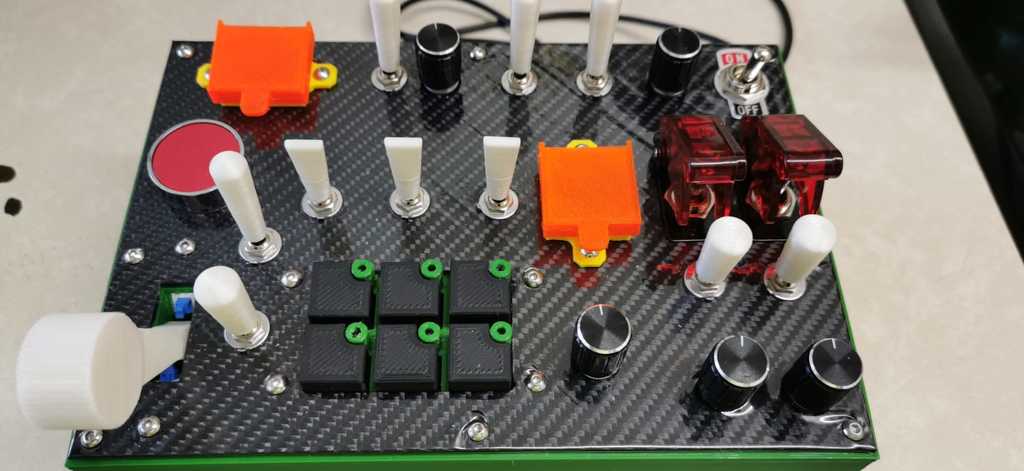
This is the button box I made for a flight sim (DCS). It can be used for other games as it is just a USB controller when wired up with an arduino pro micro. The one that I made with this has 40 buttons. The main parts have spaces to fit standard mini toggles (I used (on)off(on)) x 10, standard full size toggles (again I used (on)off(on)) x 2, standard rotary encoders x 5, an on off standard toggle x 1, a bespoke 18 mm illuminated push button for a 5 mm LED and a switch guard (one in a vertical orientation and one in a horizontal orientation), a bespoke landing gear lever (in the style of a Mig29 or SU27/SU33), a bespoke 6x2 autopilot button array (in the style of Mig29) with LED illumination from 3 mm LEDs and finally a 23 mm panel mount momentary button (like the emergency stop button). The landing gear lever assembly is designed for 2 standard 7 mm latching push buttons with the internal hook removed to make them sprung loaded momentary buttons. The autopilot assembly is designed to house standard 6 mm tactile push buttons and standard 8 mm latching push buttons with the internal hook removed as stated above. This means the autopilot button is sprung loaded and can be activated by wiring to the push button or the tactile push button. If the 8 mm push button is left as a latching switch the LEDs can be turned on mechanically with a press of the button and then turned off with the second press. I changed my arduino code so this was not required as I also wanted a master rest for all the lit LEDs (autopilot reset in the flight sim). The guarded switches have a standard 8 mm latching push button again with the internal hook removed. The toggle extensions need to simply be glued onto the micro toggle switches (I used hot glue). The hole may need opening slightly with a drill as I found the micro toggles tolerances to be quite varied. I covered the front plate with a carbon fibre vinyl (for cars). The wiring / cable management is appalling so I apologise for that horrific picture of the wiring lol, but it is more simple than it looks in the picture as long as you are fairly confident with soldering and basic circuitry. Future models could have built in cable management. There is a space in the box for mounting the arduino pro micro and also the MCP23017 I/O expander. The buttons are wired as a 4 x 10 matrix to give the 40 buttons so 14 pins are needed (hence the expansion board which gives 16 extra pins). Then the 6 autopilot LEDs all use one pin each and the 5 rotary encoders all use 2 pins each. The libraries in the code enable the MCP23017 to be used over I2C and have its pins mapped to a keypad matrix, thus making the computer see a custom keyboard applied as a joystick in windows. Once all wired up windows can only see 32 buttons but do not threat, if you use JoystickTest (http://www.planetpointy.co.uk/joystick-test-application/) you will see all 40 buttons). Code is included, not all of it is my own as some of it was adapted form another button box script so I will answer any questions I can but may not have every answer. I also cut a micro USB wire to tap the ground and live wires and re-soldered it back together after it had passed through the hole in the base. The round illuminated buttons use these wires through the on off toggle switch in the top right. The arduino is always on if the USB is plugged into the PC. All LED's have a 1k resistor in series to limit the current (arduino pro micro is 10mA per pin) and also to make the light not too bright for night time play. Brightness is absolutely fine with this limited current. Green autopilot LED's are running approximately 6mA and red 5 mm LED's slightly higher. Tie a loose knot in the USB inside the box for strain relief. dongiannone@live.co.uk if you have any questions or message me on here. check out my YouTube channel donlabs for simple electronics advise. Everything is designed for M3 nuts and bolts (I use the M3 button head hex key bolts).
With this file you will be able to print Button Box with your 3D printer. Click on the button and save the file on your computer to work, edit or customize your design. You can also find more 3D designs for printers on Button Box.