C02 Powered Pinewood Derby Motor.
thingiverse
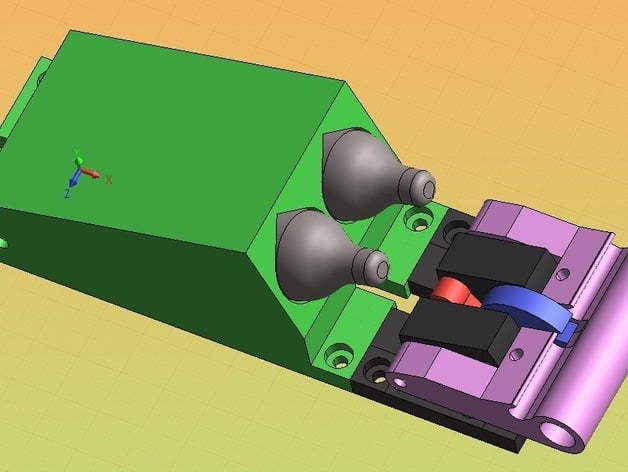
Note: My car was featured in the September 2011 issue of Popular Mechanicshttp://www.popularmechanics.com/home/how-to-plans/backyard-genius-2011-the-years-10-best-diy-creations-jet-propelled-pine-wood-derby-car This is a 3D printable motor for an 'outlaw' class Pinewood derby car. My son's cub scout pack has run an outlaw class for the last couple years. I've made other cars (http://sliptonic.com/?p=113) but this year I wanted to make as much as possible 'printable'. The trigger was inspired by a medieval crossbow mechanism. I welcome comments on improving it. http://www.youtube.com/watch?v=8d4W5kBPek8 First a note: My name for this car was 'Bad Idea' and it probably is. It's completely illegal in regular pinewood derbies, possibly dangerous, and will certainly scare every mother in the room. You've been warned. If you decide to build one, please take extra safety precautions like the note mentioned below and maybe make everyone wear safety glasses. The motor uses the following printed parts: Tankblock: holds 2 12-gram C02 cartridges at a downward angle. A channel between and below the cartridges lets a stiff wire pass underneath from the front bumper to activate the trigger mechanism. Trigger block: Holds the parts of the trigger mechanism is alignment. Pawl: The pawl is pushed toward the back of the car when sitting at the starting gate. It rotates on a common axle with the hammer and keeps the sear from rotating. Sear: The sear grabs the hammer and releases it when pressure is removed from the pawl. Hammer: Pulled forward by springs, the hammer does the work of piercing the cylinders. The hammer has a large cylindrical opening to be loaded with weight. A brass rod rests in a groove in the hammer and connects the springs. As the pins pierce the cylinders, the rod pulls out of the groove. This lets the hammer fall back and clear the way for the gas to escape. Instructions Print and clean up the plastic parts. I printed the hammer at 100% infill because it takes a beating and needs to be as heavy as possible. Cut two pieces of brass rod about 60 mm long and thread the ends with a 3mm die. You want the wing nuts to thread on and not quite touch the sides of the block/hammer. Cut two more pieces of brass rod. One 45mm runs through the hammer, trigger block, and pawl. One 25mm runs through the trigger block and sear. I used one more piece about 160mm long as the rod between the bumper and the pawl. A 90 degree bend on one end fits into the bumper and a tight 180 degree bend on the other gives a rounded surface to push against the pawl. Drill holes in the 'ears' of the wing nuts to connect the springs. Twist in the drywall screws to the two holes in the hammer. They should protrude about 1.5mm on the tank side. Fill the big hole in the back of the hammer with weight. You should be able to find some tungsten or lead fishing weight that fits snugly. If not, improvise and glue it in. Try to make the hammer as heavy as possible. The mass is needed to drive the pins into the cylinders and not just bounce off. To Use it: The pinewood derby block just needs to be cut to a thin slab about 5mm thick. If you use the standard axle positions, the block may be too thin and fragile. I drill my own holes for axles. Mount the trigger block all the way to the rear of the car with the back edge lined up with the edge of the block. Mount the tankblock just in front and touching the trigger block. Before using the springs, insert a couple cylinders and check the alignment of the piercing pins. They should meet squarely in the center of the cylinder seals. If not, make sure your cylinders are seated all the way down. Adjust the drywall screws so that both screws are hitting the seals at the same time. Remove the cylinders. Load the motor by pulling the spring rod back and dropping it into the groove in the hammer. It has to engage the notch on the sear at the same time. You can then push the bumper rod back to push the pawl against the sear. It should now hold with minimal force on the bumper. With the car in position on the track and the springs cocked, hold the hammer back with your thumb and carefully insert the cylinders. Gently remove your thumb. Safety Note: Cartridges contain a LOT of pressure and the car can become unstable for any number of reasons. After racing this car, I wish I would have added a couple eye screws to one side of the wooden block. During the race, we could pass a fishing line through and run it from the starting gate to the finish line. This is a safety precaution to keep the car from flying into the crowd if something goes wrong.
With this file you will be able to print C02 Powered Pinewood Derby Motor. with your 3D printer. Click on the button and save the file on your computer to work, edit or customize your design. You can also find more 3D designs for printers on C02 Powered Pinewood Derby Motor..