Cable box
thingiverse
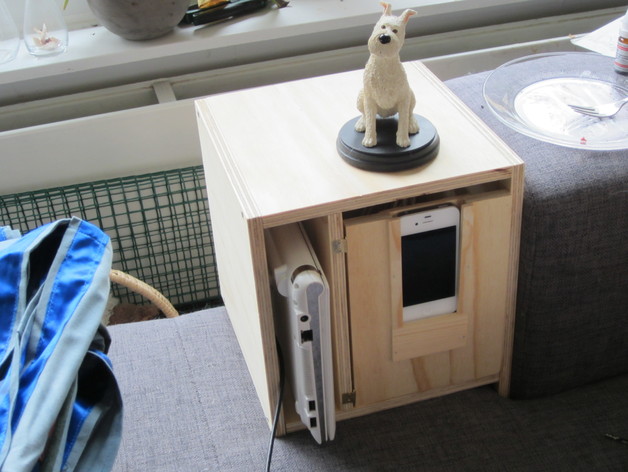
I didn't like the mess of cables usually spread out on our couch for loading all of our mobile devices. So I built this wooden box to put on our couch. It contains a 3 port german "Schuko" power plug and can hold the power cables, power adapters etc. for a netbook, an iPhone, a baby phone etc. On the front, there is a space for an iPhone to put in with its display visible and usable. The slot on the left side can hold a netbook and an iPad. On the top of the box you can put more devices with their power adapters dangling out the back of the box. Instructions (Read the whole of these instructions before you start :) ) In the included OpenSCAD file, you can define the thickness ("Holzdicke") of your wood. It prints out the measurements for a wood thickness while rendering. Print those measurements for the thickness you need. Some common wood thicknesses are included below. There are more parameters in that openscad, so you can define the height, width and depth of the box. When changing those parameters, keep in mind that your hardware must fit in there. Visit your local DIY store. Choose a wood you like. The thickness of the wood must be a mm more than the tickness of your phone. Let them cut the wood for you. (Well you can just saw your wood yourself, but hey, I'm lazy :) ) More things to buy at that DIY store: a 3 port power plug small hinges (I used some parts that are meant to hang pictures) some small wooden planks to put in front and back of that iPhone-shaped hole. I used 1cm x 0.5cm and 5cm x 0.5cm wooden planks. wooden plugs and wooden screws. a magnetic door lock (what is the exact name? see photos) Back home, first lay out the different wooden parts to make sure you put everything in the right place. Some hints: on front and the backside of the box, the wood is intentionally lower than on the sides. The idea is to give some ventilation to those power converters and also to put power cables out through the back. The centre wood is less deep than the left and right sides. That way, you can put the power cable for the netbook through the back of the box. Just make sure the fronts of all those wooden parts match up. the right side is 6cm longer, and continues below the bottom wood. On our couch, this holds the box in place. If you can not do that for your box, remove those 6cm from the design. In the openscad file, the front flips downwards. I later opted for hinges on the side. Opening downward would mean the iPhone could fall flat on it's front glass, and we don't want that do we? Drilling some ventilation holes into the side might look great if done well. I did not bother, because I had no ventilation issues. Cut a hole in the bottom plate or the back plate for your power cable going to mains. Cut the iPhone-Shaped hole into the front wood (or any other size to match your phone :) ). Apply the small woods so that the back is closed, and the front holds your phone in place. Drill an extra hole to fit dock connector on the bottom of the phone. if you like, you might use Sugru to hold that thing in place, creating a docking station for your phone. I have not tried that. Now, drill holes into the positions where two woods meet to put some wooden plugs in. Put the woods together and put some screws in there. You probably need to drill holes for the wooden screws too, or the strain might break the wood. Before putting it all together, make sure your 3 plug power cable is in place. Do not fasten the front plate that way. use the hinges instead. Well, that's about it. Put all your power stuff in there. Have fun! P.S: Here are the sizes for some common wood strengths. I used 12mm, and you should not go below that. ECHO: "holzdicke = ", 12 ECHO: "bodenplatteA = ", 216 ECHO: "bodenplatteB = ", 240 ECHO: "deckplatteA = ", 216 ECHO: "deckplatteB = ", 240 ECHO: "seite1A = ", 240 ECHO: "seite1B = ", 300 ECHO: "seite2A = ", 240 ECHO: "seite2B = ", 240 ECHO: "trennwandA = ", 208 ECHO: "trennwandB = ", 216 ECHO: "rueckseiteA = ", 212 ECHO: "rueckseiteB = ", 201.6 ECHO: "vorderseiteA = ", 147 ECHO: "vorderseiteB = ", 201.6 ECHO: "holzdicke = ", 14 ECHO: "bodenplatteA = ", 212 ECHO: "bodenplatteB = ", 240 ECHO: "deckplatteA = ", 212 ECHO: "deckplatteB = ", 240 ECHO: "seite1A = ", 240 ECHO: "seite1B = ", 300 ECHO: "seite2A = ", 240 ECHO: "seite2B = ", 240 ECHO: "trennwandA = ", 206 ECHO: "trennwandB = ", 212 ECHO: "rueckseiteA = ", 208 ECHO: "rueckseiteB = ", 195.2 ECHO: "vorderseiteA = ", 143 ECHO: "vorderseiteB = ", 195.2 ECHO: "holzdicke = ", 14 ECHO: "bodenplatteA = ", 212 ECHO: "bodenplatteB = ", 240 ECHO: "deckplatteA = ", 212 ECHO: "deckplatteB = ", 240 ECHO: "seite1A = ", 240 ECHO: "seite1B = ", 300 ECHO: "seite2A = ", 240 ECHO: "seite2B = ", 240 ECHO: "trennwandA = ", 206 ECHO: "trennwandB = ", 212 ECHO: "rueckseiteA = ", 208 ECHO: "rueckseiteB = ", 195.2 ECHO: "vorderseiteA = ", 143 ECHO: "vorderseiteB = ", 195.2 ECHO: "holzdicke = ", 14 ECHO: "bodenplatteA = ", 212 ECHO: "bodenplatteB = ", 240 ECHO: "deckplatteA = ", 212 ECHO: "deckplatteB = ", 240 ECHO: "seite1A = ", 240 ECHO: "seite1B = ", 300 ECHO: "seite2A = ", 240 ECHO: "seite2B = ", 240 ECHO: "trennwandA = ", 206 ECHO: "trennwandB = ", 212 ECHO: "rueckseiteA = ", 208 ECHO: "rueckseiteB = ", 195.2 ECHO: "vorderseiteA = ", 143 ECHO: "vorderseiteB = ", 195.2 ECHO: "holzdicke = ", 14 ECHO: "bodenplatteA = ", 212 ECHO: "bodenplatteB = ", 240 ECHO: "deckplatteA = ", 212 ECHO: "deckplatteB = ", 240 ECHO: "seite1A = ", 240 ECHO: "seite1B = ", 300 ECHO: "seite2A = ", 240 ECHO: "seite2B = ", 240 ECHO: "trennwandA = ", 206 ECHO: "trennwandB = ", 212 ECHO: "rueckseiteA = ", 208 ECHO: "rueckseiteB = ", 195.2 ECHO: "vorderseiteA = ", 143 ECHO: "vorderseiteB = ", 195.2
With this file you will be able to print Cable box with your 3D printer. Click on the button and save the file on your computer to work, edit or customize your design. You can also find more 3D designs for printers on Cable box.