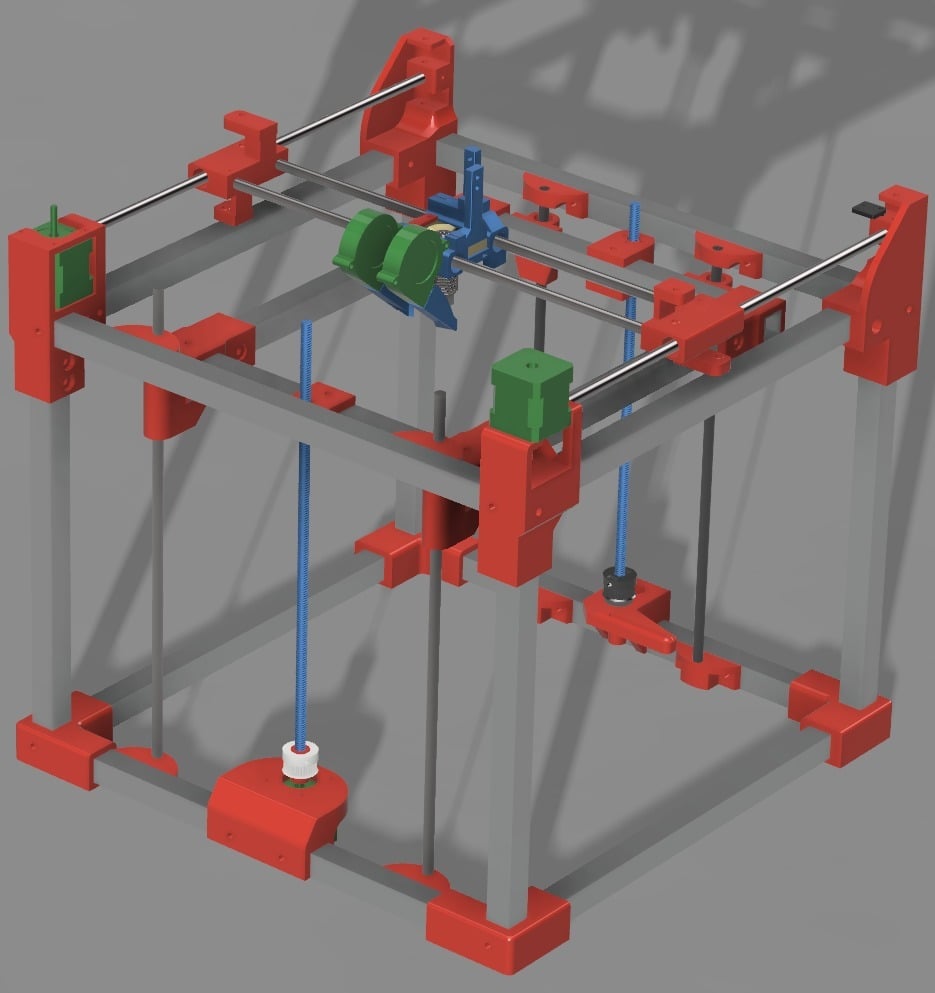
Cake CoreXY 3D Printer
thingiverse
The printer is strategically named; now, when your girlfriend/wife asks what you are doing buried in the garage all day long, you can shamelessly declare that you are making a cake. Bonus points if you actually get her a real cake afterwards. I have been using several variations of the printer with exceptional results and decided to share the design publicly. I designed the printer with ease of assembly/disassembly, versatility, and robustness in mind, allowing for solid high-speed printing and very easy maintenance/upgrades. I provide standard STL files for all parts, as well as the Fusion 360 files for anyone who would like to remix/add something. The STL files are compressed into groups, in order to minimize confusions due to the very large number of files. A few parts of the printer, such as the recommended spool holder, are remixed parts from other people’s excellent works. I also provide Excel calculators that quickly assess the size of each extrusion/rod/lead screw depending on the wanted print surface. The printer is based on Slot 6 2020 profiles, which are dirt-cheap (less than 3.5€ per meter in the EU) and very versatile, but Slot-V or other 2020 extrusions (or even rectangular pipes) can also be used. It also has a relatively small footprint, providing a good print area in restricted/tight spaces. As I have been developing the design for some time and built several different printers, I developed several versions of certain parts. You can mix & match most of them to match your needs. Some of these are: • Top/Gantry parts for either 6 mm or 10 mm GT2 belts. The pulleys should always have a bore of 5 mm (or you can adjust the holes to fit smaller screws). The “inversed” X gantry parts are for those who like to twist the gantry belts and use toothless idlers everywhere. • Gantry parts for 10 mm rods. Recommended for designs longer than 400 mm. Only the Y Gantry parts change, the X Gantry parts remain the same (unless they are redesigned, only printed bearings will fit the X Gantry with 10 mm rods). • Rear bed parts with and without additional support rods. Lightweight beds do not really require rear support rods. In case you want to add them later, the standard parts can be seamlessly added in the future without having to remove anything from the printer. If you will not use glass or other heavy materials, skipping the rear lead screw completely too is not inconceivable, although not recommended for bed larger than 220 × 220 mm. An alternative part integrates LM8UU bearings on the rear bed supports for those determined to use rear supports from day one. • There are parts for additional frame braces. Each brace requires either two 45° parts or one 30° plus one 60° part, plus an extrusion about 200 mm long. These are not really needed for the standard 300 × 300 × 250 mm design but may be useful to people building larger/taller printers and/or wanting to play with extreme acceleration/jerk settings. There are two sets of gantry parts: one is the “Standard” gantry with a center-mounted hotend and the other is the “Front Facing” gantry with a front-mounted hotend. The Standard gantry is much more stable than the front-facing gantry but the latter increases the build volume by approximately 10 mm in all directions and allows for the use of 40mm cooling fans. Nevertheless, I recommend using the standard gantry for any build larger than 250×250mm. Here are two videos, one for each gantry, with the printer in action: (<a href="https://youtu.be/1gBLKaRI3tY" target="_blank">Cake Front Facing Gantry Printing at 100mm/s</a>) (<a href="https://youtu.be/XwdT9DOLzU0" target="_blank">Cake Standard Gantry Printing at 160mm/s</a>) I provide two electronics enclosures, one that fits the recommended PSU/relay/board all-in-one and one that fits the PSU/relay and leaves the motherboard to be mounted elsewhere. You can also go with a control box, such as <a href="https://www.thingiverse.com/thing:2820320" target="_blank">this one</a>, or use parts from other people’s standalone kits – most will fit on the 2020 profile with ease. I also provide designs for printed bearings. The printed bearings require 2 mm OD PTFE tubes to be cut and inserted into the bearing slots (5 slots per bearing). Simply place half the bearing onto the rod, insert the tubes, the push it all the way on and the PTFE tubes will lock into place. These bearings are more reliable than cheap metal bearings and also silent. You can either print the supplied STL files as-is, they mimic normal LM8UU bearings, or expand them to the length of the printed parts. Building the printer should be relatively straightforward. Two things that I need to point out are that you must install the pulleys before assembling the frame (screws that are inserted from the bottom up will be obstructed by the frame), and that the front printed Z axis pulley goes over the 14 mm Z-coupler and shares the same M4 screws as well. Note that the printed Z-axis pulleys should be a perfect fit for a printer with a 320 mm Y-axis without having to use a tensioner. Reducing the Y-axis size may require larger pulleys or using an idler attached to the alternative rear tensioner. Increasing the Y-axis will require a longer closed-loop belt or mirroring the front parts to the rear and using a second Z motor (the bed extrusions will have to be shortened by about 10 mm). I strongly recommend avoiding the use of a second motor and choosing a closed-loop belt – the belt will tether both sides of the bed and force alignment, it will never shift. The larger holes at the center of the base parts are for M6 screws that will tap into the extrusion for additional support. Feet can also be attached there. Similar holes can be found on the top parts, allowing the routing of cables from the inside of the extrusion, or for securing other parts (such as an enclosure side panel). Finally, I am uploading a couple of variations of the Marlin 2.0 firmware for MKS Gen L and SKR v1.3 motherboards. They will still need adjustments depending on the specifics of each exact build but, hopefully, will save you some time over the details. A mini version of the printer is also available (<a href="https://www.thingiverse.com/thing:3676616" target="_blank">here</a>), for designs up to 150 × 150 × 150 mm. The printed parts require about 1 kg of filament and the frame can be built with extrusions that cost less than 20€. It is limited to 34 mm NEMA 17 motors and will work fine with even 24 mm motors. The small printer should cost about 100-120€ and is a real workhorse (well, a pony-sized workhorse). <i>*The following does not apply if the standard gantry is used.</i> The split X front-facing gantry works as a tensioner. Simply attach the belts on each side with the long screws just grabbing the nuts, then tighten the screws and the gantry will tension the belts. Careful not to overdo it. Make sure to insert all of the nuts on the gantry before tightening it. This gantry requires the following extra parts: • Two M4 60 mm screws plus two M4 nuts for the X gantry. • Two M3 50/60 mm screws for the X gantry/front fan. • Four M3 30 mm screws for the front fan. • A 40×40×25 mm fan.
With this file you will be able to print Cake CoreXY 3D Printer with your 3D printer. Click on the button and save the file on your computer to work, edit or customize your design. You can also find more 3D designs for printers on Cake CoreXY 3D Printer.