CALC-PAD | Hand-wired keyboard for math symbols in the Desmos Graphing Calculator
thingiverse
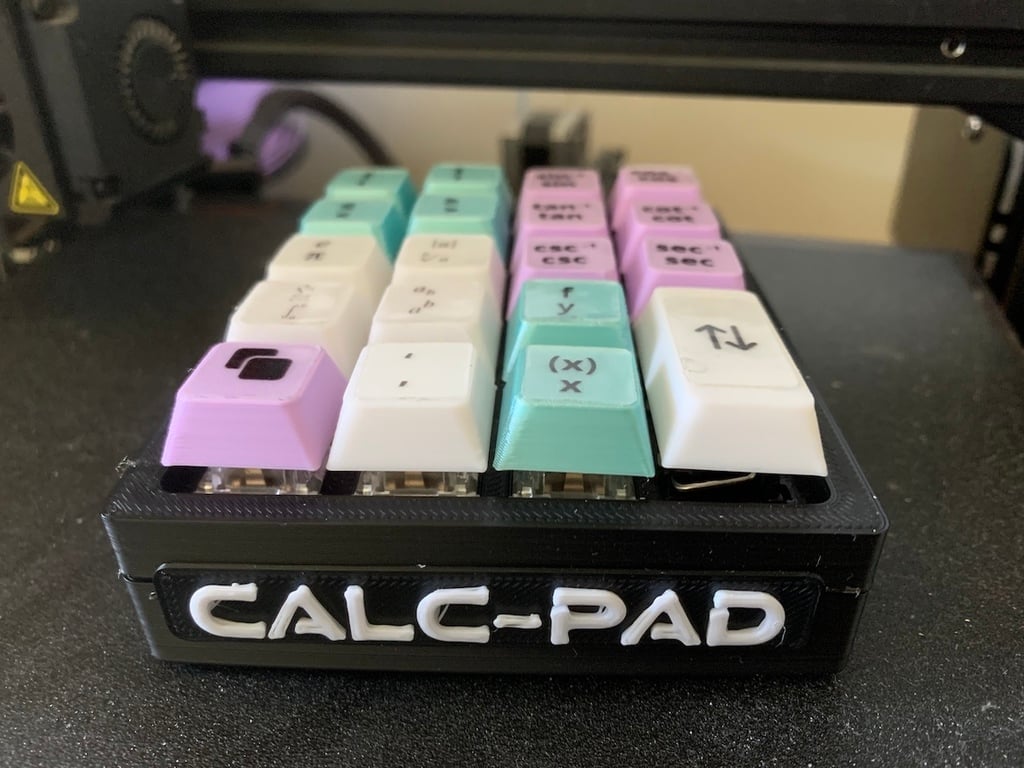
This is a macro designed for the [Desmos Graphing Calculator](https://www.prusaprinters.org/www.desmos.com/calculator)! It works on a computer or iPhone! I made one as a gift for my calculus teacher :) Press and hold any key to repeat quickly. Press the “Swap” key once to switch to the second layer. It will stay on the second layer until you press it again. For the bottom left-most key, you can choose either the square brackets or the “duplicate” function. To use the "duplicate" function, you need to have the free [DesModder](https://chrome.google.com/webstore/detail/desmodder-for-desmos/eclmfdfimjhkmjglgdldedokjaemjfjp) Chrome extension installed. Also see my [ARITH-PAD](https://www.prusaprinters.org/prints/150162-arith-pad) for an upgraded num-pad. **READ THESE NOTES:** Everything prints without supports! It is possible the files will import into the slicing software with a tiny scale. If so, make the scale 1000%. The “Both” version has a spot to insert the lightning adapter when you want to use it with your iPhone, but the adapter must be removed when you want to use the micro USB port to connect to a computer for some reason. There is a hole at the bottom to help pop off the adapter when not in use. The “Phone” version is actually untested because I haven't made one only for phone yet, but you basically just chain up in one line: Arduino Micro → Micro USB adapter → Lightning adapter and glue it all inside the box. The “Combinable” version has an extra port with 5 pins. Sometime later, I will post an adapter that can combine multiple of my keyboard designs if you want to use them at the same time on a phone for some reason? All the parts needed were ordered on Amazon. See below. **Parts List:** Print x1 "Upper" Print x1 “Lower” (choose either usable by phone, computer, or both) Print x18 “Keycap” (different colors are nice!) Print x1 “Large Keycap” x1 [Arduino Pro Micro](https://www.amazon.com/dp/B08BJNV1J3/?tag=emeraldheart) (I just get a cheap off-brand, they work fine) x19 [Cherry MX Keyswitches](https://www.amazon.com/dp/B07K57V3TJ/?tag=emeraldheart) (cheaper if you buy more at a time) x19 [220Ω Resistors](https://www.amazon.com/dp/B0185FID0K/?tag=emeraldheart) x1 Micro USB cable (for flashing, make sure it can do data transfer and isn't just a power cable! I wasted a couple hours with this stupid mistake) x1 6.25u [Costar Style stabilizer](https://www.amazon.com/dp/B07K8HP6KC/?tag=emeraldheart) (this is a multi-pack that also includes a longer one for space-bar which you don't need for this project) Additional parts for Phone-Only version: x1 [Lightning Adapter](https://www.amazon.com/dp/B09NND4R8N/?tag=emeraldheart) x1 Micro USB Adapter Additional parts for Both version: x1 [Micro USB cable extender](https://www.amazon.com/dp/B071NR19BQ/?tag=emeraldheart) (will be cut in half) x1 [Lightning Adapter](https://www.amazon.com/dp/B09NND4R8N/?tag=emeraldheart) x1 Micro USB cable (you need an additional one besides the one for flashing because this will be cut in half) Additional parts for Combinable: x5 [Male-to-Female Dupont wires](https://www.amazon.com/dp/B07GD2869Z/?tag=emeraldheart) (will be cut in half and using the female side) **Instructions for Assembly:** 1. Use the Arduino IDE to upload the code to the Arduino Micro. 2. Pop in the keyswitches. Make sure they are in the right orientation! 3. Follow the wiring diagram (at the end of the photo gallery) to solder the resistors and wires across the keyswitches. 4. Solder the wires to the Arduino Micro. 5. If doing the “Both” or “Combinable” version, cut up cables and solder any extra connections needed. (it looks like an absolute mess inside lol) 6. TEST IT OUT BEFORE SEALING (VERY IMPORTANT) 7. Glue the Upper and Lower together! (May require some force to push down) 8. I made the key labels by inkjet printing on clear vinyl sticker and cutting them out (as best as I can) with scissors. They are double-layered to prevent rubbing off.
With this file you will be able to print CALC-PAD | Hand-wired keyboard for math symbols in the Desmos Graphing Calculator with your 3D printer. Click on the button and save the file on your computer to work, edit or customize your design. You can also find more 3D designs for printers on CALC-PAD | Hand-wired keyboard for math symbols in the Desmos Graphing Calculator.