Calculus as never touched before
thingiverse
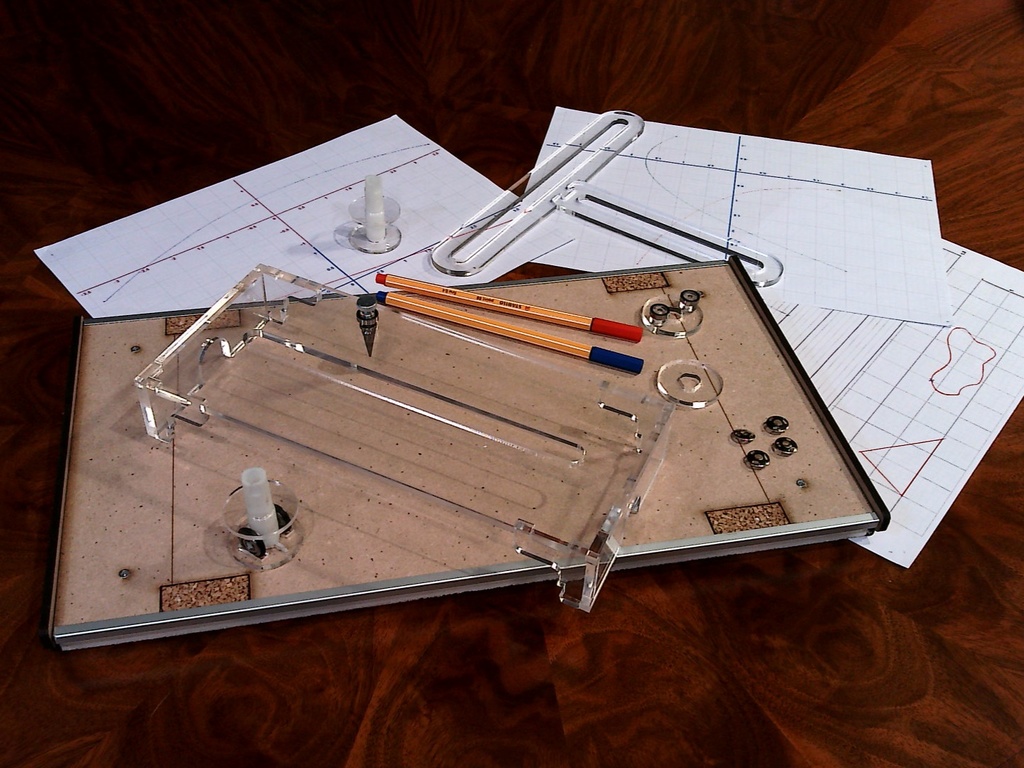
<h1> Calculus as never <i>touched</i> before </h1> We introduce a prototype of a patent-pending geometric-mechanical device for the popularization and the teaching of calculus through hands-on activities. For further information or to buy the already assembled machine, visit <a href="https://www.machines4math.com">www.machines4math.com</a> or write to <a href="mailto:info%40machines4math.com">info@machines4math.com</a> <h3>Materials needed</h3> The proposed device requires 3D printing (we used resin) and laser cutting (of plexiglass and MDF). For the laser cutting you need: <ul> <li>MDF sheet, thickness 4mm;</li> <li>extruded plexiglass, thickness 3mm;</li> <li>extruded plexiglass, thickness 5mm.</li> </ul> Furthermore, you also need: <ul> <li>2 aluminium u-profiles 6x6x1, each one of length 400mm (you can cut them from something like <a href="https://www.tecnomat.it/profilo-u-all-arg-sat-6x6x1mm-1m-10026483"> this one</a>)</li> <li>3 deep groove ball bearings 8x12x3.5 (like <a href="https://www.amazon.it/cuscinetti-pattinaggio-attrezzature-domestiche-industriali/dp/B09FYTXB5P"> these ones</a>)</li> <li>2 u-grooved ball bearings 4x13x4 (like <a href="https://www.amazon.it/gp/product/B07V7Y1VVT"> these ones</a>) </li> <li>2 o-rings 8.9x2.7 (like <a href="https://www.tecnomat.it/it/guarnizioni-o-ring-o8-9x2-7-10pz-10010695/"> these ones</a>) </li> <li>1 spike rivet (like the long ones <a href="https://www.amazon.it/dp/B08N5ZNKW6">here</a>) <li>1 M3 knurled screw (like one of <a href="https://www.amazon.it/OKBY-zigrinata-100Pcs-Impugnatura-Regolabile-12%EF%BC%88100pcs%EF%BC%89/dp/B08GCDBH8D">these ones</a>)</li> <li>8 countersunk wood screws 2.5x10 (like <a href="https://www.amazon.co.uk/2-5mm-Small-Steel-Countersunk-Screws/dp/B07T7WP945">these ones</a>) </li> <li>5 adhesive bumpers (like <a href="https://www.tecnomat.it/it/gom-tak-13mm-nero-20pz-10022025">these ones</a>)</li> <li>4 pieces of cork, thickness 4mm (like <a href="https://www.amazon.co.uk/Boulder-Developments-Tiles-Natural-coverage/dp/B00FPKV5Q8">these ones</a>) cut to size 20x40 (= 2cm x 4cm)</li> <li>4 thumbtacks (like <a href="https://shop.buffetti.it/puntine-a-3-punte-acciaio.html">these ones</a>)</li> <li>1 piece of plywood, thickness 15mm (like <a href="https://www.tecnomat.it/comp-fenolico-conif-spes-15mm-244x122-cm-10045182">this one</a>) cut to size 210x400 (= 21cm x 40cm)</li> </ul> To conclude, you need glue for the plexiglass (e.g. <a href="https://www.amazon.it/colla-Plexiglas%C2%AE-ACRIFIX%C2%AE-acrilico-grammo/dp/B00G0WREIS">this one</a>) and, to use the machine, some A4-size paper sheets (print the attached .SVG files, whose previews are also visible as images) and at least one fineliner (like <a href="https://www.amazon.it/STABILO-memorycity-8810-46-point-swvpp/dp/B01BCE27BC"> these ones</a>). Note: dimensions are in metric system (in millimeters, <i>mm</i>) and the model adopt A4-size paper sheets (not US-letter). <h3>Assembly instructions</h3> For the 3d printing, we used white resin for both "pointer" and "pointer+wheels". Concerning laser cutting, the .dxf files are named by the material. Beware that, for the MDF, there are also some engravings, as represented in one of the images. Concerning the 3mm and 5mm plexiglass laser cutting, we are going to adopt the notation introduced in the relative images. We divide the instructions into different steps: the construction of the base, the plexiglass box, the pointers, and the general assembly. <h5>The base</h5> Fix the two aluminum u-profiles on the long sides of the large MDF base (if necessary, use a rubber hammer and put some glue to fix them). Put the 4 pieces of cork in the suitable spaces cut from the MDF base. Align the plywood with the aluminum guides and fix it to the MDF base by inserting 4 woodscrews in the 4 holes. Put the remaining two MDF bars along the short sides of the base, and fix them with 4 woodscrews using the holes. On the bottom face of the plywood, put adhesive bumpers in the 4 corners and in the center. <h5>The plexiglass box</h5> The components of the 5mm plexiglass box are visible in one of the images. After assembling, you have to glue the pieces together. Insert the "5mm small disk" into one of the deep groove ball bearings. Fix these pieces on the upper side of the box by putting the knurled screw in the box hole and screwing it in the spike rivet on the lower side of the box. <h5>The pointers</h5> Insert each o-ring in one of the u-grooved ball bearings, and fix them in the axis of the 3d-printed "pointer+wheels". On the bottom, insert the "3mm unregular disk," and on the top insert one of the "3mm disks" until it is firmly stopped. Similarly, put the other two "3mm disks" on the bottom and the top of the 3d-printed "pointer." Then we have to construct the cap for "pointer+wheels." By using an M2 screw (or a rod) to align the little holes, glue the "wheel cap" with the two "5mm medium disks" and the latter with the "3mm small disks." Finally, fix the deep groove ball bearing outside the "3mm small disks." For all the steps of these constructions, put some glue if necessary. <h5>General assembly</h5> The cork rectangles are useful to fix an A4 paper sheet thanks to thumbtacks. Some suggestions of images to be printed on the sheets are provided as SVG files. Specifically, we can consider three different scenarios of assembling. For the tangent concept, we need a white A4 sheet, the two pointers with their caps, and the short guide. To make the guide touch the ball bearings of the wheel cap (e.g., to trace the tractrix), one needs to put the "5mm disks" before the short guide. For the exponential, we need the wheeled pointer with its cap, the plexiglass box, and the long guide. In this configuration, the direction of the wheels can be set parallel or perpendicular to the long guide, in order to trace respectively exponentials and parabolas. The sheet-to-be printed is "1reference_frame.svg" For the fundamental theorem of calculus, one needs both the pointers (and their caps) and the plexiglass box. Furthermore, one needs both guides assembled together to make a T-shape. In this case, one can print "2reference_frames.svg" to have the Cartesian coordinates of derivatives and antiderivatives. To solve the area problem without reference frames one can print "area_solver.svg." In these cases, fineliners can be put in a pointer to make the machine trace a curve. Fineliners can also be used to trace curves to be followed by a free pointer (in the case of the fundamental theorem of calculus).
With this file you will be able to print Calculus as never touched before with your 3D printer. Click on the button and save the file on your computer to work, edit or customize your design. You can also find more 3D designs for printers on Calculus as never touched before.