Calibrate your printer x,y,z and e quickly and easily.
thingiverse
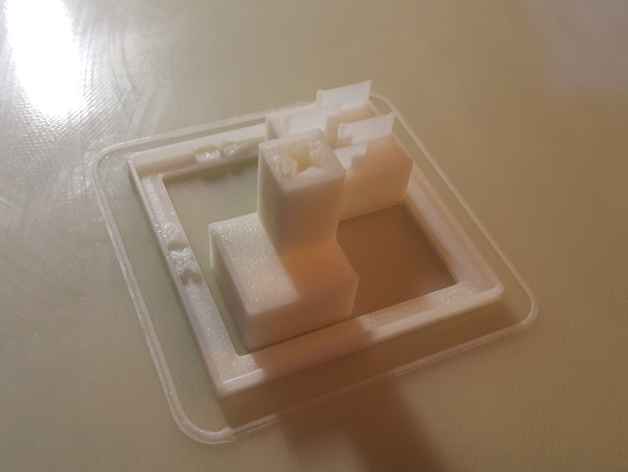
OKAY SO WE'VE ALL COME ACROSS TRIFFID HUNTER'S GUIDE, WHICH IS A VERY USEFUL MODEL FOR CALIBRATING YOUR REPRAP. HOWEVER I WANTED SOMETHING A LITTLE MORE ACCURATE AND ABLE TO DO E-STEPS FINE TUNING MORE EASILY. SO THIS OBJECT CAN BE USED FOR X AND Y CALIBRATION. ITS 50MM X 50MM SO LARGER AND MORE ACCURATE FOR ADJUSTING X AND Y STEPS/MM THAN THE TYPICAL 20MMX20MM CUBE. Z IS ONLY 10MM IN THE STANDARD VERSION TO MAKE IT QUICKER TO PRINT, BUT I HAVE INCLUDED A VERSION WITH A TOWER TO 25MM FOR Z CALIBRATION ALSO. THE NEXT PART IS E-STEPS. TRIFFID HUNTER'S GUIDE RECOMMENDS PRINTING AN OBJECT WITH 95% INFILL AND ADJUSTING ESTEPS OR FLOW ON THE FLY TO THE POINT WHERE LITTLE GAPS APPEAR BETWEEN INFILL LINES. THIS HOWEVER ONLY SETS ONE END OF THE FINE TUNING RANGE FOR ESTEPS. SET INFILL IN YOUR SLICER TO 15% RECTILINEAR SO IT CAN EASILY BE SEEN. THEN USING SLIC3R "SPLIT" THE MODEL. THE SMALLER CUBE CAN THEN BE ASSIGNED CUSTOM PARAMETERS (RIGHT CLICK AND PICK SETTINGS FOR THE SMALLER CUBE) ASSIGN INFILL_DENSITY 95%. NOW PRINT IT, ONE CUBE WILL PRINT LIGHTLY INFILLED SO YOU CAN EASILY SEE IF THE INFILL IS STRINGY AND INCREASE FLOW/ESTEPS THE OTHER WILL PRINT DENSE, BUT NOT COMPLETE, INFILL SO YOU CAN REDUCE ESTEPPS/FLOW IF YOU CANNOT SEE TINY GAPS BETWEEN INFILL LINES. IN THIS WAY YOU ARRIVE AT THE MID POINT BETWEEN SLIGHTLY-UNDER AND SLIGHTLY-OVER EXTRUDING. AS PER TRIFFID HUNTER'S GUIDE DON'T START ADJUSTING UNTIL YOU GET TO LAYER 5 OR 6 AS THE AMOUNT OF SQUASH ON YOUR FIRST LAYER AFFECTS THE LAYER HEIGHT TOO MUCH UNTIL THAT POINT. A GOOD POINT TO BEGIN TO ADJUST THE FLOW/ESTEPS IS ONCE THE OUTER 50X50MM WALL HAS FINISHED AND THE PRINTER IS JUST PRINTING THE TWO CUBES, THIS IS AROUND Z=3MM. I HAVE ALSO INCLUDED A SET OF THIN WALLS. THEY ARE 0.3MM, 0.4MM, 0.5MM AND 0.6MM. SLIC3R PRINTS THESE ALL AT 0.4MM WITH MY 0.4MM NOZZLE BUT GAPS IN THESE WALLS INDICATES SLIGHT UNDER-EXTRUSION. THE A AND B MARKINGS ARE FOR COREXY PRINTERS, THE MODEL IS ROTATED 45 DEG SO BELT TENSION CAN BE DIFFERENTIALLY ADJUSTED (THIS CAN BE AVOIDED IF YOU ARE USING A BALANCED BELT TENSION CARRIAGE LIKE THIS ONE AND YOUR TWO COREXY BELTS ARE EXACTLY EQUAL IN LENGTH). I HAVE WRITTEN A GUIDE TO EASILY ADJUSTING X VERSUS Y HERE ON REPRAP OR USE THIS GUIDE IF IT MAKES MORE SENSE TO YOU. THE VERSION WITH THE Z TOWER ONLY REQUIRES AROUND 6.5G OF PLASTIC (ABS) AND TAKES AROUND 50 MINUTES TO PRINT AT 50MM/S AVG PRINT SPEED.
With this file you will be able to print Calibrate your printer x,y,z and e quickly and easily. with your 3D printer. Click on the button and save the file on your computer to work, edit or customize your design. You can also find more 3D designs for printers on Calibrate your printer x,y,z and e quickly and easily..