Calibration cube box by HodgerTech
thingiverse
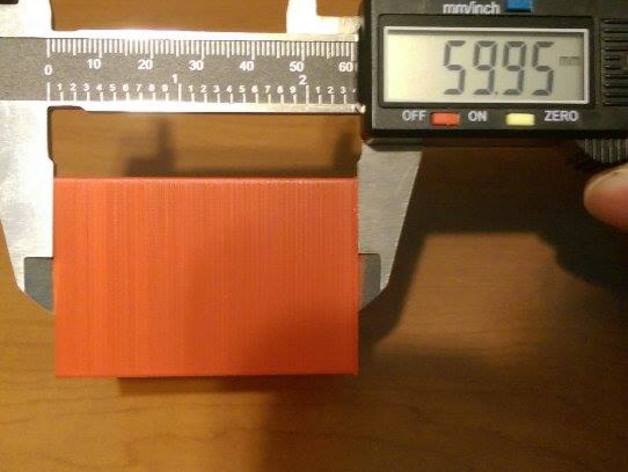
INTRODUCTION!!!! If problems with distortion in dimension persist in your prints or parts are not coming out in proportion, it's possible that recalibrating your axis in the x, y, or z direction is necessary. I designed this method for personal use and have seen positive results as shown in the pictures. Hopefully, others will find it easier to achieve great dimensional accuracy with their printers using this approach. THE METHOD? 1) Measure the nozzle's plastic extrusion with a caliper. 2a) To calibrate the z-axis, import the z-axis rectangle file into your slicer along with the nozzle size. OR 2b) To calibrate the x or y axis, import the 60mm test box into your slicer according to the closest nozzle size. 3) Set layer height to .2mm layers as these files are designed specifically for this setting. 4) Slice and print the file. 5) Remove from print bed and measure the desired axis in question. 6) Go into the Excel document and input measurements accordingly. 7) Repeat steps 2-5 until the axis is within desired parameters, if not, then print again. WHATS IN THE EXCEL DOCUMENT? The attached Excel document utilizes formulas for making estimates of steps and the third chart refines these steps to achieve maximum accuracy possible. HOW TO USE? There are approximately 20 STL files available to make life easier. As a 3D printer owner, you may have different nozzle types for various applications. STL files support .1mm to .6mm measurements based on output plastic from your nozzle or firmware settings. NOZZLE TYPES? The end of file names indicates the size of the nozzle the STL file is made for. For example, if you use a .46mm nozzle, use the .45mm file! DIMENSIONS FOR THE STL FILES 1) The 60mm test box is 14mm high and 60mm in x and y coordinates. 2) The z-axis rectangle test is 60mm high and 40mm in x and y coordinates. I hope this helps! Any suggestions for improvement are welcome.
With this file you will be able to print Calibration cube box by HodgerTech with your 3D printer. Click on the button and save the file on your computer to work, edit or customize your design. You can also find more 3D designs for printers on Calibration cube box by HodgerTech.