Caliburn Display Rack: Shelf-Mounted Clamp-On Brackets
thingiverse
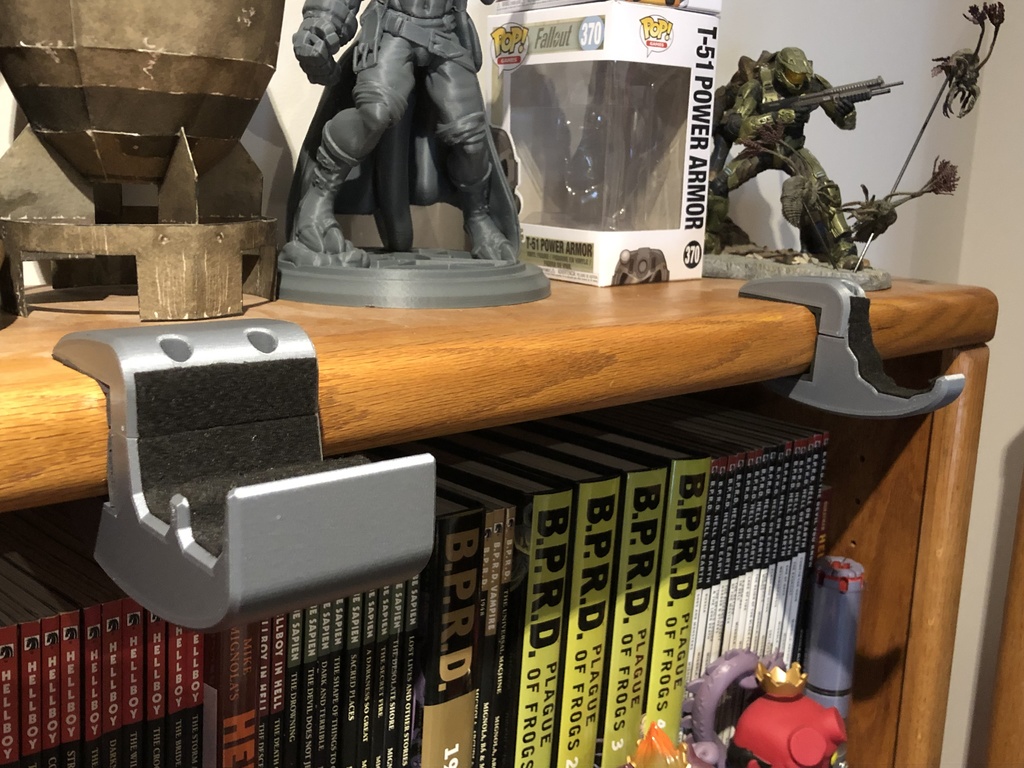
Shelf-Mounted Clamp-On Caliburn Rack Display your custom Caliburn Nerf blaster for all to see with these easy-to-install shelf-mount brackets, designed to cradle your tool of foam-laden destruction in both the upright and horizontal positions. There are two bracket types: one for shelves with flat edges and another for shelves with a 90-degree overhang at the edge. For the latter, the brackets accommodate a 20mm or less thick overhang. The front bracket also comes in thick and shallow versions for both types. INSTALLATION: What you will need: * 3 x 40mm M5 screws (head diameter is 8.6mm or less) * 3 x M5 nuts (diameter is 8.75mm or less) * Screwdriver * 2mm-thick adhesive-backed foam-rubber sheet (Optional - find at hardware and craft stores) * 1.5mm-2mm-thick adhesive-backed felt sheet (Optional - find at craft stores) 1. Optional - The brackets work best when they can grip the shelf, so it's advised to stick strips or patches of foam-rubber sheet on all of the brackets' surfaces that will be contacting the shelf. This also helps protect the shelf itself from scratches. 2. Optional - Stick strips or patches of felt on the surfaces of each bracket's cradle area where your Caliburn will sit. You could use the foam-rubbing for this, but foam-rubber may eventually peel up as it returns to its original flat shape, hence felt is the better choice as it's soft and flimsy and will remain in the cradle without peeling. 3. Attach each nut onto the very end of a screw and then press one nut into each of the three hexagonal holes on the brackets' undersides. When the nuts sit flat against the insides of the holes, unscrew the screws, leaving the nuts in place. 4. Slot the top of either bracket into the bottom and position both on the edge of the shelf. 5. Drop the screws through the top holes and screw them in just enough to catch the nuts such that the two halves of either bracket are loose but don't fall apart. 6. Slide the loose brackets into position on the edge of the shelf, with the larger bracket between your Caliburn's magwell and foregrip, and the smaller bracket immediately behind the grip. 7. Tighten the screws until snug and the brackets grip the shelf. 8. Place your Caliburn in the brackets for display. NOTE: If your shelf is too thin for the brackets to clamp onto, try placing slats of wood or other material between the underside of the shelf and the lower bracket. Be sure to insert some foam-rubber between both the shelf-and-slats and the slats-and-bracket.
With this file you will be able to print Caliburn Display Rack: Shelf-Mounted Clamp-On Brackets with your 3D printer. Click on the button and save the file on your computer to work, edit or customize your design. You can also find more 3D designs for printers on Caliburn Display Rack: Shelf-Mounted Clamp-On Brackets.