Calliope mini case
prusaprinters
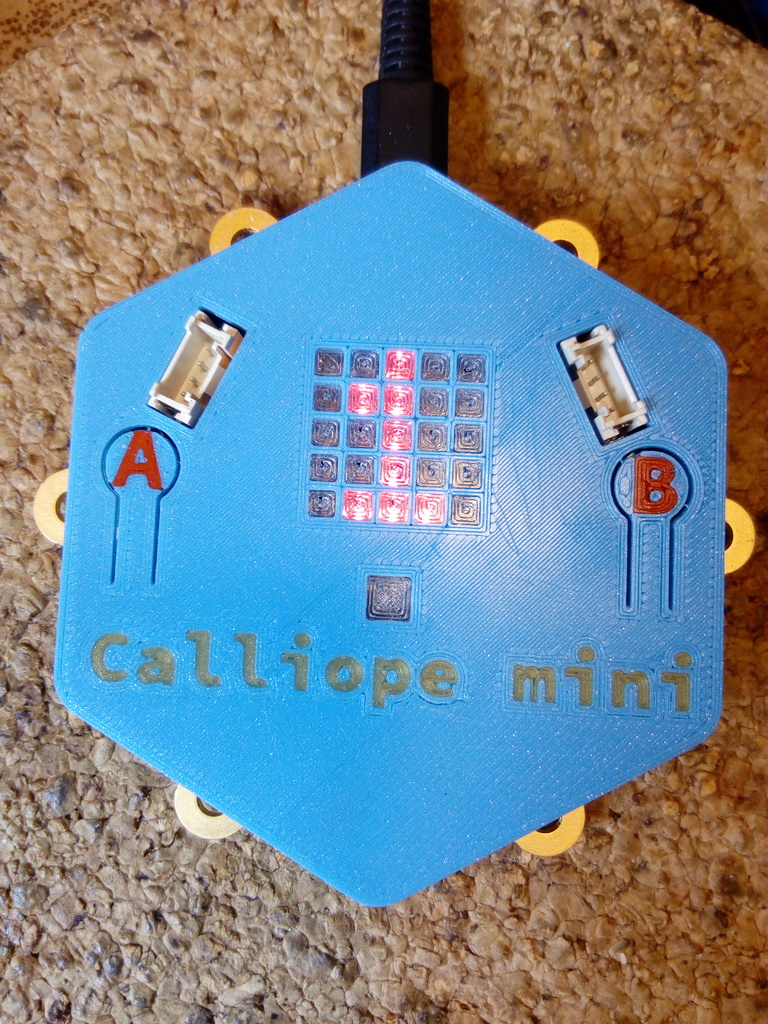
<p>(Deutsche Beschreibung unten)</p> <p>This is a case for the Calliope mini one-board-computer planned to be used in German primary schools. ( <a href="http://calliope.cc/en">http://calliope.cc/en</a> )</p> <p>I wanted a case that can stay on the Calliope permanently, but leave the pads etc. exposed for experimenting.</p> <p>Its currently basically done, but there are some todos:</p> <ul> <li>add hole above the reset switch</li> <li><p>maybe rework the peg/hole thing used to hold the 2 halves together. Hier ist eine Hülle für den Calliope mini Ein-Platinen-Computer, der ab 2017 als Pilotprojekt in deutschen Grundschulen eingesetzt werden soll. ( <a href="http://calliope.cc/">http://calliope.cc/</a> )</p> <p>Ich wollte eine Hüllle die Zugriff auf Kontaktflächen etc. lässt, aber nicht ständig abgenommen werden muss.</p> <p>Das Model ist soweit fertig, und funktioniert, aber es gibt noch ein paar Dinge auf der ToDo Liste:</p> </li> <li><p>Ein Loch für einfacheren zugang zum Reset-Knopf</p> </li> <li>Vielleicht ein anderer Mechanismus um die beiden Hälften zusammen zu halten.<h3>Print Settings</h3> </li> </ul> <p><strong>Printer Brand:</strong></p> <p>Prusa</p> <p><strong>Printer:</strong></p> <p>i3 MK2 MMU</p> <p><strong>Rafts:</strong></p> <p>No</p> <p><strong>Supports:</strong></p> <p>No</p> <p><strong>Resolution:</strong></p> <p>0.2</p> <p><strong>Notes:</strong></p> <p>For a standard print, you only need main_upper_body.stl and calliope_bottom.stl</p> <p>You need to flip the calliope_top.stl 180 degrees for printing without supports and for a smooth surface finish.</p> <p>The main_upper_body_with_letters.stl has the button and logo embossed into the surface, usefull for printing the first 2 layers with a different color than the rest of the top, to get a multicolor effect on the lettering, or to fill it later with color by hand.</p> <p>This Model includes optional files for multicolor prints:</p> <ul> <li>letter_b.stl, lettter_a.stl, logo.stl - Button lettering and Logo</li> <li>transparent_covers_single.stl - Single transparent cover for RGB led </li> <li><p>transparent_covers.stl - Transparent covers for led matrix If you have a dual or more material printer, you can add the A/B/logo/cover files as modifier meshes to the calliope_top.stl in your slicer, and assign different colors/extruders to them.<br/> The transparent covers are meant to be printed in transparent or translucent plastic, see picture.<br/> (tested in Slic3r Prusa Edition, printed with Prusa MK2 with MMU)</p> <p>Für einen normalen 3d-Drucker werden nur main_upper_body.stl und calliope_bottom.stl gebraucht.<br/> Das main_upper_body.stl Model muss vor dem Druck um 180 Grad gedreht werden, um eine glatte Oberfläche zu bekommen, und da ansonsten unnötiges Support-Material benutzt werden müsste.</p> <p>Die Datei main_upper_body_with_letters.stl enthällt die Beschriftung als "Gravur" und eignet sich gut um die ersten beiden Layer mit einer anderen Farbe zu drucken als den Rest. das gibt der Schrift eine andere Farbe als der Oberfläche, ohne das man einen Multimaterial Drucker haben muss.<br/> Oder man füllt die Gravur nach dem Druck von hand mit Farbe (Geschmolzene Wachsmalstifte z.b.)</p> <p>Dieses Model beinhaltet optionale STLs für multicolor/mutimaterial Drucker:</p> </li> <li><p>letter_b.stl, lettter_a.stl, logo.stl - Button lettering und Logo</p> </li> <li>transparent_covers_single.stl - transparentes cover für RGB led </li> <li><p>transparent_covers.stl - transparentes cover für led matrix Die A/B/logo Dateien können im Slicer als "modifier meshes" verwendet werden, und diesen können dann verschiedene Farben zugeordnet werden.</p> <p>Die 'transparent_cover*' dateien sind zum Druck mit transparentem Plastik gedacht, und dienen als Diffusor für die Leds.</p> <p>(getested in Slic3r Prusa Edition, gedruckt mit Prusa MK2 mit MMU)</p> <h3>Post-Printing</h3> </li> </ul> <p><strong>Join case halves</strong></p> <p>To get the top and bottom half to merge well, you might have to sand the "pegs" or drill out the holes a little.</p> <p>I had to use a file on 2 pegs to get them to fit, but don't overdo it, the pegs need to be stuck inside the holes at least a little.</p> <p>Damit die beiden Hälften zusammenpassen, müssen gegebenenfalls die "Stecker" oder die Löcher angepasst werden.</p> <p>In meinem fall musste ich zwei "Stecker" mit leicht einer Feile bearbeiten. Schmirgelpapier wird auch funktionieren, oder das Loch mit einem Bohrer leicht weiten.<br/> Die Stecker sollten fest in den Löchern halten, damit der Deckel nicht abfallen kann.</p> Category: Electronics
With this file you will be able to print Calliope mini case with your 3D printer. Click on the button and save the file on your computer to work, edit or customize your design. You can also find more 3D designs for printers on Calliope mini case.