Cameleon Rodpod
thingiverse
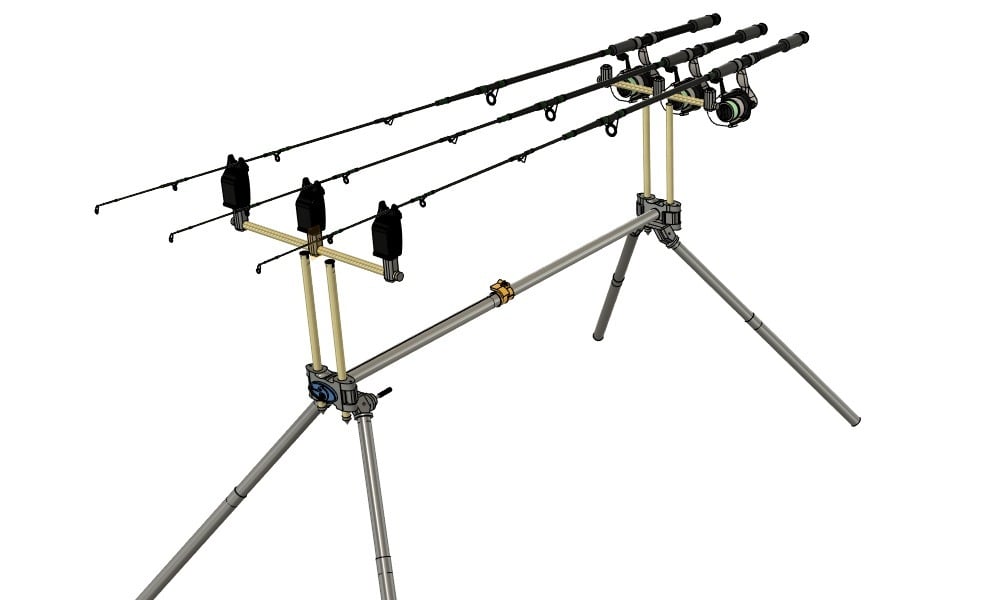
I didn’t want to buy a rod pod,So I did what I do best.I designed my own and I think it came out quite well.Why Cameleon you ask,Wel it can be printed in any color you like,or remixed and matched or even hydro dipped,just like a Cameleon any color works. I will be sharing the design file,So feel free to edit and change as you see fit,Also If you do make one,Please post your makes,videos and remixes.Depending on your machine you might need to change orientation and add supports to certain parts when printing.I used ABS Filament for the project so it can be acetone vapor smoothed for strenght. The basic structure is comprised of 3D printed parts and curtain poles,the brass/steel kind and a few nuts and bolts. Where I live we have a few sizes curtain poles ,the 16mm,25mm and 28mm is what I had in my garage,so lets go with that.I tried to add my printing times and photos as it went along. The buzzbar mounts need to be glued after drilling the bottom holes for the bottom threads and the 3/8 inch Tapped riv nut is inserted,it then gets epoxy'd to the 420mm buzz bar pole,I found that adding the alarm to the rivnut first before glueing it helped with the direction of the alarm. Here is a vid of my progress before i epoxy everything in place https://youtu.be/u4NBuI4MHX4 all that is left to redo is the main clamplever(i dont like the current design) and the legCaps borrowed dropper parts from https://www.thingiverse.com/thing:4781675 The latest copy of the design can be downloaded here https://a360.co/33kBTX1 Printed Parts 2 x Main endcaps Front and back(1 took 8:37:52 to print) 4 x levers +-2hrs 4 x pressure plates+- 1hr 4 x Endcaps +-1hr 4 x buzzbar endcaps 4 x Legmounts( (8 if you are planning on adding additional longer or shorter legs)(1 took 0:54:28 to print) 6 x Buzzbar mounts side A and B (1 took 1:18:14) 5xclamps (for all telescopic joints) 5x levers (for all telescopic joints) 5x Tube guides 1xbuzzbar drilljig(to drill holes in correct position for m10 bolts) 5x Pole guides(used to keep telescopic joins straight) 3x bite indicators 4x anchor feet 4x anchor feet plates Hardware Superglue or epoxy(used to glue stationary parts and endcaps in place or to coat printed parts) 4 x M6 eye bolts 4 x Common Nails(cut to 60mm used for cam lock lever hinge on Main endcaps) Pack of flange rivet nuts (I bought M10 and had to tap them to 3/8 inch so the alarm thread could grip 4 x m5 nuts and bolts and washers(for attaching eyebolt to the leg clamps of the main endcaps 4x M10 bolts or threaded rod for buzzbar 1x 16mm x 420mm pole(buzzbar pole) 1x25mm x 600mm main pole 1x28mm x 500mm main pole 4x 25mmx300mm legpoles 4x 28mm x400mm big leg poles 4x M5 nuts,washers and bolts for anchor feet m5 nuts and bolts wire or bycycle spokes for dropper alarms
With this file you will be able to print Cameleon Rodpod with your 3D printer. Click on the button and save the file on your computer to work, edit or customize your design. You can also find more 3D designs for printers on Cameleon Rodpod.