Camera Mount for NVIS ST-50 Head-Mounted Display
thingiverse
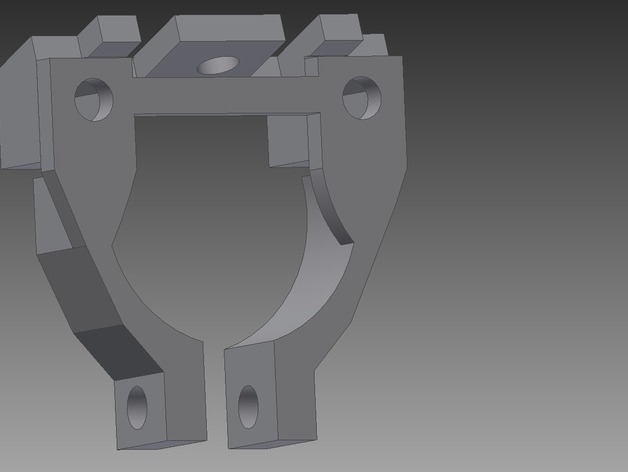
These parts are designed for attaching a small webcam to the front of an NVIS ST-50 Head-Mounted Display. Currently, the design is made to be used in conjunction with the front accessory mounting plate (http://www.thingiverse.com/thing:1076097) for the NVIS ST-50. The camera holder piece is made to be used with an uncased Microsoft LifeCam HD-6000 webcam. I believe the design could be easily modified to work with other camera (and general accessory) types as well. The mounting location was chosen to place the camera as close to the center of the eyes as possible. This affords a much better view from the camera, facilitating environment recording or marker tracking for Augmented and Virtual Reality applications. The entire assembly consists of only two pieces, the Camera_Piece_Base, which attaches directly to the ST-50, and the Camera_Mount, which attaches to the base and actually holds the camera in place. There are a few additional pieces of hardware that I recommend using to complete this assembly: A pair of M2 spacers (I recommend using: http://www.ebay.com/itm/M2-Black-Nylon-Hex-Female-Female-Standoff-Spacer-6mm-8mm-10mm-12mm-Hexagonal-/201322955283?var=&hash=item2edfc88213) Some M2 screws and nuts. Print Settings Rafts: Doesn't Matter Supports: Doesn't Matter Resolution: 200 microns Notes: I printed these parts on a Cube3 printer set at the default draft settings (200 microns, low fill, lines) and the parts came out fine. Post-Printing Finish Parts - Smoothing & Fasteners After the print is completed I recommend using some sand paper ( of any grit) to smooth the rough edges and remove any access material from the corners and inside edges of the part. Also, if the holes did not print well, they may need to be drilled through in order for the fasteners to fit. The Camera_Piece_Base part is made to hold two M2 spacers for screwing the camera mount into. I recommend using: http://www.ebay.com/itm/M2-Black-Nylon-Hex-Female-Female-Standoff-Spacer-6mm-8mm-10mm-12mm-Hexagonal-/201322955283?var=&hash=item2edfc88213 for the spacer inserts. In addition to the inserts, you will need a pair of M2 screws to attach the camera holder to the base piece. Any M2 screws of sufficient length will work for this. A final screws (also possibly M2) and accompanying nut are required for tightening the Camera_Mount piece around the camera itself. Camera_Piece_Base with M2 Spacer Inserts Assembly The Camera_Piece_Base is designed to fit securely into the center of the NVIS ST-50 accessory front plate (http://www.thingiverse.com/thing:1076097) using the existing #4-40 3/4in fastener. Camera_Pice_Base attached to the NVIS ST-50 Accessory Front Plate The webcam (designed for Microsoft LifeCam HD-6000) can then be inserted into the Camera_Mount part and screwed to the base piece using two M2 fasteners. Webcam Attached to the Base Plate A final screw and nut is required to tighten the Camera_Mount securely around the webcam. The holes are designed to accommodate an M2 fastener, though alternatives are possible. Final Mounted Webcam
With this file you will be able to print Camera Mount for NVIS ST-50 Head-Mounted Display with your 3D printer. Click on the button and save the file on your computer to work, edit or customize your design. You can also find more 3D designs for printers on Camera Mount for NVIS ST-50 Head-Mounted Display.