Canon Freelensing Mount
thingiverse
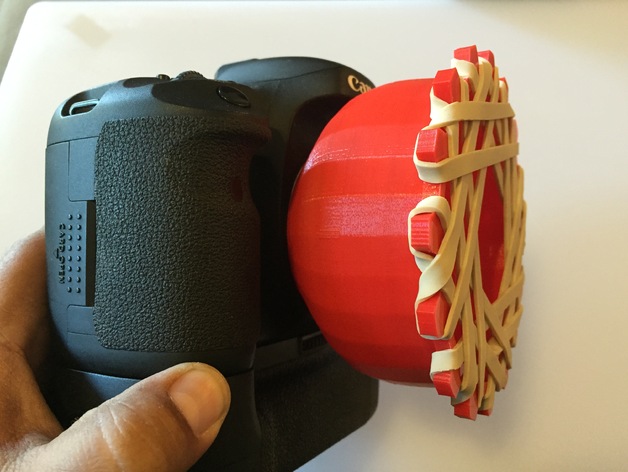
I learned about a technique called freelensing where the lens is not mounted on the camera. There is some separation to cause blurring and different focal lengths. You can create some cool images. However, I didn't like the idea of having a lens in one hand and my camera in the other. I wanted a mount that could accomplish a similar look with a little bit of control. This is a beta unit I'm still testing it out, you adjust focus by slowly pushing the lens closer or further from the camera using your fingers (Dont touch you lens!!) with the rubber band tension. You can also use the focus ring on the lens. I had best luck with 100mm or 80mm. 50 was too short a lens. 70-200mm I did not try but it seemed way to big to fit. The lens I have in the photos is a Marco 100mm. and thats what took all the uploaded photos. You will need to get rubber bands I found some at the dollar store rather thick and placed them on the mount skipping every other tooth and 5 spaces over. Im calling this a beta unit because I want to add some refinement and maybe some holes to let me more light for light leaks. but for now Im happy with the results. Photos are from my backyard and my 13 week puppy Winston. WARNING this is not a secure way to carry lenses on your camera. They will fall out if you do not secure your gear. The freelensing mount may even pop out (who knows?). What Im saying is I TAKE NO RESPONSIBILITY for any DAMAGE caused to your gear. Play with this mount at your own risk. Always secure your gear. Print Settings Printer: Wanhao Duplicator 4S Rafts: No Supports: No Resolution: idk Infill: 20 Notes: Just printed this out using simply3D with no supports took about 4hrs to print. WARNING this is not a secure way to carry lenses on your camera. They will fall out if you do not secure your gear. The freelensing mount may even pop out (who knows?). What Im saying is I TAKE NO RESPONSIBILITY for any DAMAGE caused to your gear. Play with this mount at your own risk. Always secure your gear. Post-Printing Need rubber bands I just wrapped the bands around 1 tooth moved 5 spaces down and wrapped the band around that.. then I skipped the next tooth and did the same thing. its pretty easy and you can add the bands however you like for a more tighter or looser fit. or based on the bands you have. WARNING this is not a secure way to carry lenses on your camera. They will fall out if you do not secure your gear. The freelensing mount may even pop out (who knows?). What Im saying is I TAKE NO RESPONSIBILITY for any DAMAGE caused to your gear. Play with this mount at your own risk. Always secure your gear. How I Designed This I remember seeing some canon extension mounts on here from a while back. So I used that as my base. then I measured the size of my lens circumference and guess-timated how big the mout side had to be. Modeled in Cinema4d using the Gear Tool and Loft Nurbs and printed. came out rather cool I thought. Let me know what you think.. WARNING this is not a secure way to carry lenses on your camera. They will fall out if you do not secure your gear. The freelensing mount may even pop out (who knows?). What Im saying is I TAKE NO RESPONSIBILITY for any DAMAGE caused to your gear. Play with this mount at your own risk. Always secure your gear.
With this file you will be able to print Canon Freelensing Mount with your 3D printer. Click on the button and save the file on your computer to work, edit or customize your design. You can also find more 3D designs for printers on Canon Freelensing Mount.