Capillary irrigator
thingiverse
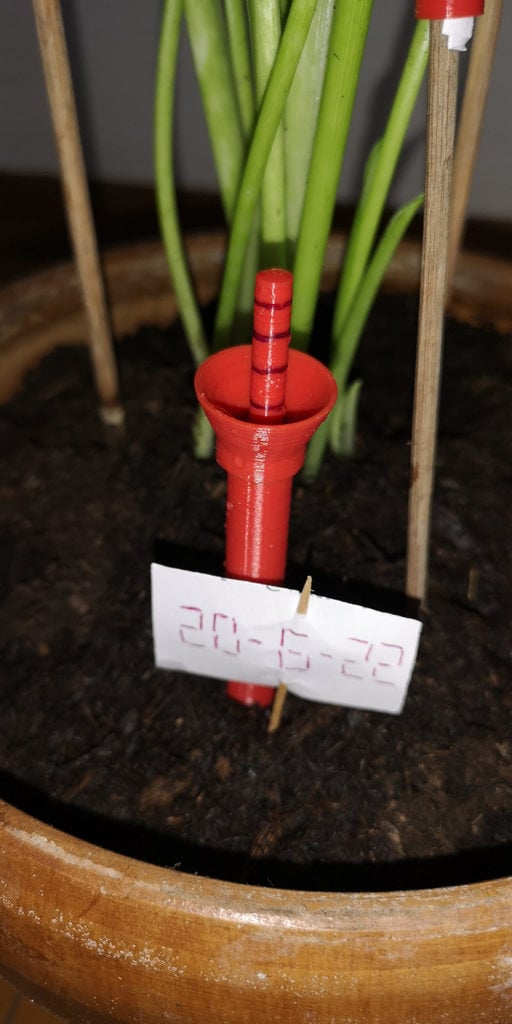
Capillary irrigator Realization with PLA + of concealed saucer system with graduated water level indicator. Warning: PLA does not like water this is a functionality test for capillary irrigation from below and durability test of PLA when in contact with water or soil. It is advisable not to fill the water to the maximum level, stop at the 4th notch to avoid water contact with the plate. The project consists of 1) The plate ... whose diameter depends on your vase that must not be drilled, mine has a diameter of 25cm, 25cm high, 14cm bottom, the size of the plate allows you to have a 7cm high chamber capable of containing 1 liter of water. 2) The perforated glass ... must be inserted in the center filled with a rope, pebbles or earth, it is pierced and therefore the water rises capillary. 3) Support feet ... to be glued underneath, they are used to maintain a certain stability to the plate which in any case remains resting on the inner edge of the vase 4) The rod ... must be inserted inside a horizontally positioned cork 5) The graduated rod ... must be inserted and glued into the rod after having checked the correct height 6) The funnel ... is used to load the water when the float has dropped and the rod disappears Video https://youtu.be/PXeZkmgjtDk Irrigatore capillare Realizzazione con PLA+ di sistema sottovaso nascosto con indicatore graduato di livello acqua. Attenzione: Il PLA non ama l'acqua questo è un test di funzionalità per irrigazione capillare dal basso e test di durata del PLA quando a contatto con acqua o terreno. Si consiglia di non caricare l'acqua al massimo livello fermarsi alla 4° tacca per evitare il contatto dell'acqua col piatto. Il progetto è composto da 1) Il piatto... il cui diametro dipende dal vostro vaso che non deve essere forato, il mio ha diametro 25cm, alto 25 cm, il fondo 14 cm, la dimensione del piatto consente di avere una camera alta 7 cm capace di contenere 1 litro d'acqua. 2) Il bicchiere forato... va innestato al centro riempito da una corda, ciottoli o terra, è’ forato e quindi l'acqua risale capillarmente. 3) Piedini di supporto... vanno incollati sotto, servono per mantenere una certa stabilità al piatto che comunque rimane poggiato sul bordo interno del vaso 4) L'asta... va inserita all'interno di un tappo di sughero posizionato orizzontalmente 5) L'asta graduata... va inserita ed incollata nell'asta dopo aver verificato la corretta altezza 6) L'imbuto... serve per caricare l'acqua quando il galleggiante è sceso e l'asta sparisce Video https://youtu.be/PXeZkmgjtDk
With this file you will be able to print Capillary irrigator with your 3D printer. Click on the button and save the file on your computer to work, edit or customize your design. You can also find more 3D designs for printers on Capillary irrigator.