Capsule (wall-mounted) Storage and Dispenser
thingiverse
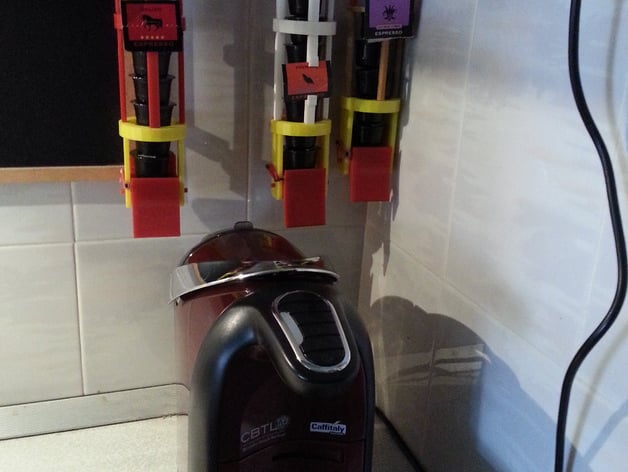
For countertops with limited space, you can still enjoy the luxury of a Caffitaly or Nespresso machine. This beverage capsule dispenser lets you store your capsules without the bulky boxes taking up precious tabletop or shelf space (Picture 2). And you can dispense capsules easily and quickly with just the push of a paddle. The return action reloads the next capsule, ready for your next cuppa! http://youtu.be/dgNXrUQ_gik The open concept lets you easily see how many capsules are left - I hate having to pour out the capsules from the box to count the balance of a certain brew. Worse, to find I’m down to the last couple. The set up is modular, each set of legs and ring take you as high as you want, limited by the space between countertop and overhang shelf. The standard version (two levels of rings) holds 11 Caffitaly or 10 Nespresso capsules. One of the legs come with a label clamp, so you can simply rip off the label on the top of the box, and always know what capsules are in a particular dispenser. Personalise it: Print, paint in any colour combination or pattern you can think of! For my own use, I mounted the dispensers on 1/4” plastic electrical wire trunking with short wood screws, and simply pasted it on the wall with double-sided tape. No messy drilling involved, the dispensers are easily relocatable, with no concerns from the wife that I may have destroyed her kitchen. In the picture of my 3 dispensers, the one on the right is version 1, on the left, version 2 and in the centre sits the current improved version. And that blank space? I’m dreaming of an RFID-triggered motorised dispenser ;) Instructions Print (per standard set *): 1 Paddle 2 Paddle Caps 1 Dispenser Cage 2 Extension Rings 1 Top Ring 3 Top legs (short ones - in 1 STL file) 7 Cage Legs ** 1 Leg with Label Holder (optional, may be replaced with 1 Cage Leg) To extend capacity by about 5 capsules, add 1 Extension Ring and 4 Cage Legs below the top ring layer. ** If you encounter print-warping with the long Cage Legs, use the “3a-Cage Leg (anti-warp)” file, with added support that you can cut away post print. I use a non-heated bed so I’ve got some curvy legs now :) There is no particular assembly order but this is how I did it with minimal “argh!” moments. @@@@ The non-printed parts required: 1 x gear shaft (to pivot the dispenser paddle) — 2mm axle about 62mm long (usually sold in 100mm lengths) available from hobby shops or a length of stiff wire, or length of a large paper clip 1 x rubber band (for the spring action) 2 x small screws (to hold the rubber band). Recommended M3 6mm and 12mm, or small screws from local hardware stores 2 x mounting screws (to mount the dispenser’s wall clips) @@@@ Join the Cage Legs to Extension Rings, working up to the Top Ring (with the 3 short legs). The top ring’s “hook” faces the back, leaving an opening in front, that’s where you will load your capsules. Note: The legs have been designed to be tight and should fit snug, so that it is easier to trim layers if the output is not that accurate, rather than to fill in gaps for a flimsy set up. Note: See Picture 5, the legs should flush with the INSIDE of the rings. Install screws on Dispenser Cage and Paddle, the shorter one on the Cage. Two screws of the same length would work too as the runner band is elastic :) Attach the Dispenser Cage to the assembled rings and legs assembly. Install the Paddle with the axle rod through the Dispenser Cage. Then cap it off with the Paddle Caps. Link the Paddle and Dispenser Cage screws with the rubber band. Test for desired tension. Tip 1: Knot the loop smaller (or loop 2-3 times) for higher tension. The Paddle should spring back into an “upright” position, but not so tight that you need force to push it. Slide in Wall Brackets onto the hooks of the Dispenser Cage and Top Ring. Measure the distance between the centre of the holes (centre of screw holes are about 255mm apart). Mark your wall accordingly (or plastic electrical trunking if you follow my installation choice). Install the wall brackets, slot in your dispenser, load your capsules. Enjoy!
With this file you will be able to print Capsule (wall-mounted) Storage and Dispenser with your 3D printer. Click on the button and save the file on your computer to work, edit or customize your design. You can also find more 3D designs for printers on Capsule (wall-mounted) Storage and Dispenser.