Car and Wheels for SAM Labs Bluetooth Motors and Sensors
thingiverse
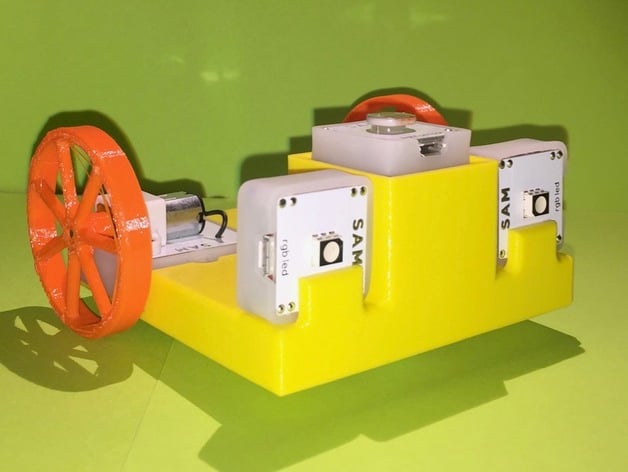
Make a body and wheels for a "car" driven by SAM Labs motors and a pinball ball. The front end of the car features brackets for placing a light sensor and RGB LED modules from SAM Labs, which can be programmed to react to varying light conditions. There are three wheel sizes and the vehicle body in this project. Print Settings Printer Brand: MakerBot Printer: MakerBot Replicator (5th Generation) Rafts: Doesn't Matter Supports: No Resolution: Fine Infill: 5% Notes: This is also designed to be printed on the MakerBot Mini - it will fit within the build envelope. It does try to pull up the tape at the corners, but if you have good adhesion, it will print fine. The MakerBot Replicator had no issue with the corners pulling up. It takes about 4 hours to print the body, 45 minutes to an hour for each wheel. Post-Printing To build the car You are going to need the Bluetooth programmable modules from SAMLabs.com. For this project specifically, you will need two (2) dc motors, two (2) rgb leds, and one (1) light sensor. I programmed mine to be driven with the slider, but you could also program it to be driven with your keyboard on your laptop. You also need one (1) 35 mm foosball, like the ones I found on Amazon. The foosball sits inside the dome underneath the car so that it rolls freely while supporting the front end. The DC Motors get the wheels placed on their shafts (with the extended part of the shaft facing the motor) and then snuggly nestled into their slots. You can rest the light sensor in the top depression and nestle the lights into the brackets on the front end. How I Designed This The car and wheels were designed using Onshape.com. The wheels fit snuggly on the axles, and are offset so that the bearing of the wheels extends to cover the entire shaft of the motors. If you wish to view or edit the CAD files, you can access them here. Standards NGSS CCSS Overview and Background Students can use these cars to learn about energy and waves of light (NGSS: 4-PS4.B, 4-PS4.C, MS-PS4.B) or to experience the concept of circumference (CCSS: 7.G.4, HSG-GMD.1). Through the programming interface provided by SAM Labs, students can manipulate the threshold of light values that will trigger the headlights and they can manipulate the behavior of the wheels to measure and observe the impact of the diameter of the wheels on the linear travel of their car. Students who use this lesson can learn programming skills, demonstrate and understanding of wavelengths of light, and experience the relationship between diameter and circumference. Lesson Plan and Activity To learn about wavelengths of visible light: Supply students with the car and a flashlight. Ask students to determine the intensity of light necessary to deactivate the headlights, which they can do by manipulating the threshold value for activation in programming until they get to the bare minimum value. Then, ask them to hypothesize and then determine (using color filters on a flashlight) if there is a difference in the threshold values depending on the color of light that is used. You can expand upon this lab to include determining whether convex or concave lenses can influence that threshold level as well. To experience circumference: Supply students with the car and some linear measurement devices. Talk about dimensions of a circle and ask if they can determine how far a car will travel based on a set number of rotations of the wheel. Ask them to hypothesize about that relationship and how far they think it will travel. Then have them program the motor to run for a a specific number of rotations and they can measure the distance traveled. As an expansion, they can calculate the error between the calculated value and the experimentally obtained value and generate ideas for why the error exists. If you also want to discuss ratios, they could mark the foosball so that it leaves a trail or mark for each rotation and they can compare the number of rotations of the foosball to the number of rotations of the wheels. Finally, there are many manipulations students could do with programming on this project. The SAMLabs interface provides as complex or simple as you want for their visual code and students can learn about logic gates if they want to apply buttons and sliders and other inputs to control the car, including using the keyboard instead of a separate interface.
With this file you will be able to print Car and Wheels for SAM Labs Bluetooth Motors and Sensors with your 3D printer. Click on the button and save the file on your computer to work, edit or customize your design. You can also find more 3D designs for printers on Car and Wheels for SAM Labs Bluetooth Motors and Sensors.