Carb Heat, Throttle, Mixture - Cessna Simulator
thingiverse
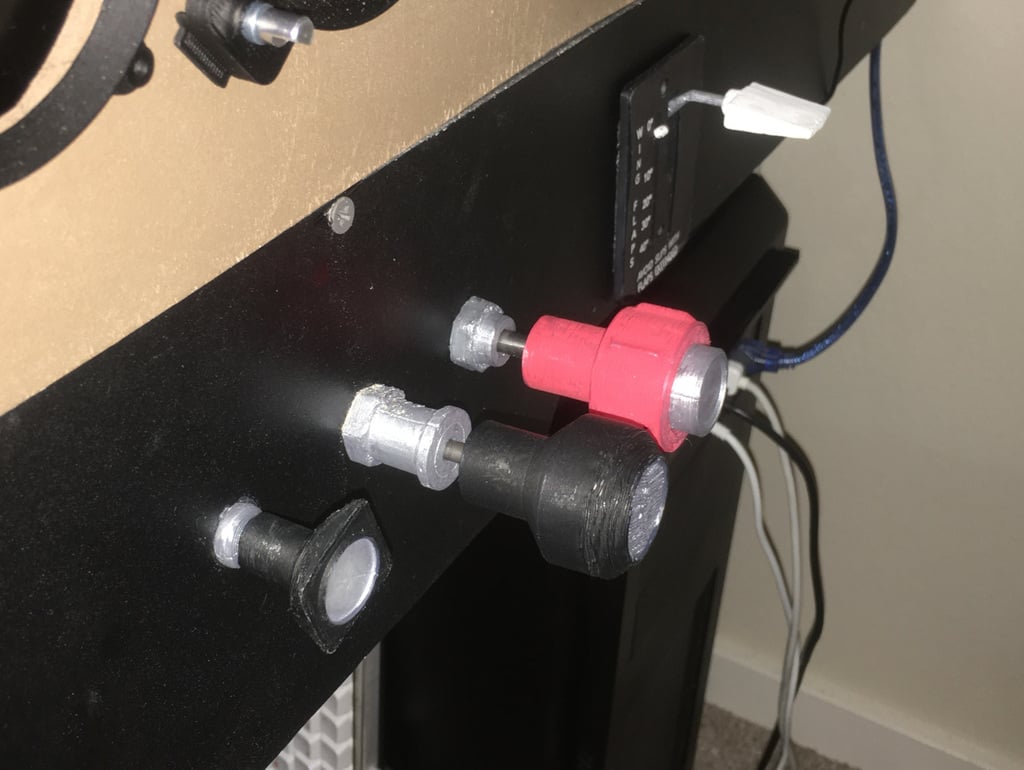
This is a set of Cessna-style engine controls for a home cockpit simulator. The three controls are carburetor heat, throttle, and mixture. Update 2020-04-26: Second version. I replaced the 3-control hardware mount box with custom individual control mounts and also added new guides. This design is a multi-remix of a few different things: - Knobs by [allanglen](https://www.thingiverse.com/allanglen): [Throttle Knob - Cessna 172 Flight Simulator](https://www.thingiverse.com/thing:2720384), [Mixture Knob - Cessna 172 Flight Simulator](https://www.thingiverse.com/thing:2720409) - Knob by [4689rich](https://www.thingiverse.com/4689rich): [Cessna 172 Carb Heat Knob](https://www.thingiverse.com/thing:3904989), which I remixed very slightly The custom parts include - Panel mounts - a different one for each of the controls - Behind-the-panel holders for potentiometers - Rod couplers for potentiometers BOM: - 3x [linear slide potentiometers](https://www.amazon.com/gp/product/B07R3295X3/) - Round metal rod(s). I used three different diameters: [1/8 in](https://www.homedepot.com/p/Everbilt-1-8-in-x-12-in-Cold-Rolled-Plain-Round-Rod-800397/204331423), [3/16 in](https://www.homedepot.com/p/Everbilt-3-16-in-x-12-in-Cold-Rolled-Plain-Round-Rod-800407/204325644), [1/4 in](https://www.homedepot.com/p/Everbilt-1-4-in-x-12-in-Plain-Round-Rod-800437/204373309). I guess it is not terribly important - just use what you have. - Tempera paint (black, red, [silver](https://www.amazon.com/gp/product/B007TH6JFW/)) - Misc: 2.5mm screws, zip ties, wire, solder, JST connectors # Assembly instructions Print 3x behind-the-panel potentiometer "boxes" (more like a holder). Drill 3 holes in your panel. Attach the potentiometers to the holders (solder wires beforehand if needed). Print the three guides and three nuts. This may be a little tricky given that there are both threads and parts needing support. I had to hack gcode to remove supports from threads. The nuts are very snug but I managed to screw them on. Maybe scaling them up a little would help - people reported success printing them at 105% scale. Insert the guides into the panel and into the holes of the potentiometers holders, fix with the nuts. Print the three knobs (supports may be needed), drill out if needed to fit your rods. Print the three rod-to-potentiometer couplings. Make sure to use the version(s) that match your rod sizes. Optionally, use OpenSCAD customizer to generate couplers for different rod sizes. I recommend printing without supports. Insert the rods into the guides, attach the couplers and potentiometer levers. Cut the rods to size. Fix the couplers with screws. Paint the knobs. Glue the knobs to the rods. # Simulator connection I use this with [SimVim](https://simvim.com/) and [X-Plane 11](https://www.x-plane.com). This particular page deals with analog inputs: https://simvim.com/svc_axis.html SimVim is a fantastic project - well worth [supporting](http://patreon.com/simvim/posts) - all you need is an Arduino and an X-Plane plugin (Linux, Mac, Windows), but that's it. Highly recommended.
With this file you will be able to print Carb Heat, Throttle, Mixture - Cessna Simulator with your 3D printer. Click on the button and save the file on your computer to work, edit or customize your design. You can also find more 3D designs for printers on Carb Heat, Throttle, Mixture - Cessna Simulator.