Carbon Reinforced 3-d Prints
thingiverse
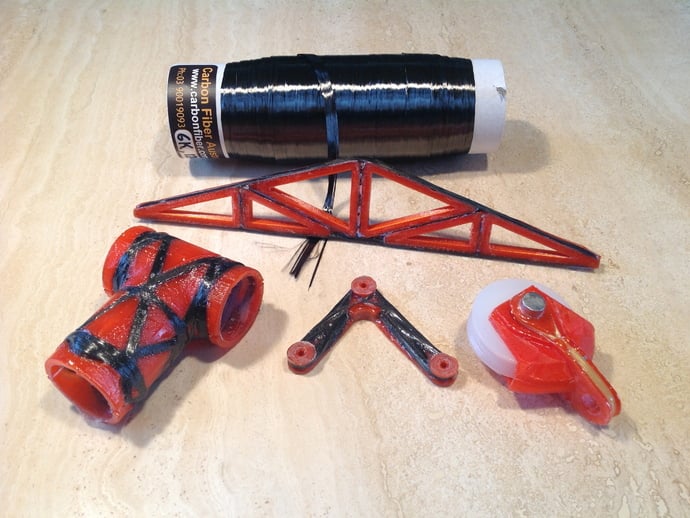
This project looks at how to combine the immense strength of carbon fibre, with the design versatility of 3-d printing. The reinforcing methods described here are quite simple and require no equipment or experience. Unidirectional carbon epoxy is one of the strongest structural materials, and has a tensile strength of about 150Kg per sq mm. Instructions To reinforce a part, first identify the load-paths, then design grooves or lugs to guide the fibres correctly. Carbon is extremely strong and rigid, but will just snap if overloaded. Aramid (Kevlar) is nearly as strong in tension, has low rigidity, and is much more durable. Check the video, I was just experimenting and you will see ways to do it better for your application. http://youtu.be/p1yOf6Ba1ts The small truss tested a method most useful for model aircraft wing spars. It was easy to make and failed at 120kg when supported to prevent it buckling sideways. The pulley block body was reinforced with aramid fibre for durability. Note the small hooks to hold the fibre in the slot, and that the fibre was moulded directly onto the waxed pin. It weighs just 7gm, and i eventually broke it using the force of a car jack at about 1200kg! The 25mm tee joint was amazing, it felt light and flimsy but proved to be stronger than the aluminium tube when tested. The PLA crumbled quite easily, but the carbon held. I was happy with my first attempt, the grooves for the four pairs of crossed fibres are just 1.5 x 4mm, I would want a lot more carbon if it was holding my bike-frame together. This fully printed tee joint was challenging to design and print (the overhangs were just OK), and would have been better using soluble PVA. I show a photo using hook-rings which are fixed to the actual tube or waxed rod, the fibre is wound around, then the ring and carbon is trimmed off. I haven't tested this, you could lay a lot more carbon, but it may not be well placed at the joint. I also show a winding boss, which is the same as part of the whole tee, but printed from the other side and fixed to the tube. Spend a lot of time experimenting with thick cotton or string to learn how to wind the fibres and make sure they are in the right place. You can get started for $50 to $100 by buying the carbon and aramid 'tow' and epoxy resin. I used 6k (6,000 fibres) carbon tow, 12k would be ok. I used West 105 laminating resin with the slow 206 hardener. The small dispensing pumps are ok but I use scales for small quantities. Also buy artists brushes, plastic cups, gloves, acetone for cleaning and furniture wax for releasing. Epoxy must be measured and mixed carefully, and cured for 24-36 hours in a warm place. Read the instructions! Small jobs can be wetted out with a brush, but I made a wetting rig with printed disposable guides which worked well and prevented the carbon from fraying. I hope your super-strength parts work well!
With this file you will be able to print Carbon Reinforced 3-d Prints with your 3D printer. Click on the button and save the file on your computer to work, edit or customize your design. You can also find more 3D designs for printers on Carbon Reinforced 3-d Prints.