Carla's Tunnel for Wooden Railway
thingiverse
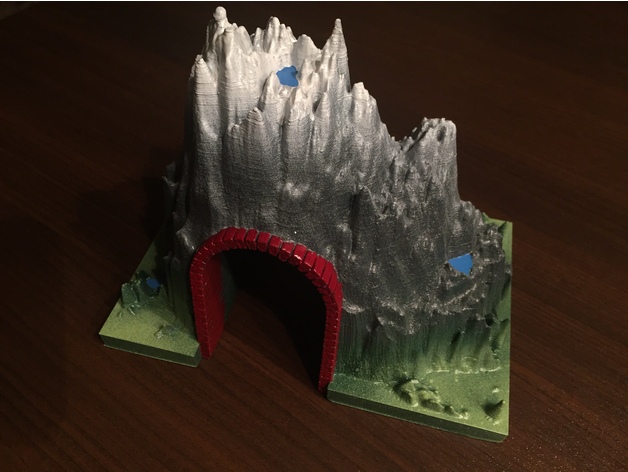
This model was designed to be a Christmas gift to my niece how loves her wooden railway. It consists of two parts: the mountain and the brick tunnel. That is to be able to use different versions of both parts: an optimized file with lower detail but ease to slice and a high resolution version for best results. You can even mix different detailed files of the mountain and the tunnel! As it comes in two parts, the alignment is essential. Therefore: If you use Simplify3D, import both files and double click on one part to open the properties tab. There just click on "Reset position". Click on the second part and do the same. After this step you are basically set on the alignment. If you have to reposition the whole thing, make sure you select both at the same time! Preferrably group both parts... Please mind the following: Yes, I designed it for my niece. But any way: it was a bit of work which I offer to the community and any tip is highly appreciated. The spirit of the community is share and respect... Thank you ;-) Print Settings Printer Brand: FlashForge Printer: FlashForge Creator Pro Rafts: No Supports: Yes Resolution: 0.15 Infill: 20 Notes: I strongly recommend to use an infill amount of at least 18-20% as to give the small gaps and valleys in the upper part a chance to get printed cleanly. I used the following settings: Layer settings: Layer Height: 0.15mm Bottom and Top Solid layers: 6 Perimeter Shells: 3 To assist the print to stay attached to the bed I set a Brim of 6 Outlines at 0mm distance. Infill: Full Honeycomb Percentage: 20% Support: Percentage: 12% Dense Support Layers: 3 Dense Infill percentage: 75% Horizontal Offset: 0.3mm Vertical Separation Layers: 1 Max Overhang Angle: 45° It is a big print, so heated bed is recommended for better adhesion... Cooling: 100% on Adjust Print Speed for layers below 10s down to 9% Print Speeds: 35 mm/s Outline underspeed: 60% Infill underspeed: 70% Support underspeed: 90% Travel Speed: 90mm/s Vertical Speed: 30mm/s Results in a print time of about 42 hours... Post-Printing Finishing I used spray cans and a small brush to do the painting in the following order: Step 1: Let's rock Use dark gray as the base color and spray the whole mountain. Let the paint dry completely. Step 2: let it snow! Use a white spray for the summit to give the impression of snow. While doing so hold a piece of cardboard in front of the lower part approx. 5 cm away from the model. This will protect the lower part from being painted but gives a blurred fall-off. Spray from the side, not from the top. If that gives some areas without snow at the top, use a brush and bring some paint there that you pickup from a cardboard. Step 3: Spring in the valley: Take dark and light green paint and spray it at the lower part. Use the same cardboard screen technique as above at Step 2. Step 4: Mountain landscape If you like, add some fresh blue mountain lakes with a brush. Step 5: Paint the tunnel Paint the tunnel bricks with a brush. Use different shades of red and simulate a darker shade at the upper part from steam engines' smoke. Step 6: Optionally clean up Cover the visible part of the mountain and the tunnel with painter's tape and Spray the bottum with dark grey. How I Designed This The Mountain... ... is a flat box. To its top mesh a displacement modifier is applied to. The displacement map used is a mix of several noise maps and fall-off maps. The resulting object was meshified again and the sides of the mountain pulled outward where necessary to give a nice volume for the tunnel. A surface displacement with a noise map added the rough finish. The tunnel... ... was a gate profil that was extruded. At the front and the back two seams were added by slice planes. The so created faces (the bricks) were chamfered to create bricks with gaps. To the bricks a surface displacement noise was added to give them a more rough and raw appearance. combined: The mountain was boolean substracted by the tunnel mesh to reduce overlapping. finish: stl check and optimization
With this file you will be able to print Carla's Tunnel for Wooden Railway with your 3D printer. Click on the button and save the file on your computer to work, edit or customize your design. You can also find more 3D designs for printers on Carla's Tunnel for Wooden Railway.