Cartridge Case Trimmer
prusaprinters
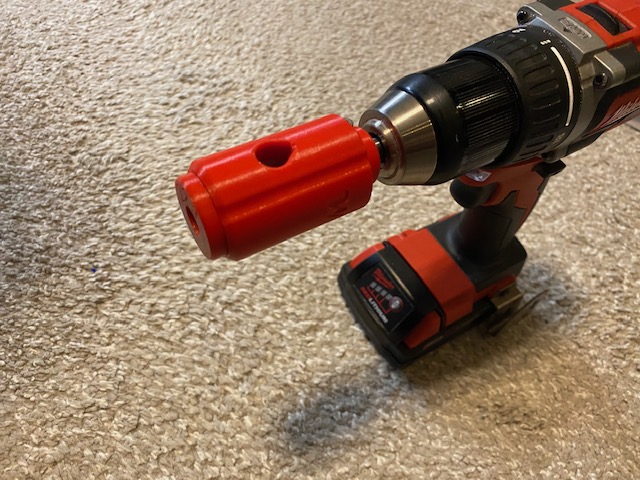
<p><strong>11NOV21 Update -</strong> I just uploaded the 6.5x55 Swedish and .22-250 Remington bushings. </p><p>I've also uploaded a generic .dwg of how I design each of these bushings (6.5x55S is in this example), so you can make them yourself if needed. I take the SAMMI dimensions of each case and insert it into the bushing base design with 2mm of the neck protruding through the end. Then I offset the case dimensions so there will be an additional .3mm clearance between the SAMMI dims and the ID of the bushing (in other words, I offset the cartridge dimensions .15mm on each side from the centerline). I also apply a 2mm radius to where the neck meets the taper on the case, and then a .6mm chamfer where the case is inserted into the bushing. These are probably poor instructions, but looking at the drawing will explain it much better than I can in words! Once that drawing is made, I import it into Fusion 360 as a .dxf. Then I revolve the shape in Fusion and add the debossed text - that's pretty much it!</p><p><strong>18MAY21 Update -</strong> I've processed quite a bit of .223 and .308 brass over the past few months, and this trimmer has been performing great. One tip I wanted to mention is how I typically set the exact trim length: I've found that by taking a case which is about .003"-.004" longer than the desired trim length and setting the clamp on the end mill with that will pretty much ensure a perfect length. This accounts for axial bearing play, etc. which isn't there until you put more force into it. For instance, if I want to trim my .308 cases to 2.005", I'll find a piece of sized brass that's 2.010" long or more to start with. I'll just trim it a little bit it a time, until it measures 2.008" on my calipers. Then, I'll loosen up the clamp on the endmill shank so it can slide, move the trimmer/clamp out a bit together, and then lightly press the 2.008" case into the bushing until it moves the trimmer/clamp enough for the case mouth to contact the endmill. Carefully tighten the clamp at that point without letting it move, and then you're done. If you reinsert that 2.008" case for trimming, then it should be come out about perfect after you run it through the normal trimming option.</p><p><strong>11FEB21 Update -</strong> I just uploaded the MK4 version of the brass trimmer. This uses two (2) of the R6 bearings stacked on each other, which makes a significant improvement in angular alignment of the end mill. The drawback is that there is slightly less shank length for the drill chuck, but there's still plenty in testing. The MK3 version with one bearing still produced good cuts that seemed to be quite square, but I just couldn't help but to think more consistency in the angular alignment would be better. I've left the MK3 version up if you choose to use 1 bearing. I also made some slight improvements to the clamp design. You'll note there are now some bushings with "tight" in the file name - these are slightly tighter on the internal clearance if your case fits a bit loose.</p><p><strong>Overview:</strong></p><p>I've got a manual Lee case trimmer for my brass which isn't a terrible system, but it's tedious. I know there are trimmers on the market that are much more efficient, but they are also pricey. Some like this are in the $100+ range, and then you have to pay $30 or so for each additional caliber you want to trim. I wanted similar functionality, but also something more budget friendly.</p><p>I can't take full credit for this idea - like I said there are others out there like it that you can buy, and even some other 3D designs out there. I just wanted to design one from the ground up myself and get rid of what I perceived as drawbacks of other designs.</p><p>My design uses a bearing set which aligns the endmill, and there is a separate cartridge bushing for each type of case you want to trim. The bushing on my design is retained by an O-ring. Trim length is set by adjusting the clamp along the endmill shank, which is then placed in the chuck of a drill. You really don't have to use the O-ring, but it does a good job of retaining the bushing.</p><p>I'm still in the process of uploading bushing designs, but if there is any specific caliber you want, I'll see what I can do about getting it made up.</p><p><strong>Parts you'll need that aren't 3D printed:</strong></p><p>R6-2RS bearing (two (2) for MK4 version or one (1) for MK3 version)- I used this one: <a href="https://www.ebay.com/itm/R6-2RS-C3-Premium-Rubber-Sealed-Ball-Bearing-3-8-x7-8-x9-32-R6rs/303030100702?ssPageName=STRK%3AMEBIDX%3AIT&_trksid=p2057872.m2749.l2649">https://www.ebay.com/itm/R6-2RS-C3-Premium-Rubber-Sealed-Ball-Bearing-3-8-x7-8-x9-32-R6rs/303030100702?ssPageName=STRK%3AMEBIDX%3AIT&_trksid=p2057872.m2749.l2649</a></p><p>Or, buy a 10 pack and make trimmers for your friends!: <a href="https://www.ebay.com/c/3022919666">https://www.ebay.com/c/3022919666</a></p><p>3/8" x 2-1/2" 4-flute, flat bottom, center cutting end mill - I paid the small bit of extra money for a made in Canada carbide endmill, but even HSS should work. I used this one: <a href="https://www.ebay.com/itm/3-8-Carbide-Endmill-4-Flute-Flat-Bottom-Regular-TiAlN/133414909772?ssPageName=STRK%3AMEBIDX%3AIT&_trksid=p2057872.m2749.l2649">https://www.ebay.com/itm/3-8-Carbide-Endmill-4-Flute-Flat-Bottom-Regular-TiAlN/133414909772?ssPageName=STRK%3AMEBIDX%3AIT&_trksid=p2057872.m2749.l2649</a></p><p>SAE Size 016 O-Ring for each bushing - you can probably pick these up at any auto parts or hardware store, but I opted to just pick some up on eBay (plenty of extras!) - <a href="https://www.ebay.com/itm/O-rings-Nitrile-25-pieces-SAE-size-016-appx-3-4-X-1-16-X-5-8/184556789144?ssPageName=STRK%3AMEBIDX%3AIT&_trksid=p2057872.m2749.l2649">https://www.ebay.com/itm/O-rings-Nitrile-25-pieces-SAE-size-016-appx-3-4-X-1-16-X-5-8/184556789144?ssPageName=STRK%3AMEBIDX%3AIT&_trksid=p2057872.m2749.l2649</a></p><p>M3x20mm hex head cap screw and M3 nut - these are for the 3D printed clamp, but you could also go with a standard 3/8" shaft collar with set screw.</p><p>A few tips on assembly:</p><p>The bearings may be a bit tight in the bore, as they should be. If it's too tight (due to printer/filament variations), take a bit of sandpaper to the inside. Same with the bushing fit. The bearings can also be a tight fit on the end mill - start the bearing on at the cutting end, and work them back and forth on the shank a bit. This made mine work perfectly. Do this before placing the bearings in the bore, and do it with gloves on! The end mill caught me by surprise and drew blood.</p><h3>Print instructions</h3><p>I made the body in PETG, .2mm layer height, 3 perimeters, with 40% infill. Clamp printed at same settings but 100% infill. You don't need any supports if you orient things correctly (body with smaller hole on build plate, bushing with larger end on build plate, clamp with small spacer facing up).</p>
With this file you will be able to print Cartridge Case Trimmer with your 3D printer. Click on the button and save the file on your computer to work, edit or customize your design. You can also find more 3D designs for printers on Cartridge Case Trimmer.