Case Prep 6-port Station
thingiverse
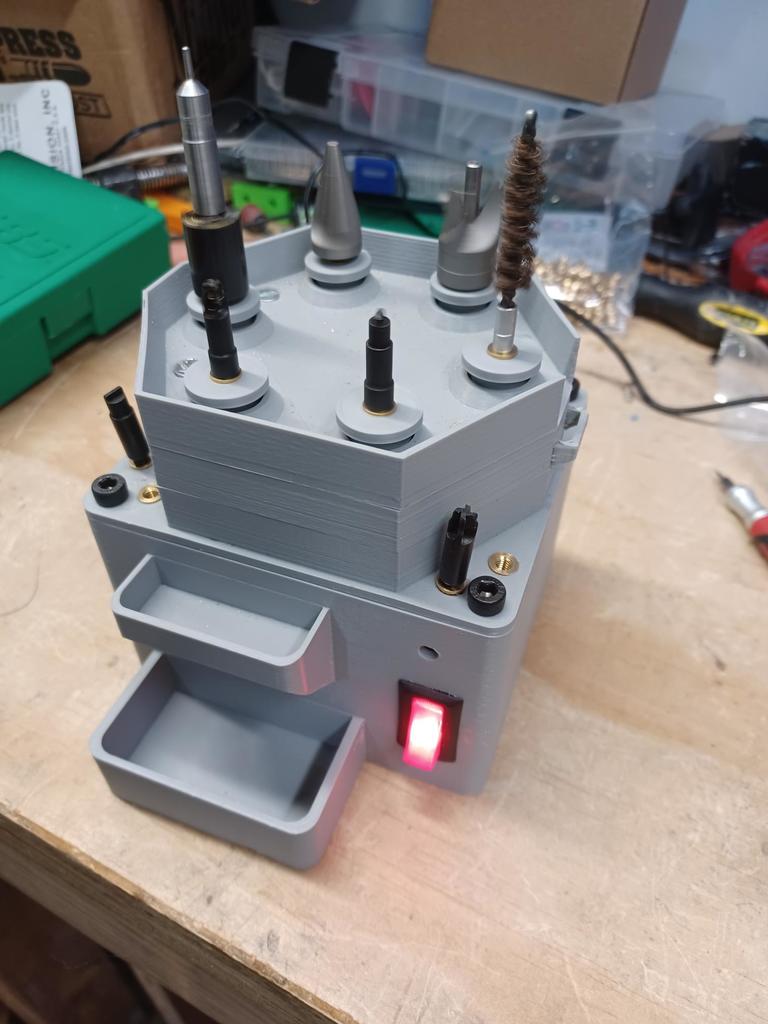
UPDATE: ======= - New maingear that uses metal hub. I found I had to modify the main gear to accommodate a 6mm Flange Coupling Connector. Found the "6mm Flange Coupling Connector" on Amazon in a 4-pack. This will eliminate the issue with the maingear stripping off of the D-shaft if too much torque is applied. - Added lid. - Bearings are "608" bearings which are "8mm x 22mm x 7mm" skateboard bearings. I got a 20-pack from Amazon. You'll need 12x for the build! Based on "Brass Prep Station" by msgbean as found on Thingiverse! Tool posts uses 8/32 brass inserts, Lyman case prep tool inserts, and standard gun cleaning kit brushes. Project files will be available on Odysee, Thingiverse, and Printables 8/32 brass inserts can be found on Amazon under the brand name "E-Z Lok" and should also be available locally. 8/32 flathead screws hold the top assembly, and standard hex head screws hold the top and bottom halves. You could easily use any standard screw you had available for all but the tool post inserts. Don't screw the upper portions (with the bearings) too tightly, otherwise the friction will cause the motor to stall. M5 screws and inserts *could* be used for the assembly if you have some of those available, but you will still need 8/32 inserts for the tool posts. I purchased a 100-pack of 8/32 brass inserts, so I had enough inserts available to add extra tool holder storage spots on the sides. You can drill out the holes for extra tool holder storage without inserts. Tool post alignment - it seems the tolerances in the assembly allow for tool holder wobble. You will have to adjust the tool post if it spins erratically. I had to do this for several. Use a soldering iron to heat the insert, then pull against the most erratic point of the spin. This will re-align the brass insert and will make the tool spin more true. I was able to tweak the inserts until the tools spin "true". I used the 200 RPM "Geartisan" brand motor. The 100 RPM just didn't cut it. Motor brand will not matter so long as it has the 6x M3 mounting holes. I used M3x8 screws. The motor MUST be wired "backward" to make the tool posts spin in the correct direction! (e.g. the positive wire needs to be attached to the negative terminal, and vise-versa for the other wire). Maingear additional hub is intended to be screwed into the main gear to provide a mounting surface coverage for the exposed motor shaft. I was having problems with the motor pulling loose from the main gear during testing, since there is no grub screw to hold the main gear against the D-shaft. This extra hub simply provides more surface area for the main gear to stay connected to the motor hub to avoid any torque-related issues. I found a 2-pack of 12v 2 Amp power supplies, which I suspect the extra amperage was also helpful in making sure the mechanism works during load. I had an illuminated automotive rocker switch available so I used that... any switch will work! There's provision for an LED bezel on the main box. The teeny little shaving collector is optional. Finally, lid is optional but very handy to keep the sharp tool inserts from exposure to basically everything else in the shop :)
With this file you will be able to print Case Prep 6-port Station with your 3D printer. Click on the button and save the file on your computer to work, edit or customize your design. You can also find more 3D designs for printers on Case Prep 6-port Station.