Case with 4040 Mount for Raspberry Pi Zero
thingiverse
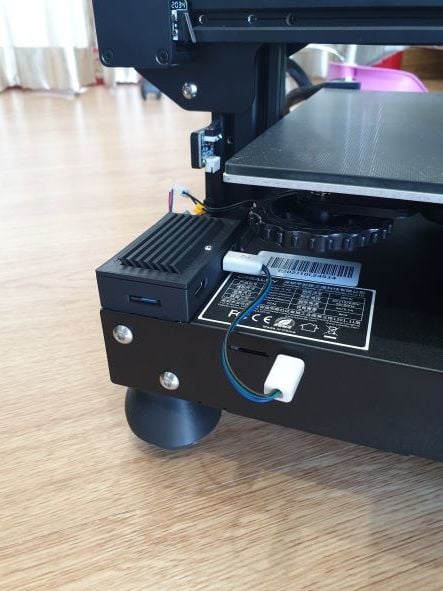
Hello Makers! I am running Klipper on my "Ender 3 V2 Competition" with several sensors, endstops, etc. hooked up to the Raspberry Pi Zero W GPIO pins. Looking around, I couldn't find a case that would: 1) Cleanly bolt to the 4040 extrusions 2) Properly fix the pi in place without need for additional screws 3) Provide a clean cable route for GPIO-attached cables I therefore went ahead and designed my own case from scratch. For the looks, I based it loosely on the case designed by guppyk. Now, to mount the case follow these steps (check pictures also): 1) Insert two M3x6 hex screws in the corresponding holes of the case and loosely screw M3 t-nuts on those 2) Slide the case onto the 4040 extrusion of your choice and tighten them (make sure the t-nuts are oriented perpendicular to the extrusion). 3) Place the Pi Zero in the case as shown in the pictures and lead any cables out of the case through the corresponding slot. 4) Fix the Pi Zero in the case by pressing the SD Card bracket into place. 5) Choose the cable port bracket, depending on the number of cables that are attached to the GPIO of the Pi, and press it into place. 6) Screw the cover on by using three M2.2x6 self tapping Philipps screws. Just in case you have more than 16 cable attached to the GPIO, I included the STEP-file of the cable bracket so that you can adjust the cable opening to your build. The Pi case prints without supports and should result in a clean look of the Pi install. Check the pictures for the orientation in the slicer. I hope you enjoy my design...Check out my blog at https://allpro3d.com ! Cheers and keep making
With this file you will be able to print Case with 4040 Mount for Raspberry Pi Zero with your 3D printer. Click on the button and save the file on your computer to work, edit or customize your design. You can also find more 3D designs for printers on Case with 4040 Mount for Raspberry Pi Zero.