Cat Screen Door (Print on Screen)
prusaprinters
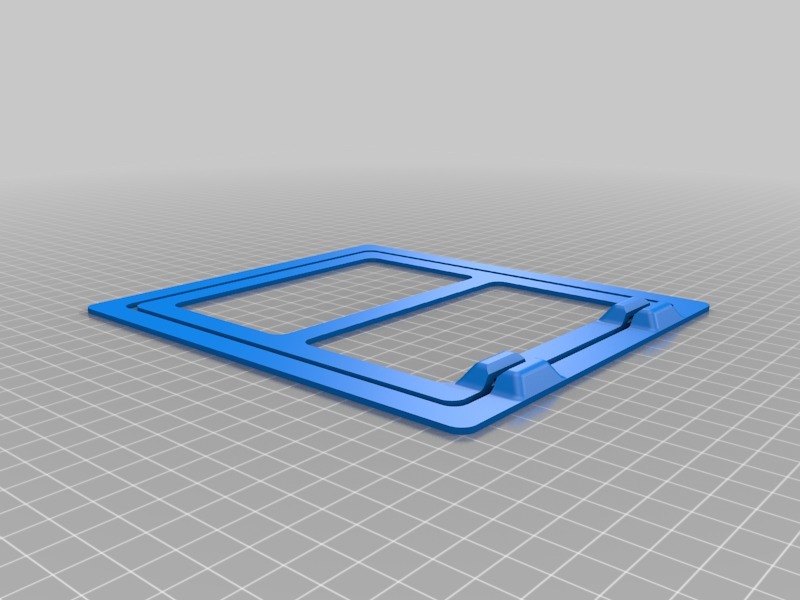
<p>Inspired by <a href="/ShoreyDesigns/designs">David Shorey's</a> (Twitter <a href="https://twitter.com/shoreydesigns">@shoreydesigns</a>) examples of printing on fabric, I realized I could start making more utilitarian objects by printing on material. This cat door is designed to print directly on the screen material.</p> <p><em>NOTE: I don't actually have a cat, so I didn't actually put this in place. I have a dog door similar to this we purchased off of Amazon (not an affiliate link).</em></p> <p>The process is:</p> <ul> <li>Purchase replacement screen material for your window or door.<br/> <em>(Don't forget the tool and retainer spline)</em></li> <li>Cut a piece of screen a few inches (100mm) larger in each direction</li> <li>Lay out the screen onto the frame and mark where you want the door printed</li> <li>Determine how you can lay out the screen onto your print bed during the printing process<strong>so it will not get caught in any mechanisms during all phases of the print process</strong><br/> <em>This is an advantage of a non-moving bed similar to the Ultimaker design. It may prove more difficult on other printer setups.</em></li> <li>Print the first ~1mm and have the printer pause</li> <li>Lay out the screen material directly onto the partially printed piece<br/> <strong>Make certain it will not get caught in any mechanisms.</strong></li> <li>Resume the print</li> <li>Install the screen in the frame following instructions for your specific screen, tool, or the internet</li> <li><p>Cut the screen between the inner frame and outer frame on the vertical and bottom sides Cutting out the Screen: <a href="https://youtu.be/-644cNgQ-ow">https://youtu.be/-644cNgQ-ow</a><br/> Showing how it moves: <a href="https://youtu.be/osE1wZUJZEA">https://youtu.be/osE1wZUJZEA</a></p> <h3>Print Settings</h3> </li> </ul> <p><strong>Printer Brand:</strong></p> <p>Ultimaker</p> <p><p class="detail-setting printer"><strong>Printer: </strong> <div><p>Ultimaker 2</p></div><strong>Rafts:</strong></p> <p>No</p> <p><p class="detail-setting supports"><strong>Supports: </strong> <div><p>No</p></div><strong>Resolution:</strong></p> <p>any</p> <p><p class="detail-setting infill"><strong>Infill: </strong> <div><p>any</p></div><br/> <strong>Filament:</strong><br/> [</p> <h3> ProtoPasta UV stable filament is best, like ASA ](http://www.amazon.com/s?url=search-alias&field-keywords=ProtoPasta+UV+stable+filament+is+best%2C+like+ASA&tag=thingiverse09-20) Garrett's Chaos Red <br/> <p class="detail-setting notes"><strong>Notes: </strong> </p><div><p>To insert the screen mesh, you need to tell your printer to pause at ~1mm, after it has printed the first layer or two. The exact layer the print should be paused at will depend on your resolution. I used a 0.8mm nozzle with a 0.48mm layer height (0.36mm initial layer height) and paused after layer 2 (~0.84mm). The method to do this varies by slicer/printer. For my Ultimaker (network attached via a Raspberry Pi running Octoprint) using Cura 4.1, I used the "Pause at Height (Octoprint)" post processor (<strong>Extensions - Post Processing - Modify G-Code - Add Script</strong>) and setting <strong>Pause at</strong> = Layer No. and <strong>Pause Layer</strong> = 2.</p></div> How I Designed This</h3> <p><strong>Print on Window Screen</strong></p> <div><p>This model was designed to have the printer paused at ~1mm to have the screen inserted. I made sure I made the frame thick enough to allow for multiple layers to be printed on each side of the screen even with relatively thick layers.</p></div> <p class="detail-title"><strong>Magnets</strong></p> <div><p>I added space for magnets and a surface to attach a piece of metal. The magnets were based on some small magnets I had from a previous project. They were 3/8" long, 3/32" diameter cylindrical magnets (~9.5mm long, 2.38mm diameter). The Fusion 360 file (<a href="https://a360.co/2LfMA34" rel="nofollow">https://a360.co/2LfMA34</a>) is available to modify as you see fit.</p></div></p></p></p> Category: Pets
With this file you will be able to print Cat Screen Door (Print on Screen) with your 3D printer. Click on the button and save the file on your computer to work, edit or customize your design. You can also find more 3D designs for printers on Cat Screen Door (Print on Screen).