Cat Toy Race Track
thingiverse
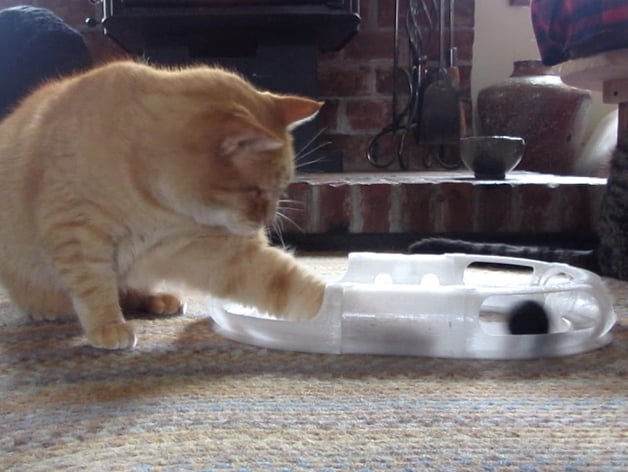
Three of my four cats give this a paws up. The fourth one thinks it's a total yawn. Cataction video: https://vid.me/8lmp It's pretty self-explanatory from the pictures -- assemble a track (minimum print is six curve sections), drop in the ball, and either let your cat go at it alone, or play a sort of kitty tetherball. I would suggest having at least one tunnel or peephole section -- cats love to stick their paws in holes and grab prey! My cats seem to prefer the topCut sections -- I wish I had printed four topCuts and only two sideCuts. The straight sections allow you to expand the diameter of the track. Types of Track Sections: 60 Degree curves (topCut, sideCut, tunnel) 60 Degree curves with a 7mm high hill in the middle (topCut) 100mm Straight sections (topCut, sideCut, tunnel, peephole) About the ball. There are several versions. The solid ball was a snap to make, and really _____ hard to print. In contrast, the hollow ball that is joined by pins cut from filament, prints effortlessly. Plus, if you have a little bell you could enclose it inside. I printed the track sections in PETG (the ball is ABS). It was my first time using this plastic. I like how it has the flexibility of ABS without the warping and cracking. I like how it is translucent making it easier for the cats to see the ball when it gets hidden in a tunnel. I don't like the silvery sheen it has however, or the incredible amount of stringy hairs it leaves all over the piece. I would suggest natural PLA for this print -- less flexible to be sure than PETG so the puzzle attachments might need more filing for good fitment, but I think it would have looked better. Print Settings Rafts: Doesn't Matter Supports: Yes Resolution: 0.2 Infill: 20% Notes: Mistakes and Caveats: I made the mistake of making the top tab connection points thicker by going above and below the wall of the tube. This means there might be some airprinting if you print this flat without support. I suggest printing with the end that has the tab cuts on the build plate, and using support everywhere. Sorry about that. If you do print it flat, try to have the first layer at 100% width -- wider and you'll be filing the edges of the bottom puzzle slots and tabs (I learned this the hard way). I don't have any 1.75mm filament so I couldn't test the fitment of the shell balls designed to use 1.75mm pins cut from filament. Worst case scenario, print 3 mm pins about 6-7mm tall and use the 3mm pin shell. Also, I optimized my drawings for a 0.4mm nozzle diameter. I'm hoping that will be close enough to the more common 0.35 to not matter. If it does, I have included the freeCAD source files so you can make adjustments. Probably the easiest way would be to make adjustments to the sketches that define the negative space for the puzzle tabs -- these are in the "compenentParts" group. Deconstruct the basic tube you want to adjust, make the tab cut, and then make a simple copy of that basic tube. After that, deconstruct the part you want in the "finished part group". The cuts to make the finished section are separated so you just need to do a cut of those from the new basicTube, and you'll have a part optimized for your printer. This would also be a fine time to get rid of the underhanging thickener for the top tabs too.
With this file you will be able to print Cat Toy Race Track with your 3D printer. Click on the button and save the file on your computer to work, edit or customize your design. You can also find more 3D designs for printers on Cat Toy Race Track.