Ceiling mounted clothes hanger
thingiverse
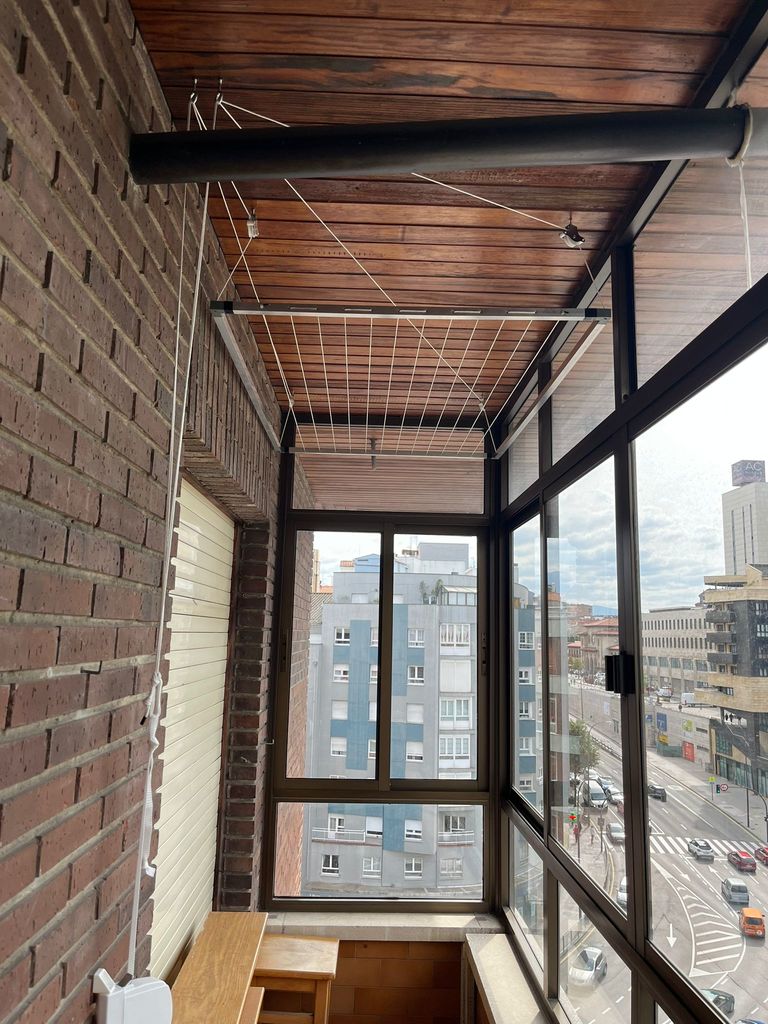
**Texto disponible en Español más abajo** # ENGLISH **Pieces list:** - 4x 3d printed brackets - at least 20m of 2.5mm string (it depends on your drying rack size and place - 20x20mm (1mm thick) aluminum square tubing - 4x (minimum) small pulleys - 2x (minimum) eyebolts This is a ceiling mounted clothes hanger. Simple and effective. As the frame is made of 20x20mm aluminum square tubing, final size is fully customizable. You need to print the piece 4 times. Cut your aluminum tubing to size. Then, on the short size drill holes to weave some string. I spaced the holes 60mm. Tie a knot as tight as possible at the start and the end. Use the printed bracket to assemble the structure. You may need to sand or glue so the bracket slides inside the aluminum. Introduce a string in the holes of the bracket and tie a knot. Screw your pulleys to the ceiling in a similar way as depicted on the photos. It does not really need no be 100% perfect as long as the pulleys are inside the area of the drying rack. Now, screw a couple of eyebolts to guide the strings. Attach the strings to a mechanism that you can easily set, I used a blind mechanism. There you have it # ESPAÑOL **Lista de materiales:** - 4x escuadras impresas - 20m (mínimo) de cuerda de 2.5mm (depende del tamaño del tendedero) - cuadradillo de aluminio de 20x20mm de 1mm de grosor (depende del tamaño del tendedero) - 4x (mínimo) poleas tendedero - 2x (mínimo) hembrillas o cáncamo Esto es una escuadra para montar un tendero de ropa colgado del techo, simple pero muy efectivo. Como la estructura está hecha de cuadradillo de aluminio de 20x20mm, puedes hacértelo de la medida que mejor te vaya. El mío es de 80x130cm. Imprime la pieza 4 veces. Corta el cuadradillo de aluminio a la medida que quieras. Después, haz agujeros por los que vas a pasar la cuerda donde colgar la ropa. Yo espacié los agujeros 6cm. Usa las escuadras impresas para montar el marco del tendedero. Quizá tengas que lijar o pegarlas para que entre bien y no se mueva. Una vez montado, cuando pases la cuerda intenta que esté lo más tensa posible. Haz un nudo al principio y al final. Ahora, pasa una cuerdas por cada agujero de las escuadras. Haz un nudo al final de cada cuerda. Atornilla las poleas al techo más o menos como ves en la foto. No hace falta que quede exacto a las esquinas del tendedero, con que esté "dentro" de su área vale. Usa al menos un par de hembrillas (cáncamo) para poder guiar las cuerdas por el techo y la pared. Pasa las cuerdas por las poleas y después por las hembrillas. Rota las poleas si es necesario para que su eje sea perpendicular a las cuerdas. Nivela el tendal y une las cuatro cuerdas para que suba a la vez todo el tendedero. Une esas cuerdas a un sistema que te permita bajar subir y mantener a la altura deseada las cuerdas. Yo utilice un recogedor de persiana de superficie. https://youtube.com/shorts/9IEx2YhvC90?feature=share
With this file you will be able to print Ceiling mounted clothes hanger with your 3D printer. Click on the button and save the file on your computer to work, edit or customize your design. You can also find more 3D designs for printers on Ceiling mounted clothes hanger.