CEL Robox Filter Enclosure V1
thingiverse
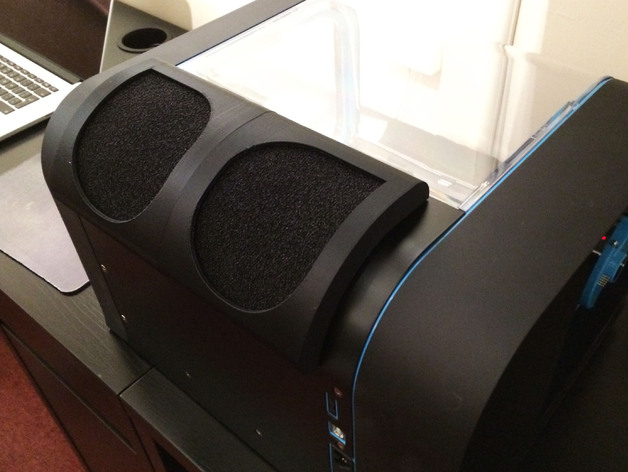
Two part enclosure design features an Activated Carbon filter installation mechanism that easily integrates into the CEL Robox system. To assemble, simply slide the two parts together and apply a small amount of adhesive for a secure fit. Next, insert 12.7mm wide padded magnetic tape into the recessed area, ensuring it is securely in place before adding 12mm thick Activated Carbon Foam to complete the filter setup. Attaching the enclosure to the Robox requires minimal effort due to its clever design. The top two pins locate snugly into the vent holes and flex slightly as the bottom two pins take hold. This initial grip provides a solid foundation for securing the enclosure in place, further reinforced by the magnetic tape that ensures a tight seal. While this design remains a work in progress, the enclosure functions flawlessly when connected to my Robox, effectively utilizing its Activated Carbon filter to maintain a clean and optimal environment within the 3D printer. **Print Settings:** **Supported Features:** Yes Resolution: Achieved with precision at 300 microns or better. Notes: To optimize print settings for successful production: To achieve accurate printing with limited support for pin placement, ensure that both prints are oriented vertically, similar to the illustration in the photograph provided. This layout requires specific alignment within the Robox's available print volume, necessitating adjustment to maintain correct positioning. In spite of a learning curve, this setup is viable for integration into your CEL Robox and can provide desired performance levels. To improve future printing operations, a possible enhancement involves the introduction of a three-part model allowing optimal placement on the printer without constraints due to orientation limitations
With this file you will be able to print CEL Robox Filter Enclosure V1 with your 3D printer. Click on the button and save the file on your computer to work, edit or customize your design. You can also find more 3D designs for printers on CEL Robox Filter Enclosure V1.