Cell Phone Spring Loaded Tripod Mount
thingiverse
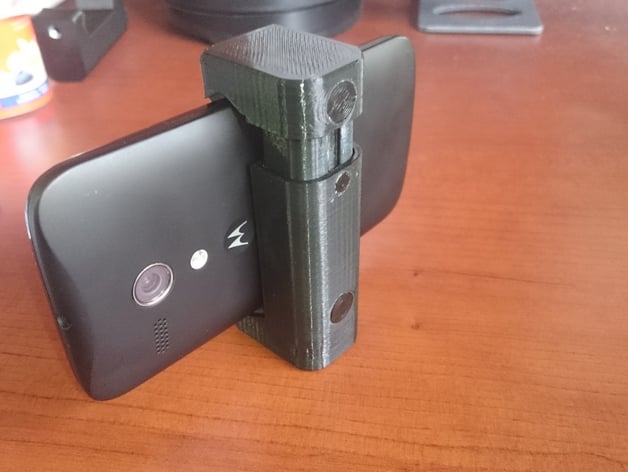
I liked my adjustable tripod mount, but a friend (thanks Simon!) suggested I make one with a spring, so no screws to adjust. I thought it was a great idea, and here it is. It is a lot faster to use than the one with the screw! The only thing is that you'll have to find a spring with similar specs than the one I used. Hardware: -Spring, 3/8" OD, about 1-7/8" center to center between the loops, not too heavy. -1/4-20 UNC hex nut -Foam padding with tape on the back -Super Glue (I use Gorilla Super Glue) Top Mount is a straight forward print, I used 30% infill. All pins I used 100% infill. Bottom Mount is a bit more tricky... you need to split the gcode into 2 programs, or insert a pause somehow, right before the nut pocket gets covered up. Then put the nut in the pocket (make sure the nut does NOT stick up above the plastic, otherwise the nozzle will hit it and cause damage to your printer, I'm not responsible for this!!). Then restart the program from there, or run the 2nd program if you splitted the program. When you assemble, put the spring in the top mount and insert the spring pin in the spring loop to hold it there. Glue the pin in the countersink. Then insert the top mount in the bottom mount and repeat with the other spring pin. Then put just a little bit of glue in the smaller hole, making sure it doesn't drip in the slot of the top mount, and insert the stop pin in the hole. Open the tripod mount and wipe off any glue that might have gone in the slot. Let the glue dry (maybe overnight), and you are done! If you make one, please take a minute to upload a picture, it's always appreciated!
With this file you will be able to print Cell Phone Spring Loaded Tripod Mount with your 3D printer. Click on the button and save the file on your computer to work, edit or customize your design. You can also find more 3D designs for printers on Cell Phone Spring Loaded Tripod Mount.