Centripetal Force Demonstrator
thingiverse
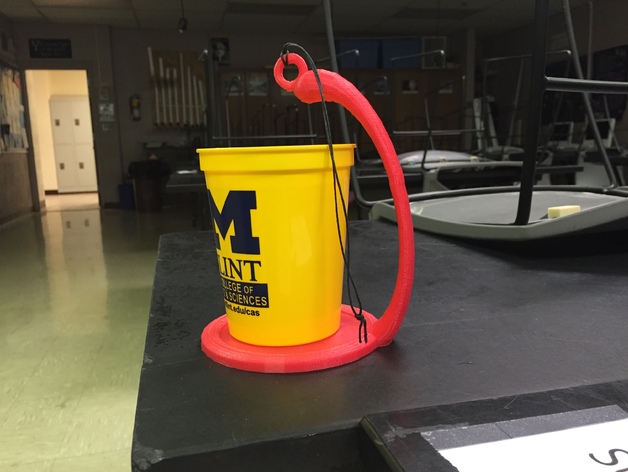
I saw the Centrifugal Mug Carrier by Ecogeeco and decided to see if I could make my own. It's pretty much the same thing as the SpillNot I've seen from Arbor Scientific. It is sized to fit a standard coffee cup (83 mm diameter, 110 mm tall). You'll need to tie a string or strap to the ring. You put a full cup of water or a mug of coffee and swing this around without any danger of spilling. Unless, of course, you hit someone with it. With a little practice you can swing this in big vertical circles or even in horizontal circles over your head. Print Settings Rafts: Doesn't Matter Supports: Yes Resolution: 0.3 Infill: 40% Notes: I printed mine with PLA. Three perimeters and 40% infill. I wanted to make sure the neck was strong enough while swinging this in big circles over my head. How I Designed This This was created in TinkerCad.You can easily modify it to suit what ever cup you might have. https://tinkercad.com/things/i02pOyl5X81 This was created from: A "Cylinder" (orange) as the base with a squished "Torus thin" (red) to make a lip to keep something from sliding off. A "Torus" (green) to swing it by. This was placed above the center of the base floating in space. It is important that this be centered above the base at the desired height. Then group it with the base so it will stay centered. A "Torus Thin" (blue) was stretched to attach the base to the ring. "Box" holes were used to remove the un-needed bits. A stretched "Half Sphere" was tacked on to make the ring attachment more attractive. This is hidden in the picture below. Standards NGSS Overview and Background Students will go online and find commercial science demonstration/lab products or will envision new objects for aiding in science education. They will create these in Tinkercad for 3D printing. In the process, students will learn a little about the underlying scientific phenomena involved as well as constraints in 3D design and printing. If copying the design of an object found online, students will also be tasked with proposing improvements to the original. Objectives Students will be able to demonstrate a device for teaching/learning science. Students will be able to create and print a basic 3D design. Students will be able to evaluate a design, either their own or one they’ve found, and make improvements. Audiences Students in grades 6-12 Subjects Science or engineering students Skills/Standards NGSS Engineering standards and Science Standards specific to the particular problem NGSS Science and Engineering Practices: Asking questions and defining problems Constructing explanations and designing solutions NGSS Core Ideas: Engineering, Technology and Applications of Science ETS1.A: Defining and Delimiting an Engineering Problem ETS1.B: Developing Possible Solutions ETS1.C: Optimizing the Design Solution NGSS Core Ideas: Science - Standards will vary depending on the problem students select to solve. Lesson Plan and Activity Introduce students to Tinkercad and give them a brief overview. Something similar to the video below. Have students play and create an interesting thing. I typically have students skip the Tinkercad tutorials and dive right in. Share a couple of the students’ creations with the class and talk a bit about the capabilities and limitations of 3D printing. Would these designs be printable? Would support be required? Should it be printed in multiple parts and then assembled? Introduce the Assignment. Create a device to help teach a scientific concept. You can take inspiration from an existing commercially available product or you can create your own. Break students into groups of 2-3 and have them research and/or brainstorm ideas. Students use TInkercad to create models for 3D printing. Print, test model, and share with class for input. Students refine or re-design their models to make improvements. Re-print, test and make improvements as needed. Duration One class period to introduce and create a sample thing in Tinkercad One class period to share designs, discuss 3D printing, and introduce the assignment. One class period for students in groups of 2-3 to brainstorm/research science supply sites for ideas. 1-2 class periods to create models in Tinkercad for printing. One class period for testing and demonstrating to the class. 1-2 class periods to improve on or re-design their objects.
With this file you will be able to print Centripetal Force Demonstrator with your 3D printer. Click on the button and save the file on your computer to work, edit or customize your design. You can also find more 3D designs for printers on Centripetal Force Demonstrator.