Cessna Flight Sim Control Box
thingiverse
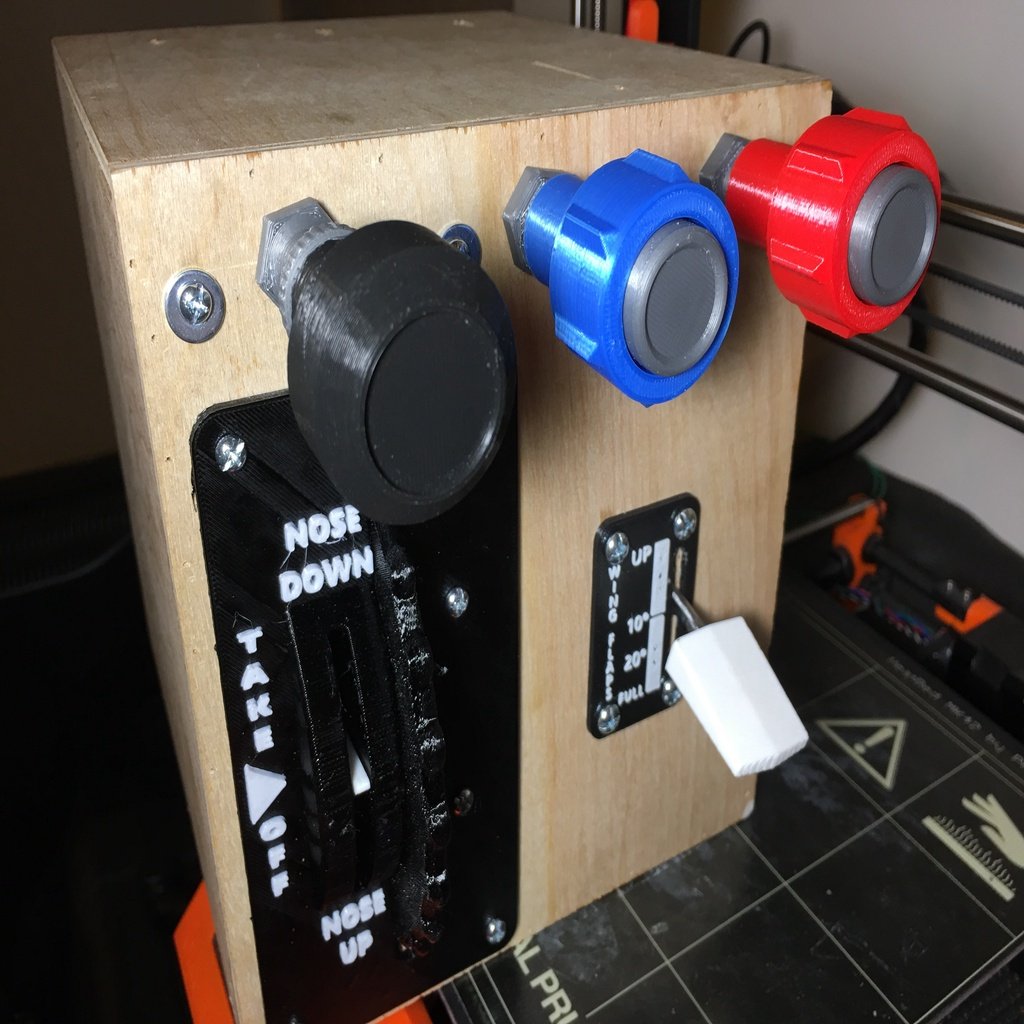
This is a project guide for creating a custom flight simulator control box using Arduino and 3D printing. The guide includes instructions for: 1. Downloading and uploading the UnoJoy sketch to an Arduino Uno 2. Booting the Arduino into DFU mode 3. Installing drivers and running a batch file to turn the Arduino into a USB joystick 4. Wiring the pots and switches to the Arduino 5. Creating a custom 3D printed box using STL files The guide also includes recommendations for customizing the design, printing the front panel, and using CNC routing for a more professional finish. Here are the steps: **Arduino:** * Find an Arduino case or mounting plate that is low profile on Thingiverse * Get an Arduino Uno and follow these instructions: 1. Download UnoJoy (https://github.com/AlanChatham/UnoJoy) 2. Upload the UnoJoy sketch to your Arduino (UnoJoy/UnoJoyArduinoSample/**UnoJoyArduinoSample.ino**) 3. Boot Arduino into DFU mode (see video) 4. Install drivers (UnoJoyWin) 5. Run **TurnIntoAJoystick.bat** (downloaded with UnoJoy files) **Wiring:** * Understand how pots and switches work * Use the 5v and GND pins of the Arduino to power all the pots (and yes, I just soldered all the positives together and into a single wire for 5v on the Arduino) * All "signal" wires for the pots are wired into A0,A1,A2,A3 of your Arduino * The Flaps switch is an On-Off-On. Ground the center post to negative, and then run both other connectors to any digital I/O pin of your Arduino (such as 4 and 5) **The Box:** * Include only the front plate STL, as well as the flaps faceplate * All other parts to construct this are linked herein to remixes, or to online drawings * Recommend using 1/4" (5mm) Birch ply or some light thin wood for the box walls, as it is much lighter and cheaper than all the filament it would take to print this Note: The guide includes a YouTube video link for reference.
With this file you will be able to print Cessna Flight Sim Control Box with your 3D printer. Click on the button and save the file on your computer to work, edit or customize your design. You can also find more 3D designs for printers on Cessna Flight Sim Control Box.