Cetus 3D MK2 Filament Feeder Guide
thingiverse
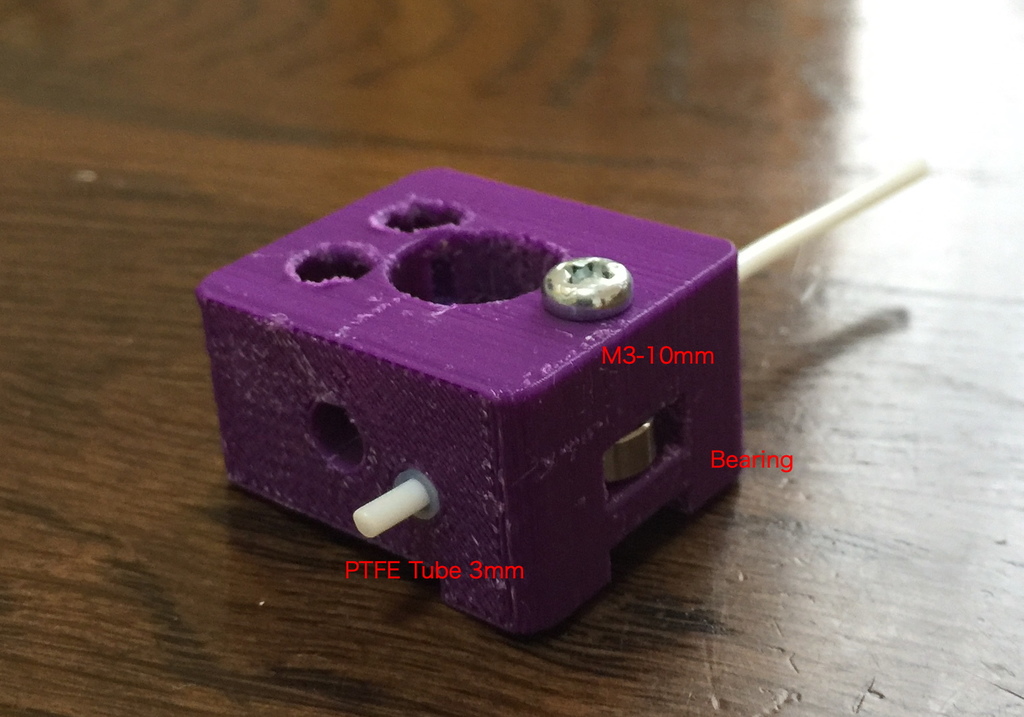
Unfortunately, the Extruder of MK2 abandoned the design of Afinia H480. The partner gear that sends filament may be Teflon, perhaps. Because it's not metal, pushback is too weak. Therefore, filament feed becomes incorrect and can't be used as a printer. And, unfortunately, ABS printing is necessary. Please print this first with another printer. A bearing is required. It has an inner diameter of 3 mm and an outer diameter of 7 mm and a thickness of 3 mm. As a note at the time of installation, add it. When looking at the filament insertion hole from above, align the gear position and the heater hole of the extruder. Some products are misaligned at the time of shipment from the manufacturer. If adjustment is wrong, you may repeat head replacement several times, but the printer can't be used because of poor filament feeding. For Afinia H480 - Print options: Quality [Fine] v1.00: To fix bearing, melt it and stop it with a soldering iron or similar. v1.03: A version that eliminates burning by soldering iron. No need to fix with adhesive. v2.21: I tried to fix the bearing with printed shaft. When I used about 500g of filament, the shaft was bent and it was necessary to exchange. v2.31: It's a version using 10 mm length screw with M3. I improved durability. If you tighten the screw perfectly, feeding of filament will be intermittent. Good to loosen screws after tightening one turn. Adjustment is only for this one. It also serves to adjust contact surface of bearing and screw. v2.32: I'm using M3's 10 mm length screw. There is no need to make delicate adjustments. I succeeded in supplying Cetus parts at Cetus. The recovery means when filament is clogged is as follows: 1.Initialize and lift the head. 2.Cut the filament. 3.Loosen the 2 screws holding the filament feeder guide. You will not remove it completely. 4.Remove the nozzle with an 8 mm wrench. When the filament is pulled out of the nozzle, go to #14. 5.Remove the filament feeder guide. 6.Check nozzle and filament feeder guides. This check is very important but too detailed and can't be described. 7.Attach the nozzle without attaching the filament feeder guide. 8.Warm the nozzle and pull out the filament with pliers. 9.If the filament can't be removed, disassemble the nozzle. 10.Replace the PTFE tube (12 mm length) inside the nozzle. 11.Fix the stainless steel tube so that it will not be crushed by a vise. 12.Remove the nozzle with an 8 mm wrench. 13.Push a 2.8 mm drill into the stainless steel tube by hand and take the filament and PTFE tube. 14.Assemble it at the end. I don't think it's an end-user's job, but in an emergency it can't be helped. Lastly, one important thing. The heater and sensor are sloppy. Subtly depress this. It is not fixed. Don't push too much. If you do not understand this, don't touch Cetus. It is very disappointing that when the room temperature approaches 30 degrees Celsius, the filament feeder guide is deformed and can't hold the bearing. As a result, I recommend making with ABS filament. There is no trouble at all and it's very nice to use. I think the durability will exceed one year. Although developed for MK2, there is an example where MK2 has a feeder for MK1. Introducing the feeder for MK1. Cetus 3D MK1 Filament Feeder Guide https://www.thingiverse.com/thing:3525292
With this file you will be able to print Cetus 3D MK2 Filament Feeder Guide with your 3D printer. Click on the button and save the file on your computer to work, edit or customize your design. You can also find more 3D designs for printers on Cetus 3D MK2 Filament Feeder Guide.