Cetus 3D printer handle
thingiverse
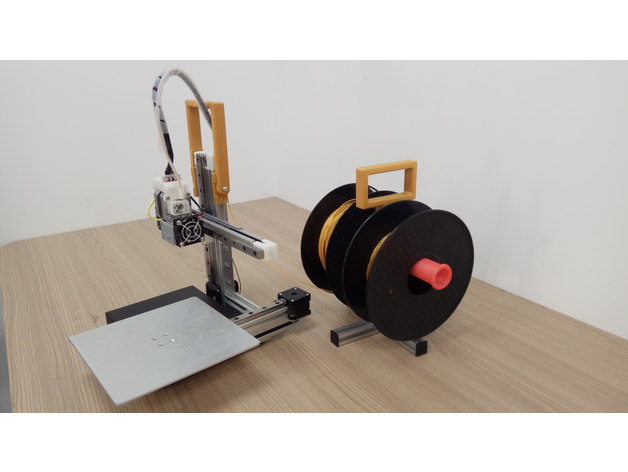
Cetus3d printer's handle. Filament rack handle: m5x12 x1 or m3x8 x6 Host handle: m5x5 x2, m5 nuts x2, m4x6 x4, m4 nuts x4 Filament roller: m4x8, m4 nuts Main host part: Only install handles: Printed items z_axis_fixed_plate_handle_mounting_module.stl x2 (handle mounting modules on both sides) host_handle_main_host_handle.stl The handle mounting parts are fixed to the aluminum bracket using m4 screws and the rotating handle parts use m5 screws. Handle with z-axis locking mechanism: Printed items z_axis_fixed_plate_handle_mounting_module.stl (installed on the left side of the aluminum bracket) host_handle_main_host_handle.stl z_axis_fixedplate-right_handle_and_z_axis_locking_module.stl (installed on the right side of the aluminum bracket) z_axis_lock_switch-z_axis_locking_switch.stl z_axis_fixed_arm_z_axis_fixed_arm.stl Prepare a 3mm diameter extension spring with a length of about 18mm. Use m3 screws to fix the "z-axis locking switch" and "z_axis_fixed_arm" together on the "handle_and_z_axis_locking_module". The other end of the spring is fixed to the "z_axis_fixed_arm". Note: Put m5 nuts on both sides of the handle mounting modules before installing them. After completing the function test, fix the entire module to the right side of the main host's z-axis aluminum bracket using m4 screws. Fix the "z_axis_fixed_plate_handle_mounting_module.stl" to the left side of the main host's z-axis aluminum bracket using m4 screws. There will be a 3mm gap between the handle mounting module and the aluminum bracket due to the nut being stuck slightly on top of the printed item. Finally, fix the handle to the handle mounting module. Filament rack part: Printed items: rack_handle_filament_rack_handle.stl, Filament_roller.stl x2, Filament_cap-material_blocker.stl x2 1. Originally place the aluminum bracket at the top and change it to be fixed at the bottom, forming a cross shape with only one middle aluminum strip remaining, ensuring the entire frame is stable. 2. Use m4 screws to fix two "Filament_roller.stl" on the filament rack, adjust the height so that the filament will not get stuck under the aluminum bracket. 3. Push the "rack_handle_filament_rack_handle.stl" from the top of the aluminum bracket down and fix it with an m3 screw. 4. After placing the filament, you can add the "Filament_cap-material_blocker.stl" to prevent the filament from falling off when lifting the filament rack or printing. Custom Section
With this file you will be able to print Cetus 3D printer handle with your 3D printer. Click on the button and save the file on your computer to work, edit or customize your design. You can also find more 3D designs for printers on Cetus 3D printer handle.